The Ondes Martenot; Better Than A Theremin

Monotrondes+logo

[Ville] loves the sound of an ondes martenot and decided to build his own. No, it’s not made of vacuum tubes like a 1920s original, this one is made out of a cheap, off-the-shelf analog synth and just a few extra parts.

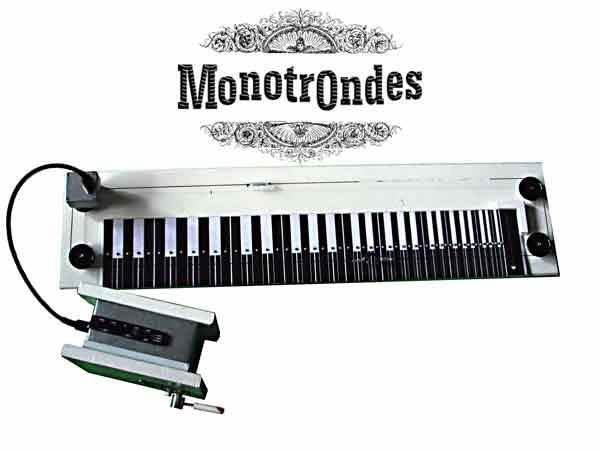
The ondes martenot is a theremin-like musical instrument; instead of waving your hands around aerials on the theremin, the ondes uses a small ring attached to the player’s finger on a wire loop and a volume lever. The ondes isn’t a common instrument by any means, but Radiohead uses one several in any event.

[Ville] began his build by taking a small, cheap, and new Korg Monotron analog ribbon synth, cracking it open, and reading the schematics. A 100k multiturn pot was wired into the monotron and fastened to a printed paper keyboard with a system of pulleys and a small metal ring. With the multiturn pot wired into the pitch input on the monotron, [Ville] had a semi-accurate and very functional ondes martenot replica.

You can hear [Ville]’s ondes in action after the break. It’s a little rough starting out, but by the time he’s looping multiple phrases it really does sound wonderful.

Continue reading “The Ondes Martenot; Better Than A Theremin”

Chest Freezer Kegerator Conversion Has Six Beers On Tap

keg-freezer-conversion

Drawing a pitcher of frosty cold beer out of your own keg fridge is a liberating feeling which [Danodemano2] can enjoy all the time since he pulled off this 6-tap chest freezer conversion. You won’t have to kill yourself to get it done, this image shows the custom cuff sitting between the chest freezer body and lid which is where all the added hardware is anchored.

Chest freezers are popular because they’re efficient. And let’s face it, if you’re going to devote an appliance to storing cold beer you better make certain it doesn’t drive up utility bills. That’s the reason for the rigid foam insulation around the ring, with the spray foam to ensure energy isn’t lost around the openings in the wooden frame.

This design goes above and beyond the functionality from the last offering we looked at. That one had a pretty nice tile job, but the finished wood contrasts the black freezer very nicely on this one. It’s the PC fan used for circulation and the properly terminated wiring that we really like. The one thing we wonder about is the feasibility of fitting all six corneilus kegs and the carbon dioxide tank into this beast.

[via Reddit]

Life Sized Katamari Damacy Ball Controls Game But Isn’t Sticky

life-sized-katamari-damacy

If you haven’t ever heard of Katamari Damacy we highly recommend you unite a copy of the game with that PlayStation 2 console that’s been collecting dust and then kiss the rest of your summer goodbye. The quirky game, driven by remarkably catchy background music (Na Naaaaah na na…), revolves around a ball that attracts objects of every kind to it. As you accumulate more stuff the ball goes from the size of a mouse to that of a house and then some. Perhaps the biggest appeal of the game is playing it with groups of people and that’s where this hack hits the mark. It brings the game outdoors to a festival in London with video projected on a wall and this life-sized ball as the controller.

The project uses the same electronics laid out by the original work coming out of NYC Resistor back in 2009. That project originally wanted to use a 36″ yoga ball but they couldn’t quite hit the mark. This attempt did make it happen. The ball was decorated in the style of the game (also note the presenters are in costume). Guts from an optical mouse detect the motion. This is processed by an Arduino board which then uses a digital potentiometer to mimic the joystick movements on a PS2 controller.

Continue reading “Life Sized Katamari Damacy Ball Controls Game But Isn’t Sticky”

Tearing Apart An Organ And Making A MIDI Keyboard

pedul

What do you do if you’re in a band and have an old, dead organ lying around? Build a MIDI foot controller, of course.

After dispensing of the old organ guts, [Mark] mounted the pedals in a handsome road case and started working on the electronics. His first inclination was to mount an Arduino Pro Mini on a piece of stripboard, but after that failed decided to learn Eagle and fabricate a PCB. each key of the organ pedals are connected to a switch read by the Arduino which sends data to a Korg Microsampler over MIDI.

The swell pedal from the organ was also reused, but because the old incandescent light in the pedal was toast, this was replaced with an LED. It still works, allowing [Mark] to do volume swells on his new, fancy, MIDI foot controller.

You can check out a video of the controller below.

Continue reading “Tearing Apart An Organ And Making A MIDI Keyboard”

LED Tie Plays Tetris

tetris

[Bill] has been working with a gaggle of 8th graders this summer at a STEM camp, impressing them with his geeky attire such as an 8-bit and PCB ties, and an LED illuminated lab coat. The adolescent tinkerers asked him what he would be wearing on the last day. Not wanting to let the kids down, he whipped up an LED Tetris tie in an evening.

The Tetris board is a 20 x 4 grid of WS2811 based RGB LED strips, controlled by a Digispark dev board. Structurally, the tie is just two bits of card stock with the electronic bits sandwiched in between. and taped to a cheap clip-on. In the video below, the tie doesn’t have any sort of input to control the movement and rotation of blocks. [Bill] plans to update his tie with some rudimentary AI so it can play itself.

All the code is over on [Bill]’s git. It’s still a work in progress, but from the STEM student’s reaction, there’s a lot of potential in this tie.

Continue reading “LED Tie Plays Tetris”

Solder Trick To Make Your Own Surface Mount Breakout Boards

surface-mount-breakout-trick

We think you’re really going to enjoy this trick for making surface mount breakout boards. It’s common to use magnet wire to connect individual pins of a surface mount part to breadboard friendly protoboard with pin headers. What’s new here (at least to us) is that [Raul] solders one wire to both pins directly across from one another.

The image at the left shows an eight pin part with four wires soldered in place. To get to this point he first taped the wires down to a work surface being careful to space them to match the pitch on the chip’s leads. He then tapes the chip in place and solders all of the legs to the wires. This seems to kill two birds with one stone as aligning one wire to one leg is tough. From there he flips the chip over and cuts the wire spanning under it. This leaves an easy job of soldering the trailing side of the wire to a hunk of protoboard.

It’s perfect for chips with a small number of pins. Of course you may still want an etched breakout board for something with a ton of leads.

Signmaking In Glass And Gold

Signmaking today isn’t what it once was. Where today a few vinyl letters stuck to a piece of plate glass is good enough for any storefront, there was a time when the signs in front of businesses were works of art involving many skills and dozens of tradesmen to create. [David Smith] is one of the last remaining old-school signmakers, and his creations are just as beautiful as the finely crafted signs of a century ago.

The techniques [David] uses to create his signs are as varied as the finished products are elegant. He cuts patterned grooves into glass with wheels made of diamond or ceramic and bends shaped glass over forms in a very large kiln.

Aside from cutting, shaping, and grinding glass, [David] also paints his signs – on the back side in reverse, building up his design layer by layer. The very first layer in some of his designs are gold leaf, a difficult material but [David] invented his own leaf applicator that makes the job much easier.

Truly amazing works of art, and certainly much more elegant than whatever plastic nonsense goes as proper signmaking these days.

Continue reading “Signmaking In Glass And Gold”