Astounding Papercraft Skills Result In This Working Robot

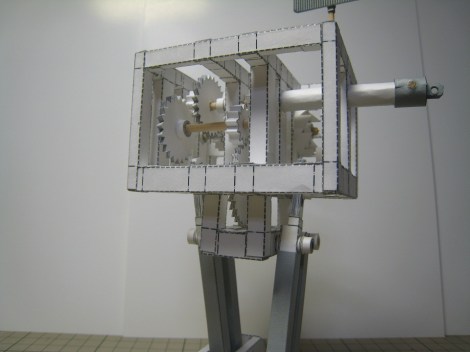
It would have been very hard to believe this is made from paper if we hadn’t seen all the parts being built. As a still image it looks neat, but the speed at which those paper gears turn in the video after the break will certainly leave you slack-jawed. It really is a walking robot made using papercraft (translated).

These are actually being sold as kits, but there’s not much in the way of materials. You’ll get six sheets of paper, some skewers which act as the axles, and a bit of elastic band which stores potential energy when winding-up the model. The genius is in the design, which is printed on those sheets of paper. The build process involves plenty of delicate work. Dozens of cuts lead into hundreds of folds, and that’s before assembly even starts. We’ve never considered building a ship in a bottle, but this might be right up our alley. If you need to give a gift to a tinkerer this should show up high on the idea list.

Continue reading “Astounding Papercraft Skills Result In This Working Robot”
Integrating A Power Bus Into A Quadcopter Frame

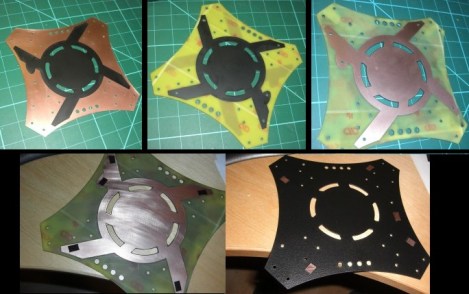
When working on flying vehicles weight is always a consideration. [Brendin] found a way to get rid of a wiring harness on his quadcopter, simplifying the assembly while lightening the load. He did it by incorporating the power bus into the frame of the vehicle.

He started with some copper clad board. Because the substrate is a structural component he didn’t want to use a CNC mill to do the etching as it also removes a bit more than just copper. After using the mill to cut out the shape and drill holes he coated the board with flat black paint. This acts as the etch resist, which he sent through a 50W laser engraver to remove the paint and expose the areas he wants to etch. After etching he removed the rest of the resist, and masked off his solder pads with small rectangles of electrical tape. This protects the solder pads from the truck bed liner paint he uses to insulate the copper. He says it works great and plans to use the technique on all future builds.

Checking Out Mount Olympus From 38 Km

The image above shows Mount Olympus in the center, with a tiny bit of the western suburbs of Thessaloniki, the second largest city in Greece, in the lower right hand corner. These two points are 70 kilometers apart, but we’re not seeing a picture taken from the International Space Station. This is a picture from the SlaRos project, a high altitude balloon launched last summer that ascended to 38 kilometers above Greece.

On SlaRos’ project page (Facebook warning), the team covers the hardware that went in to lofting a camera high above the cruising altitude of commercial airplanes. A GPS module tracked the balloon in real time and relayed this to a GSM module to the mobile command and tracking team.

There are a ton of high altitude pictures of Greece over on the project’s Facebook page as well as a time lapse video of the Grecian wilderness after the SlaRos payload landed. The payload spent a full night in a field before it was recovered, but we’re very glad the team was able to recover these awesome pictures.

Radio Built From The London Underground Map

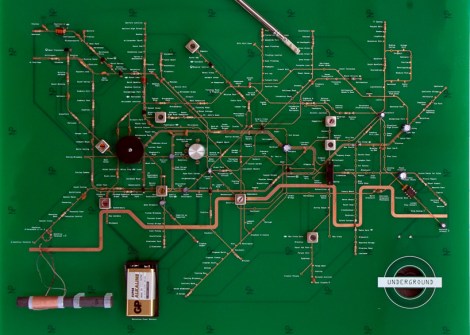
We love it when PCB artwork is actually artwork. Here’s one example of a radio whose layout mimics the map of London’s subway system.

The build is for an exhibit at the London Design Museum. They have an artist in residence program which allowed Yuri Suzuki time and resources to undertake the project. He speaks briefly about the concepts behind it in the video after the break.

The top layer of copper, and silk screen was positioned to mirror the subway lines and stops on a traditional transportation map. Major components represent various transfer hubs. In this way he hopes the functioning of the circuit can be followed by a layman in the same way one would plan a trip across town.

This may be a bit more abstract than you’re willing to go with your own projects. But there are certainly other options to spicing you track layout.

Continue reading “Radio Built From The London Underground Map”

Displaying Images On The Surface Of Bubbles

The image you see above isn’t a simple photograph of our blue marble from thousands of miles above. No, that image is much cooler than a satellite because it’s a projection of the Earth onto a soap film screen. Yes, we can now display images on the surface of bubbles.

Instead of a the soap bubbles you’d normally give a small child, this project uses a mixture of sugar, glycerin, soap, surfactant, water, and milk to produce a film much more resistant to popping than your standard soap bubble. Shining an image through these films doesn’t result in much of an image, so the researchers used ultrasonic speakers to vibrate the film and make it possible to display a picture.

With a small projector, this system makes it possible to display an image on the surface of bubble. Of course, the display area is tiny right now, but the size will most likely increase as the experimentations continue.

You can check out a whole bunch of videos demoing this tech after the break.

Continue reading “Displaying Images On The Surface Of Bubbles”

Doubling Down On Motor Drivers

Motor driver chip too weak for your needs? Just use two of them. That’s the advice which [Starlino] gives. He stacks motor driver chips to product move powerful controllers.

When stacked as shown, the driver combos should be able to drive at 4A. This is partly because he ganged together the outputs in pairs, and also because of the stacking. That’s a lot of juice, but [Starlino] documented his testing stage which shows that they’re up to it. It’s a bit hard to see from this angle, but he is using a serpentine heat sink. It snakes its way between the stack of chips, then over the top chip before folding back and spreading its wings. The motors he’s using have a stall current of 3.7A, and he included resettable fuses graded at a 2A hold current. He’ll be glad to have that extra protection is something goes wrong with the drivers.

[Thanks Roger]

Gilded Hello Kitty Ax Made Using Electrolysis

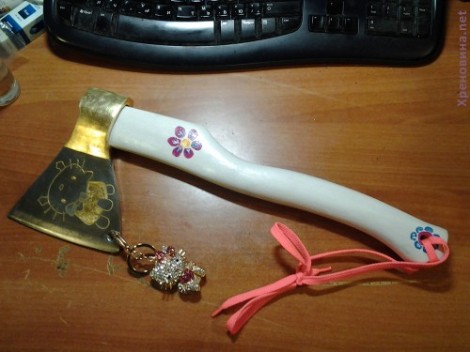
Ummm…. cute? For the Hello Kitty fan who has everything?

Yeah, we’re really not sure what’s going on here. It’s an art piece on which [Denis] spent a lot of time. He polished it, etched it, painted it, applied gold leaf, and drilled a hole for a charm. It’s that hole which interested us the most. He had a heck of a time figuring out how to make a hole in the hardened steel. The solution that finally worked was to use electrolysis to bore through the metal (translated).

[Denis] first made a small depression where he wanted the hole. This took time, and pretty much ate through the engraver bit he was using. But it was just enough to hold a drop of saline. He connected the positive side of his power supply to the ax head, then dipped the negative lead into the drop of saline. Each time the drop turned black he wiped it away and replaced it with fresh solution. Just five hours of this and a pack or two of cotton swabs and he was through.