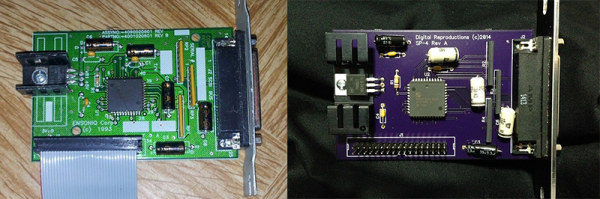
USB Ableton Foot Controller Reuses Old Keyboard

footLooper2

No, Hackaday hasn’t started advertising shoes, this is [Matlek’s] foot controller for Ableton Live.

Matlek plays guitar and needed an easy way to control Ableton Live, which he uses as a looper. Ableton normally expects keyboard input, so that’s exactly what he gave it.

An old dell keyboard was gutted down to its controller board. This exposes  the leads the keyboard uses to scan the key matrix.  From there it is simply trial and error connecting different pins together and seeing which keys are printed on the PC screen (A text editor works well for this). Only 8 characters are needed to control the looper, so [Matlek] chose digits 1-8.

Since some of the wires are going to be sharing pins, a small piece of stripboard comes in handy between the buttons and the keyboard controller. [Maltek] used basic momentary push buttons for his mini key matrix, though we think that box looks sturdy enough to support some larger stomp box style buttons.

Everything comes together inside a sturdy shoebox, which also serves to insulate the exposed keyboard PCB from shorting out.

The only major downside to the project is that the box is light enough that it slides easily on the floor when recording or triggering loops. Adding some heavy items (or dare we say, some shoes) would solve this problem. Self adhesive rubber feet on the bottom of the box would help too.

Continue reading “USB Ableton Foot Controller Reuses Old Keyboard”

Completely Analog Electronic Music Box

For the Ottawa Mini-Maker Faire this year, [Steven Dufresne] created an electronic take on the classic mechanical music box.

A typical music box uses a sequence of bumps on a rotating drum to pluck the tuned teeth (called lamellae) of a metal comb. Steven ditched the drum and comb and replaced them with a strip of paper and a single 555 timer.  The timer is configured as an astable oscillator with a fixed capacitor and charging resistor.  The discharge resistor is selected via a series of 13 shaped wires that drag along the strip of paper.  When a wire drags over a hole, it is connected to a copper pad below that is soldered to a specific resistor.  This completes the circuit and generates a tone specific to the resistor selected.

While the electrical aspects of the project are fairly simple (not even requiring a circuit board), the mechanical parts are much more sophisticated.  Steven had problems getting the dragging wires to make good contact and keeping the paper roll pulled tight.  He outlines all of these challenges and how he solved them in his very thorough video summary (embedded after the break).  With all of his incremental improvements to the design, the finished music box stood up to a whole 14 hours of abuse at the Faire.

Continue reading “Completely Analog Electronic Music Box”

The Melloman, Mk. II

mello

Way back in the 60s, strange electronic instruments were all the rage. The most famous of these made before the era of the synthesizer was the embodiment of musique concrète, the Mellotron. This instrument had an incredibly complex arrangement of magnetic tape that allowed a performer to play a keyboard and have the sound of any instrument come out of a speaker. This system was prone to failure, and there has been a lot of technological improvements in tape over the last fifty years, leading [Mike Walters] to build a new version of his famous Walkman-based Mellotron, the Melloman.

This build is an upgrade over the previous Melloman made in 2009. Like the original, this build uses 14 portable tape players, each loaded up with a continuous tape for each note. The tapes contain two octaves of the same note, one each on each channel, which are routed to the output whenever a key is pressed.

There are a few improvements over the old Melloman. Instead of transistors, [Mike] is using optocouplers to send the recorded sounds to the output. This build is also a whole lot cleaner, with the wiring looking very professional. As for a sound demo, you can check out the video below.

Continue reading “The Melloman, Mk. II”

ArduGuitar, An Arduino Controllable Guitar

The ArduGuitar

Electric guitars have several switches and potentiometers for controlling volume, tone, and which pickups are enabled. Rather than fiddling with these by hand, [Bob] built the ArduGuitar. It uses an Arduino to control the parameters over Bluetooth. This allows for musicians to configure presets, then recall them as needed, providing the exact same sound every time. It’s similar to the Guitarduino, but adds wireless control.

The internals of the ArduGuitar consist of the Arduino Micro, a BlueSMiRF from Sparkfun, and resistive opto-isolators. The resistive opto-isolators allow the Arduino to adjust resistance through an electrically isolated barrier. This prevents the Arduino from interfering with the guitar’s sound.

Some of the first Vactrols were used to create a tremolo effect in guitar amplifiers. These pulsed a incandescent lamp onto a photoresistor. Fortunately, there are now integrated solutions. PerkinElmer makes these, and they have a nice application note [PDF] on audio applications.

The final part of the design is an Android app, which provides remote control over Bluetooth. The source for everything is available on Github, and the detailed build log is available here.

Pair Of MIDI Dongles To Inspire Some Weekend Music Hacking

pair-of-midi-dongles

This pair of dongles is a fun way to get your feet wet working with MIDI hardware. They’re called MIDIvampire-I and MIDIvampire-II. Just plug one end into your MIDI-ready instrument and the other into a pair of speakers and you’re off and running. Mark I is a polyphonic synth, and Mark II is a drum machine, but both use basically the same hardware which you may already have on hand.

The single chip on each board is an ATmega328 often found anchoring Arduino boards. The other silicon component is an S1112B30MC voltage regulator. The rest of the components are passives, with MIDI and headphone jacks for connectivity. They’re selling these if you want the easy way out, but we thought we’d bring them to your attention in case you needed a breadboarding project this weekend. The firmware, BOM, schematic, and board artwork are all available on the Wiki pages linked in the articles above. After the break you can see a couple of demo videos which walk through all of the features.

Continue reading “Pair Of MIDI Dongles To Inspire Some Weekend Music Hacking”

Cheap Guitar Amp Repaired By Replacing The Distortion Circuit

cheap-amp-distortion-repair

It’s an understatement that [Troy] is not impressed with the distortion circuitry built into this guitar amp. He picked it up for $40 on Kijiji (basically local classified ads run by eBay) so he wasn’t afraid to get elbow deep in its inner workings to see what was going on. It only took him a few minutes to solder together the distortion circuitry that fixed it. Figuring out what needed fixing is another story.

[Troy] uses some colorful language and metaphors to illustrate his disdain for the sound of the overdrive option. He hooked it up to an oscilloscope and his trained eye immediately tells him that it’s not working as it should. After studying the PCB and working out a schematic he reworked the circuit with this pair of diodes and a resistor. It still uses a bit of filtering on the board, but does away with all of the other cruft. What remains is a cheap amp, but one that actually functions.


[Update] Vladimir’s Robot Guitar

vladGuitar2013

[Vladimir Demin] is somewhat of a legend for us; in his spare time he’s been mastering the automation of musical instruments. This time he’s back with upgrades to his build and four new videos. [Vladimir’s] top priority was to rework the strumming mechanism that earlier ran on solenoids. He’s improved the sound quality and reduced the clicks by swapped to stepper motors and overhauling the software.

Compared to his earlier setup, this one sounds more soulful and less automated, but [Vladimir] admits that it’s still not good enough and that he’s working on a new, brilliant implementation. Until then, take a few minutes and check out the rest of the videos below, then join us in scratching our heads in amazement: everything is built with simple hand tools.

[Vladimir] has come a long way, and it started with this Bayan (button accordion). Last year’s guitar build is also worth a look, as well as an in-depth interview.

Continue reading “[Update] Vladimir’s Robot Guitar”