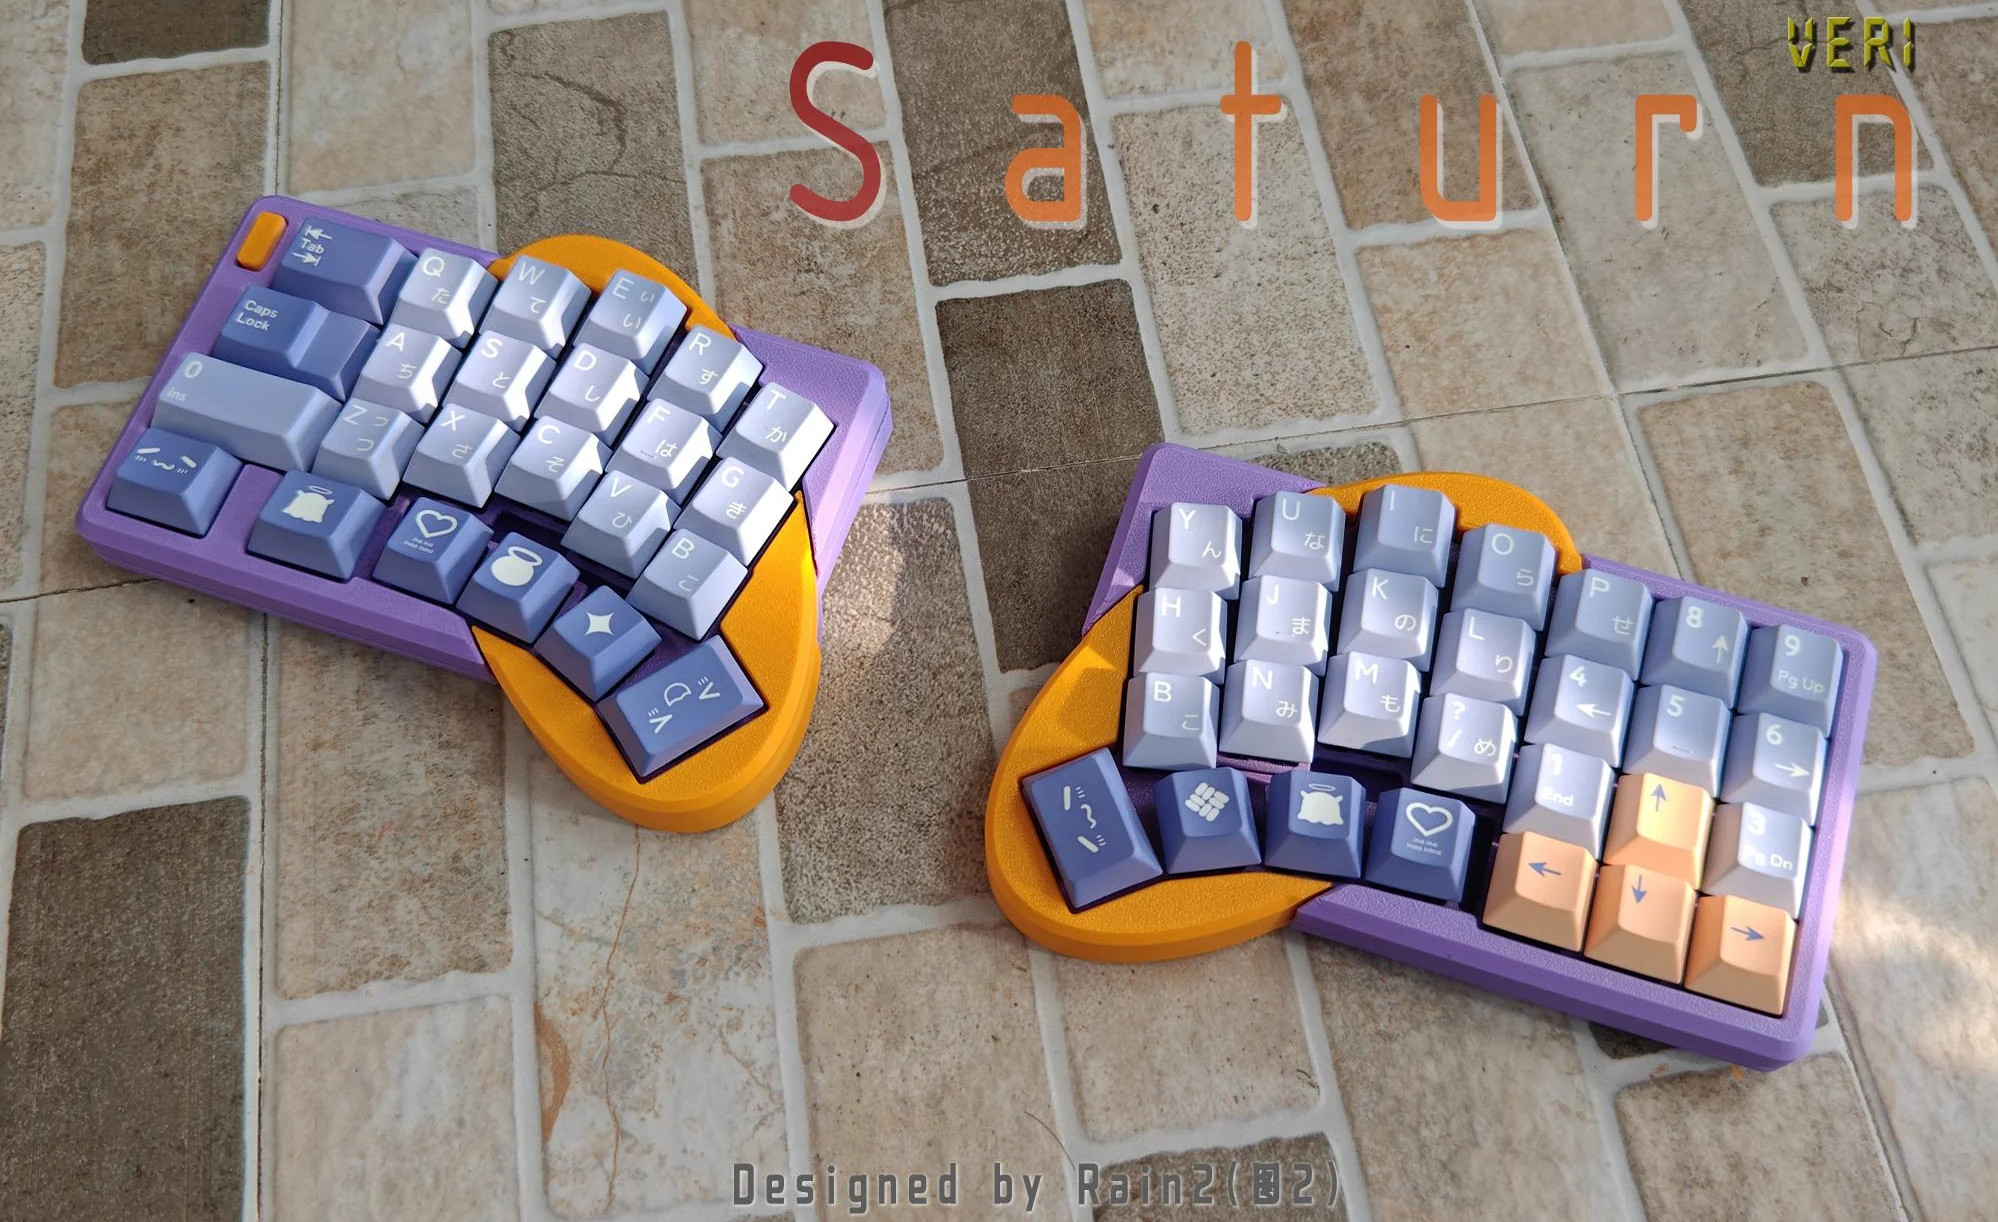
I love, love, love Saturn by [Rain2], which comes in two versions. The first, which is notably more complex, is shown here with its rings-of-Saturn thumb clusters.
Image by [Rain2] via redditSo what was the impetus for this keyboard? It’s simple: a friend mentioned that ergo keyboards are a no-go if you need a num pad really bad.
Saturn has one built right in. The basic idea was to add a num pad while keeping the total number of keys to a minimum. Thanks to a mod key, this area can be many things, including but not limited to a num pad.
Unfortunately, this version is too complicated to make, so v2 does not have the cool collision shapes going for it. But it is still an excellent keyboard, and perhaps will be open source someday.
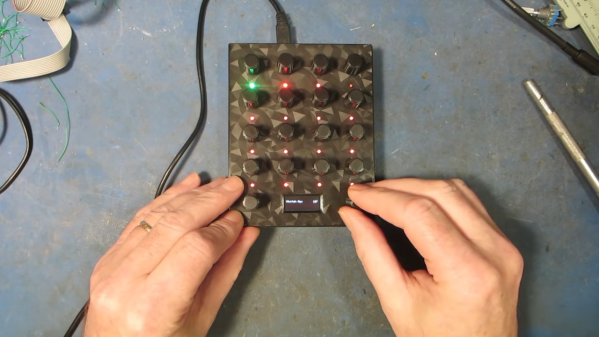
We live in a golden age for MIDI controllers. [rheslip]’s contribution to the milieu is a twisty take on the format, in that it’s covered in an array of knobs. Thus the name—Twisty 2.
The controller can be built using the Raspberry Pi Pico or Pico 2. It’s set up to read a 4×4 array of clickable encoders, plus two bonus control knobs to make 18 in total, which are read via a 74HC4067 analog mux chip. There’s also an SK6812 RGB LED for each encoder, and an OLED display for showing status information. MIDI output is via USB, or, if you purchased the W variant of the Pi Pico/Pico 2, it can operate wirelessly over Bluetooth MIDI instead. The controller is set up to send MIDI CC messages, program changes, or note on/off messages depending on its configuration. Flipping through different modes is handled with the bottom set of encoders and the OLED display.
Few musicians we’ve ever met have told us they learned how to play the encoders, and yet. The cool thing about building your own MIDI controller is you can tune it to suit whatever method of performance strikes your fancy. If the name of this build alone has you inspired, you could always whip up a MIDI controller out of a Twister mat.
Few things rival the usability and speed of a full-sized keyboard for text input. For decades, though, keyboards were mostly wired, which can limit where you use your favorite one. To address this, [KoStard]’s latest project uses an ESP32 to bridge a USB keyboard to BLE devices.
The ESP32-S3 packs a ton of fantastic functionality into its small size and low price—including USB-OTG support, which is key here. Taking advantage of this, [KoStard] programmed an ESP32-S3 to host a keyboard over its USB port while connecting via BLE to devices like cellphones.
There are some slick tricks baked in, too: you can pair with up to three devices and switch between them using a key combo. Some of you might be wondering how you can just plug a microcontroller into a keyboard and have it work. The truth is, it doesn’t without extra hardware. Both the keyboard and ESP32-S3 need power. The simplest fix is a powered USB hub: it can be battery-powered for a truly mobile setup, or use a wired 5V supply so you never have to charge batteries.
We love seeing a simple, affordable microcontroller extend the usefulness of gear you already have. Let us know in the comments about other hacks you’ve used to connect keyboards to devices never designed for them.
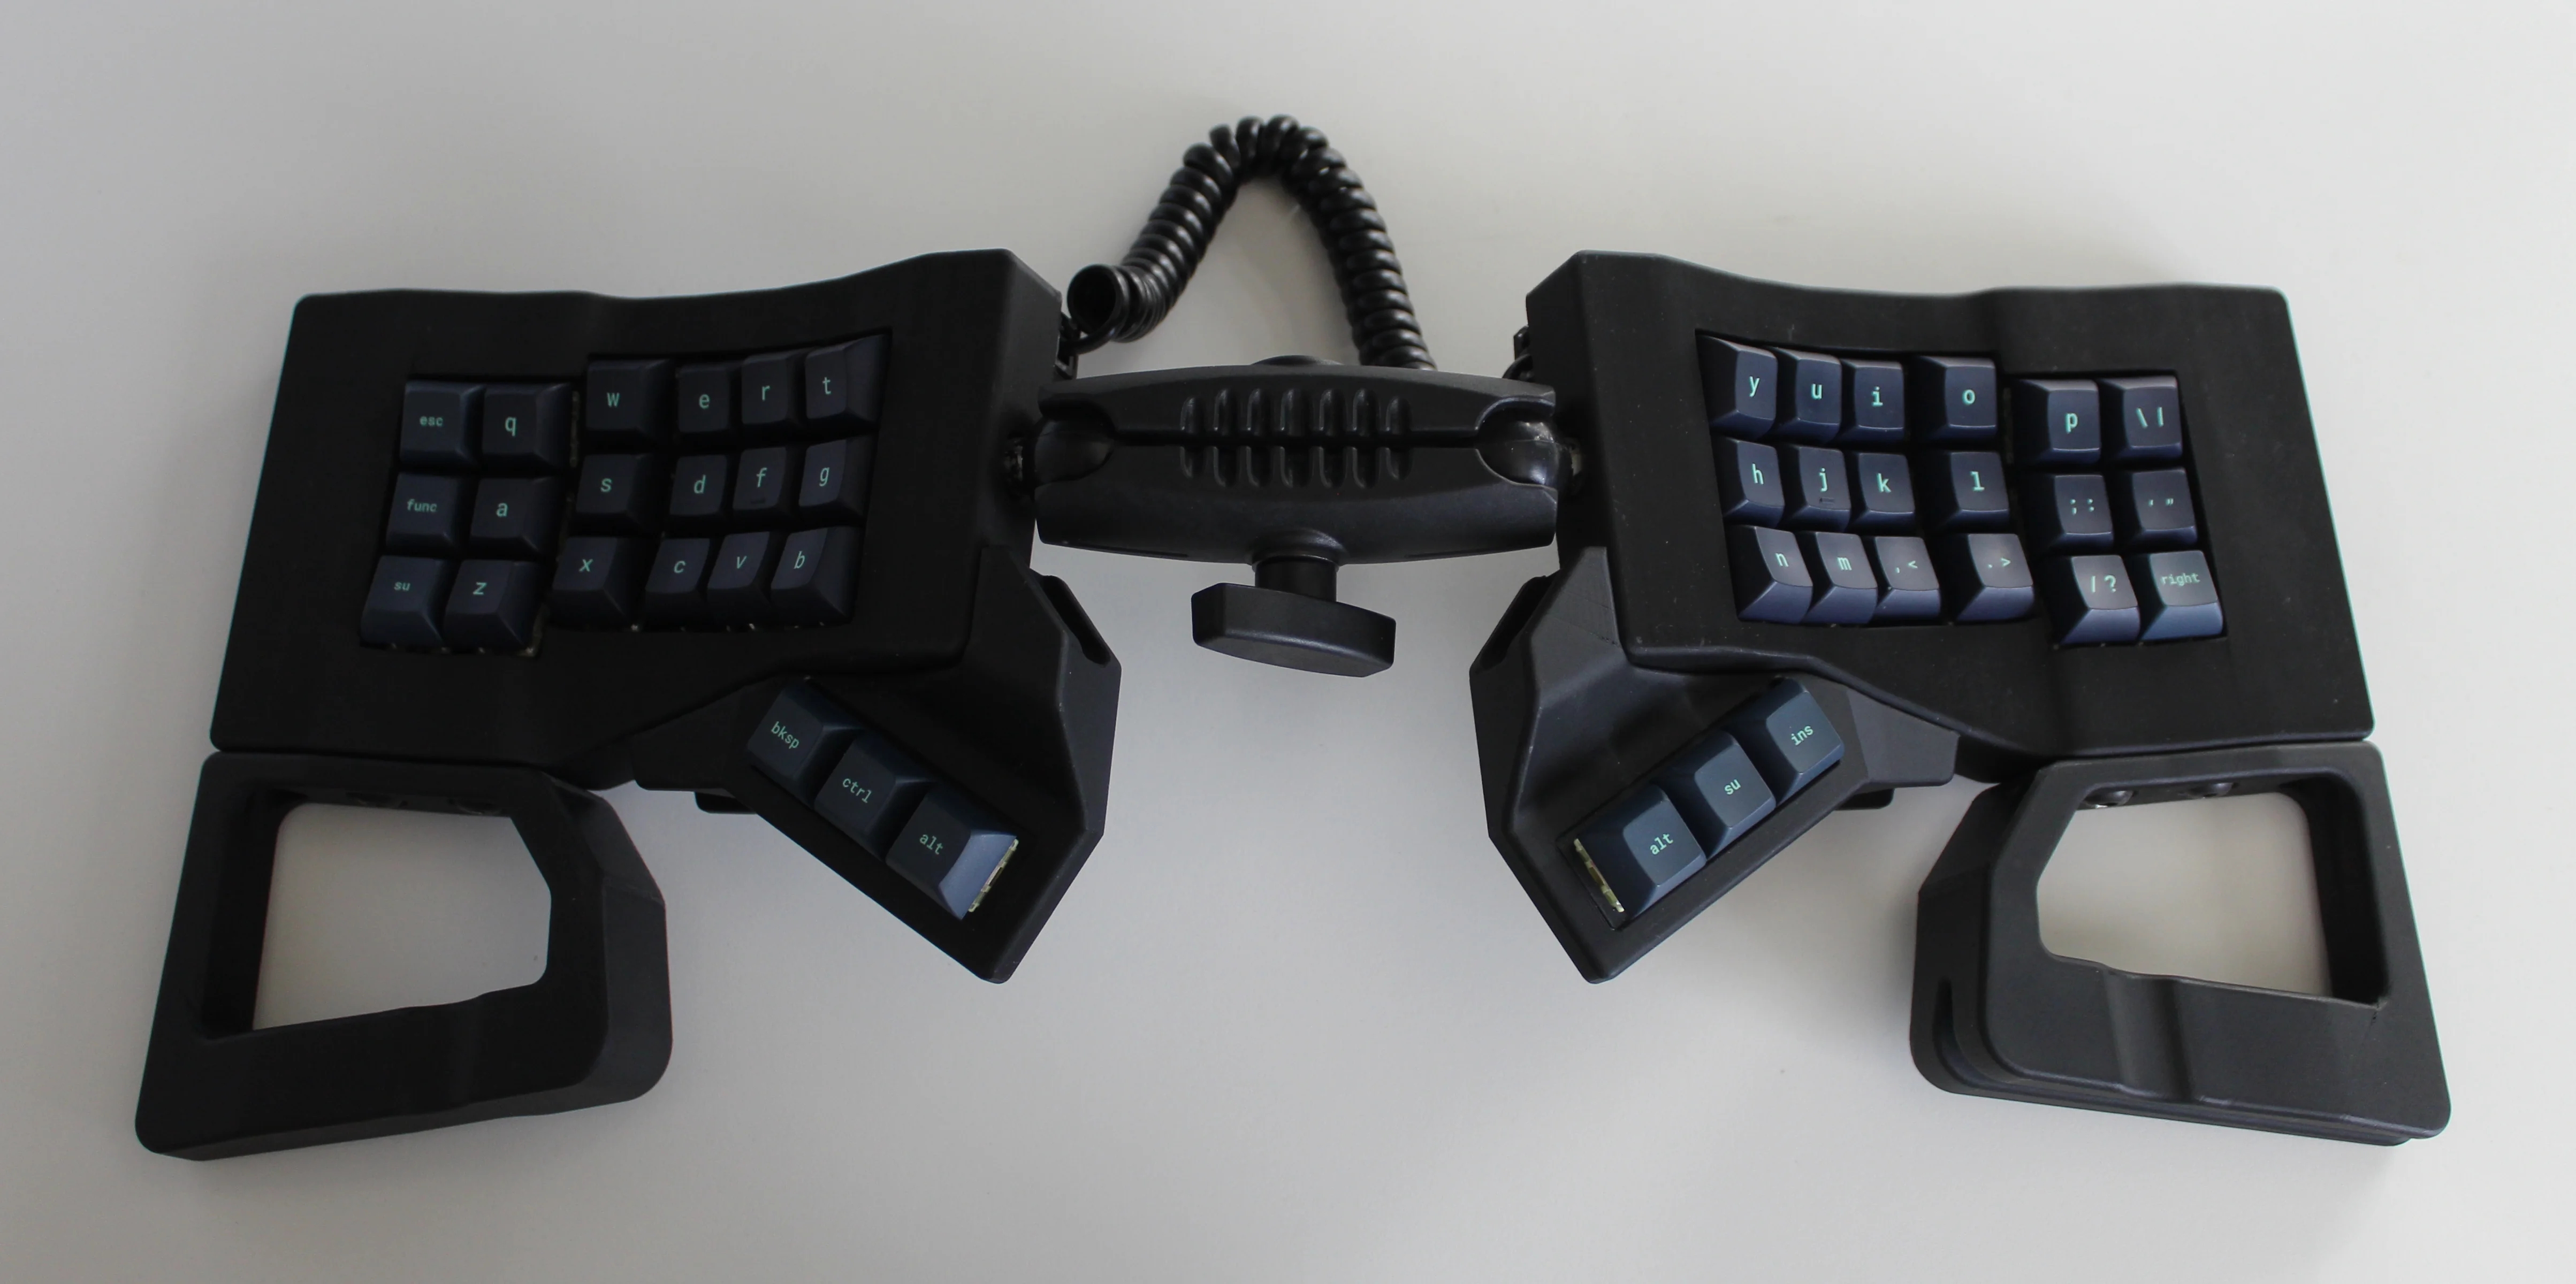
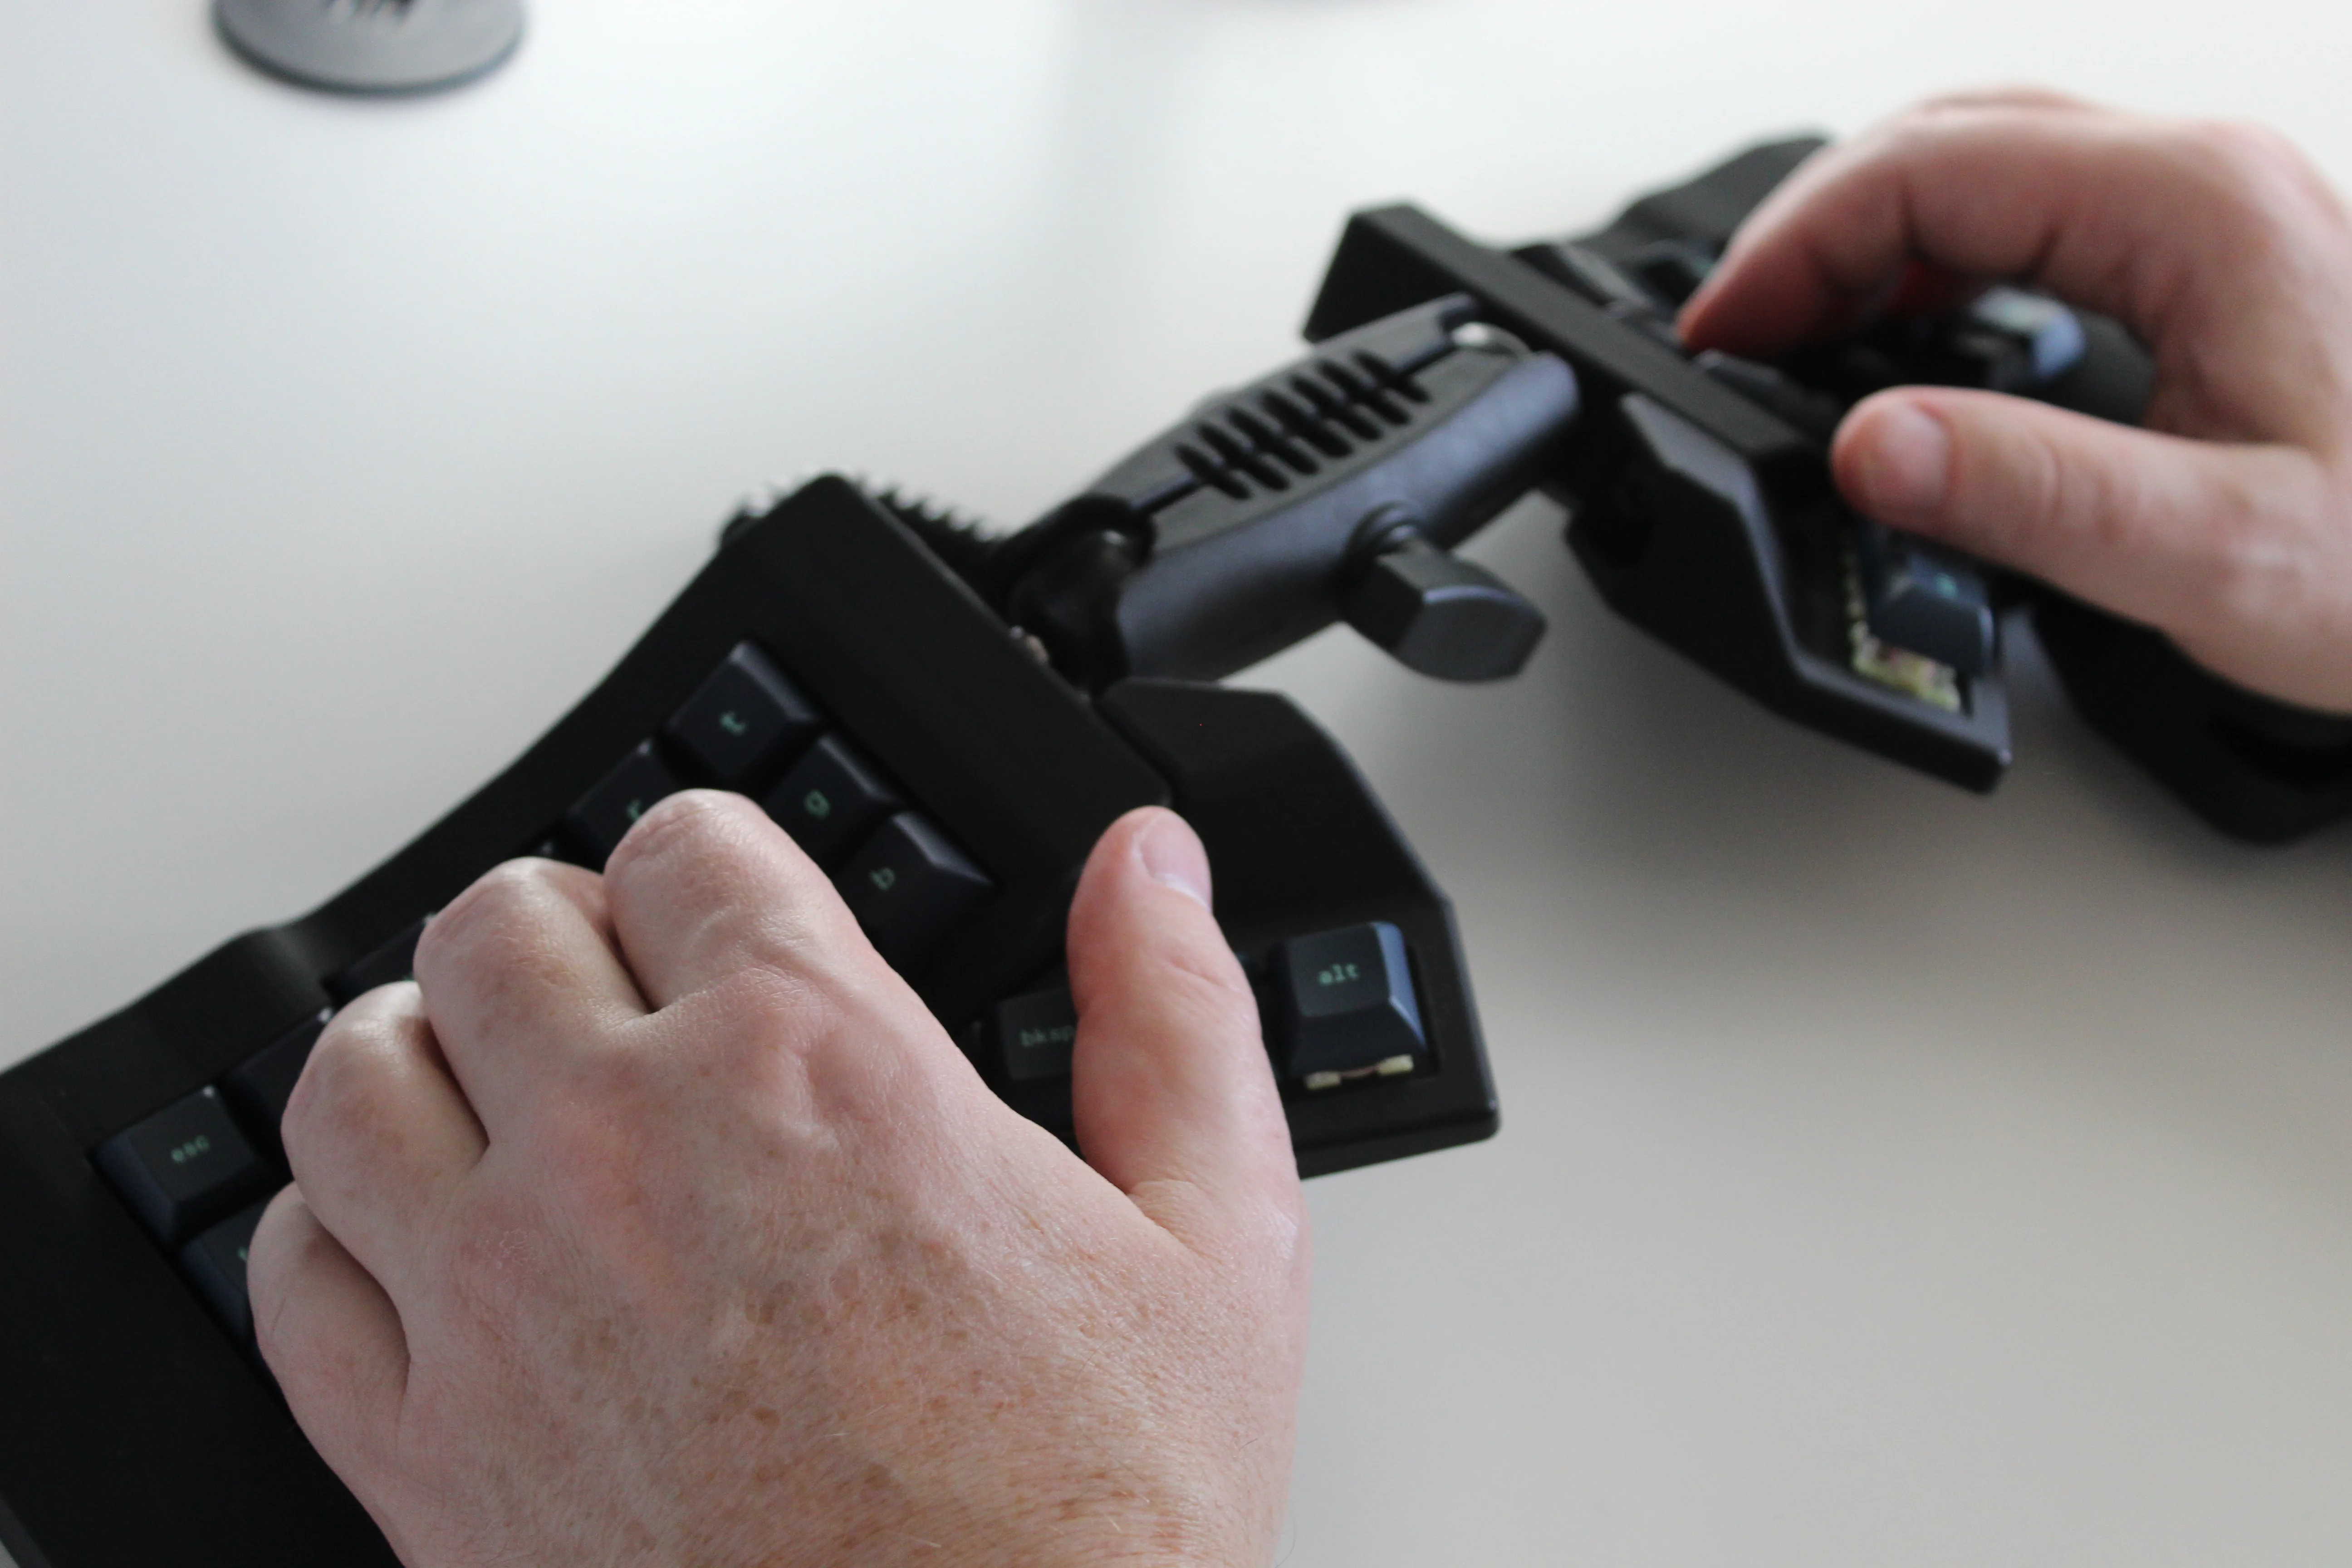
Get a handle on this bad boy! Okay, so those voids are really more for airing out your palms, I’d imagine, because palm sweat sure is real — you should see the pads of my Kinesis. This kind of looks like two sawed-off machine guns kissing, and I mean that in the best possible and non-violent way.
Image by [ntc490] via redditSo, [ntc490] has been on Team Special Keyboard for eight years now and decided it was time to design one. The goal was to make something semi-portable, super ergo, and as easy/cheap to build as possible, which, honestly, that sounds like one of those pick-two situations.
And yet, pricing (oh yeah, this is gonna be A Thing You Can Buy) will be around $115-155, depending upon whether you want the base kit, or the add-ons, too, minus switches and key caps.
So let’s get into the particulars here. As you can see, there are key wells and thumb clusters, inspired by other keyboards including your bog standard Maltrons, Kinesis Advantages and more modern, open-source takes like the Dactyl. [ntc490] loves the key well-thumb cluster combination, and I do, too (hello from the Glove80). And miraculously, the keys are hot-swappable via sockets.
Image by [ntc490] via redditThat novel tenting mechanism is adjustable, rugged, and portable. You can tent it near-vertical, lay it flat, or take it apart if you wish. The thing is modular for future expansion options such as wrist rests and displays.
So please do go visit the thread if this keyboard appeals to you at this price point. I love it, but I would need more rows of keys, personally. The top reddit comment mentions this as well, and [ntc490] says that because the thing is modular, it can easily accommodate more keys in both the wells and the thumb clusters. I seriously want one of these. Just with a few more keys.
All right, I’ll cut to the chase: Cheap03xD is mainly so cheap because the PCB falls within a 10 x 10 cm footprint. The point was to make a very affordable keyboard — all the parts come to ~40 Euro (~$47). So it would seem that [Lander03xD_] succeeded.
Image by [Lander03xD_] via redditCheap03xD is all the things — 36-key, split, column-staggered, wireless, hot-swappable, and uses ZMK. The batteries are easily replaceable, and no they don’t get in the way.
Those are MMD Princess silent switches, which I wouldn’t choose, but [Lander03xD_] is taking this board to the office, so I get it. They sure are a nice shade of pink, anyway, and they go really well with the pastels of the DSA keycaps and the bezel.
One cool thing to note is that the PCBs are reversible, like the ErgoDox. This isn’t [Lander03xD_]’s first board, and it won’t be the last.
Now, let’s talk batteries. [Saixos] pointed out that the design doesn’t appear to include a protection circuit. In case you can’t tell from where you’re sitting, those are nice!nano clones that [Lander03xD_] is using, and they expect a protection circuit.
[Lander03xD_] is going to look through the docs and see what’s what. The goal is not to have any daughter boards, so this may take some rethinking.
A knob can make a surprisingly versatile interface, particularly if it’s the SmartKnob, which builds a knob around a BLDC motor for programmable haptic response. It can rotate freely or with a set resistance, spring back to a fixed point when released, stick at detent points, and completely change its behavior as the interface demands. For people inexperienced in electronic assembly, though, smartknobs can be difficult to assemble. That’s why [Kokensha Tech] designed a simpler version, while at the same time letting it use a wider range of BLDC motors.
In addition to a motor, the original design used a magnetic encoder to detect position and a strain gauge to detect pressure on the knob. A circular LCD on the knob itself provided visual feedback, but it also required the motor to have a hollow center shaft. The LCD control wires running through the shaft proved tricky to assemble. [Kokensha Tech] moved the display out of the knob and onto a separate breakout board, which plugs into the controller board. This greatly broadens the range of compatible motors, since they no longer need a hollow shaft.
The motor now fits on a separate carrier board, which makes it easier to swap out different motors. The carrier board has mounting holes sized for a wide variety of motors, and four different types of motor connectors. [Kokensha Tech] also redesigned the rest of the PCB for easier soldering, while avoiding components with narrow pin spacing whenever possible. The original design used a LILYGO T-micro32 Plus MCU. The ESP32 is both cheaper and easier to solder, so it was a no-brainer to swap it in.
Unlike Texas Instruments, whose graphing calculators have famously not made technological improvements in decades despite keeping the same price tag, HP has made a few more modern graphing calculators in the last few years. One of which is the HP Prime which boasts hardware from the mid-2010s including an ARM processor, a color screen, and rechargeable lithium battery. But despite this updated hardware it’s still using micro-USB for data and charging. [David] wanted to fix that by giving this calculator a USB-C port.
The first steps were disassembling the calculator case and removing the micro-USB port. The PCB is glued to the LCD screen which isn’t ideal, but he was able to work on it with everything attached. The parts are small enough to need a microscope, and with a hot air station he was quickly able to remove the USB port. His replacements from a generic online retailer were able to be soldered without much effort, but there was one major complication. The new USB-C ports didn’t account for the “On The Go” mode supported by micro-USB and were shorting a pin to ground which put the calculator into “host” mode instead of acting as a device. But using the microscope and cutting a trace on the PCB disabled this mode permanently and got the calculator working properly.
As far as modernizing calculators go, it seems like the HP Prime checks a lot of boxes, with the major downside that the LCD screen and more powerful processor means that the battery needs to be charged more often than the old TI calculators. Rather than carry a dongle around everywhere, [David] found this to be a much more efficient change to his trusty HP. If you’re still stuck using TI calculators, though, there are a few ways to modernize those as well like this build which adds a lithium battery or this one which ports a few Game Boy games to the platform.