Cache Shortwave Signals For Later With This SDR Spectrum Grabber

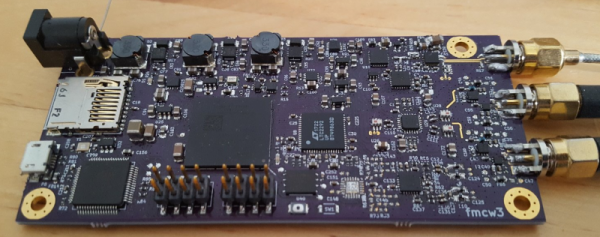
Shortwave listening has always been a mainly nocturnal hobby. To get the real DX, one had to wait for favorable ionospheric conditions after sunset and spend hours twisting knobs while straining to pick voices from half a planet away out of the noise. But who has time for that in today’s world? And what of the poor city-dwelling SWL, with antenna limitations and often elevated noise floor in the urban jungle?
Continue reading “Cache Shortwave Signals For Later With This SDR Spectrum Grabber”

Vintage Tube Radio Restorations

[J.B. Langston] has some vintage late-40’s/early-50’s tube radios that he wanted to repair – a Motorola All-American 5 AM radio, an Air Castle AM/FM radio and a Sears Silvertone AM/FM radio. He goes over, one by one, the three vintage radios, the problems they had, and how he got them back into working order. No finding a replacement microchip here, this was all about replacing capacitors and finding vacuum tubes!

In contrast to most modern builds we see on Hackaday, vintage radios are fairly simple – mainly turret-board builds with a transformer, resistors, capacitors, coil and tubes. The main issues in any vintage electronic repair is checking the capacitors because old wax paper and electrolytic capacitors can degrade and will need replacing. When repairing the All-American 5, [J.B. Langston] had an issue with the transformer, and he goes over how he fixed what’s called silver mica disease in it. While many parts were replaced with modern equivalents, only a selenium solid-state rectifier in one of them was replaced by a different part – a silicon diode and a high-wattage series resistor.

Looking at the inside of some of these radios, it’s surprising that they could be restored at all – 65-odd years of rust, dust, dirt and grime will take their toll – but [J.B. Langston] was able to fix all three radios and clean their Bakelite cases so they look and work like new. He goes over what he discovered, how he fixed the problems and the links to where he got help when needed. We’ve seen some great vintage radio projects over the years, including adding RDS (Radio Data Systems) to a vintage radio, converting a vintage radio with modern technology and even some other radio restoration projects.

Continue reading “Vintage Tube Radio Restorations”

An SDR For The Rest Of Them

If you are a radio enthusiast it is very likely that you will own at least one software defined radio. With the entry point into the world of SDRs starting with the ultra-cheap RTL2382 based USB receiver sticks originally designed for digital TV, it’s a technology that passed long ago into the impulse purchase bracket.

If you are not a radio enthusiast, or not even a Hackaday reader, you may not have heard of SDR technology. Even the humblest up-to-date radio or TV may well contain it somewhere within its silicon, but at the user interface it will still resemble the device you would have had in the 1950s: analogue tuning, or a channel-flipper.

It is interesting to see an attempt to market a consumer device that is unashamedly an SDR, indeed that is its unique selling point. The Titus II SDR bills itself as the “World’s First Consumer Ready SDR Package”, and is based around an Android tablet mated with a 100 kHz to 2 GHz SDR tuner and a pair of speakers in a portable radio styled case. It will support all modes including digital broadcasting through software plugins, and there will be an open plugin API for developers. They are taking pre-orders, and claim that the launch price will be under $100.

It sounds like an exciting product, after all who wouldn’t want a radio with those capabilities at that price! However it leaves us wondering whether the price point is just a little too ambitious for the hardware in question, and we’ll reluctantly say we’ll believe it when we see real devices on the market. A $100 consumer price doesn’t get you much in the tablet world, and that is from high-volume Chinese manufacturing without the extra cost of the SDR hardware and the overhead of smaller volume from a niche product. There are pictures online of real prototypes at trade shows, but we’d like to see a website with fewer renders and more hard plastic.

There is another angle to this device that might interest Hackaday readers though. It should remind anyone that building one yourself is hardly a difficult task. Take an RTL2382 stick with or without the HF modification, plug it into a tablet with an OTG cable, install an app like SDR Touch, and away you go. 3D print your own case and speaker surrounds as you see fit, and post the result on hackaday.io.

Via the SWLing Post.

Listening To Jupiter On A DIY Radio

By Jove, he built a radio!

If you want to get started with radio astronomy, Jupiter is one of the easiest celestial objects to hear from Earth. [Vasily Ivanenko] wanted to listen, and decided to build a modular radio receiver for the task. So far he’s written up six of the eight planned blog posts.

The system uses an LNA, a direct conversion receiver block, and provides audio output to a speaker, output to a PC soundcard, and a processed connection for an analog to digital converter. The modules are well-documented and would be moderately challenging to reproduce.

Continue reading “Listening To Jupiter On A DIY Radio”

Resurrection — Pressing WW2 Radio Equipment Back Into Service

Mass production was key to survival during the Second World War. So much stuff was made that there continues to be volumes of new unpacked stuff left over and tons of used equipment for sale at reasonable prices. Availability of this war surplus provided experimenters in the mid 20th century with access to high performance test equipment, radio equipment, and high quality components for the first time.

Even today this old stuff continues to motivate and inspire the young generations because of its high build quality, unique electro-mechanical approaches, and overall innovative designs which continue to be relevant into the 21st century. In this post we will show you how to get started in the hobby of resurrecting WW2 radio equipment and putting it back on the air.

Continue reading “Resurrection — Pressing WW2 Radio Equipment Back Into Service”

Hollow State Receiver

[Netzener] received a Radio Shack P-Box one tube receiver as a gift. However, at the time, his construction skills were not up to the task and he never completed the project. Years later, he did complete a version of it with a few modern parts substitutions. The radio worked, but he was disappointed in its performance. Turns out, the original Radio Shack kit didn’t work so well, either. So [Netzener] did a redesign using some some old books from the 1920’s. The resulting radio — using parts you can easily buy today — works much better than the original design.

The most expensive part of the build was a 22.5 V battery, which cost about $25. However, you can get away with using three 9 V batteries in series if you want to save some money. The battery provides the plate voltage for the 1T4 vacuum tube. A more conventional AA battery drives the tube’s filament. The original Radio Shack design relied on a variable inductor for tuning. These are difficult to find now, so [Netzener] uses a more conventional adjustable coil and a common tuning capacitor.

As an extra touch, [Netzener] painted the perf board to look as much like the original Radio Shack kit as possible. You can see from the pictures, it came out looking very good. If this isn’t challenging enough for you, maybe you want to roll your own tube. Or maybe you should just settle for the socket.

Continue reading “Hollow State Receiver”

A Vintage Interface For A Modern Radio

The arrival of affordable software defined radio technologies over the last couple of decades has completely changed the way that radio amateurs and other radio enthusiasts approach the airwaves. There’s a minor problem with most software defined receivers though, being by their nature software driven they will usually rely on a host computer for their interface. Thus the experience is one of clicking mouse buttons or using keyboard shortcuts rather than the mechanical analogue dial interfaces that provided easy control of older radios.

Meccano encoder mounts for the win!

This is a problem that has been addressed by [Jon Hudson, G4ABQ], with one of his SDRplay receivers. He’s mounted it and its control PC in the chassis of a very aged and non-functional Marconi CR100 communication receiver, and given it a control interface that only uses the Marconi’s front panel controls (YouTube link). A rotary encoder has been grafted onto the Marconi tuning capacitor with what looks like some Meccano, and in turn that feeds an Arduino which behaves as a keyboard for the benefit of the PC. Some extra buttons have been added for mode selection, spectrum zoom and shift, and care appears to have been taken to give their labels a period feel. Arduino code came courtesy of [Mike Ladd, KD2KOG]. The result is a very controllable SDR receiver, albeit one in a rather large case.

If you are interested in the project then we are told that it will be on the RS stand at Electronica in Munich next week, meanwhile we’ve put the video below the break.

Continue reading “A Vintage Interface For A Modern Radio”