Conference badges are getting more complex each year. DEFCON, LayerONE, Shmoocon, The Next Hope, Open Hardware Summit, The EMF, SAINTCON, SXSW Create, The Last Hope, TROOPERS11, ZaCon V and of course the CCC, have all featured amazing badges over the years. This years CCCamp 2015 rad1o badge is taking things several notches higher. The event will run from 13th through 17th August, 2015.
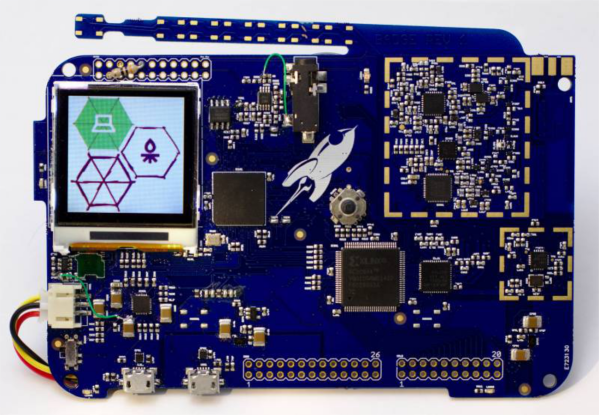
The rad1o Badge contains a full-featured SDR (software defined radio) transceiver, operating in a frequency range of about 50 MHz – 4000 MHz, and is software compatible to the HackRF One open source SDR platform. The badge uses a Wimax transceiver which sends I/Q (in-phase/quardrature-phase) samples in the range of 2.3 to 2.7 GHz to an ARM Cortex M4 CPU. The CPU can process the data standalone for various applications such as FM radio, spectrogram display, RF controlled power outlets, etc., or pass the samples to a computer using USB 2.0 where further signal processing can take part, e.g. using GnuRadio. The frequency range can be extended by inserting a mixer in the RF path. Its got an on-board antenna tuned for 2.5GHz, or an SMA connector can be soldered to attach an external antenna. There’s a Nokia 6100 130×130 pixel LCD and a joystick, which also featured in the earlier CCCamp 2011 badge known as the r0ket.
A 3.5mm TRRS audio connector allows hooking up a headphone and speaker easily. The LiPo battery can be charged via one of the USB ports, while the other USB port can be used for software updates and data I/O to SDR Software like GnuRadio. Check out the project details from their Github repository and more from the detailed wiki which has information on software and hardware. There’s also a Twitter account if you’d like to follow the projects progress.
This years Open Hardware Summit also promises an awesome hackable badge. We’ll probably feature it before the OHS2015 conference in September.
Thanks to [Andz] for tipping us off about this awesome Badge.