Most of the time we feature hokey film footage in our Retrotechtacular series, but we think this hack is as cool today as it was fifty years ago. [Clint] wrote in to tell us about Operation Red Line. It was an experiment performed May 3rd and 4th, 1963, which means the 50th anniversary just passed a few weeks ago. The hack involved sending data (audio in this case) over long distances using a laser. But back then you couldn’t just jump on eBay and order up the parts. The team had to hack together everything for themselves.
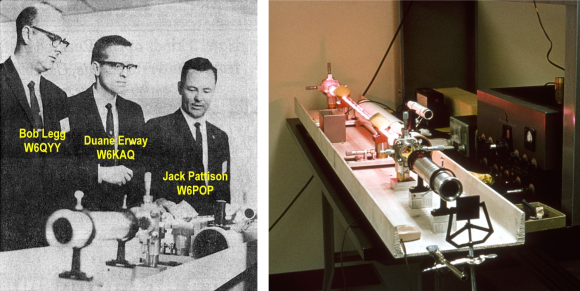
They built their own helium-neon laser tube, which is shown on the right. The gentlemen involved were engineers at a company called Electro-Optical System (EOS) by day, and Ham radio enthusiasts by night. With the blessing of their employer they were able to ply their hobby skills using the glass blowing and optical resources from their work to get the laser up and running. With that side of things taken care of they turned to the receiving end. Using a telescope and a photomultipler they were able to pick up the beam of light at a distance of about 119 miles. The pinnacle of their achievement was modulating audio on the transmitter, and demodulating it with the receiver.
[Clint] knows the guys who did this and wrote up a look back at the project on his own blog.