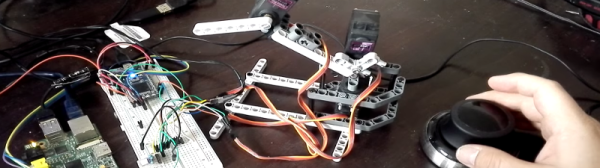
PiMagic RaspPi to Arduino Shield Interface

Adding I/O To The Rasberry Pi Models A & B

The Raspberry Pi has been the basis for many cool projects. Even so, Models A and B have been criticized for having only a handful of GPIO pins available. Sure, the new Model B+ has a 40-pin GPIO header but what if you want to use your old RaspPi with a bunch of in and outputs? [Steve] is one of those guys and has done something about it by creating a pretty neat solution he calls the PiMagic. It’s a Pi Plate that has an on board ATMEGA328 running an Arduino bootloader. The RaspPi and the Arduino communicate via UART as [Steve] felt it was a bit simpler than going the SPI or I2C route.

The RaspPi GPIO’s run on 3.3v and the ATMEGA328’s like 5v. To solve this, the PiMagic has a Level Shifter that keeps the I/O of the two boards happy. Older Pi’s had a problem burning out PCB traces when supplying too much current on the 5v supply line. [Steve] threw in a fuse that will burn out before the Pi does to ensure that no Pi’s were harmed in the making of this project.

Now that a bunch of I/O are available, how do you physically access them? Well, the PiMagic has female headers in the typical Arduino layout. This way any Arduino Shield will plug right in. [Steve] made all his source files available for those who want to make one themselves. Find an assembly video after the break.

Continue reading “Adding I/O To The Rasberry Pi Models A & B”

THP Semifinalist: Secure Your Internets With Web Security Everywhere

[Arcadia Labs] has created a great little device in Web Security Everywhere, a semifinalist in The Hackaday Prize. At the center of it all is UnJailPi, a Raspberry Pi device which can act as a secure router between a protected network and the unprotected internet. UnJailPi can create OpenVPN and Tor connections on the fly from its touch screen interface. The full details are right up on [Arcadia’s] Hackaday.io project page.

One of the most amazing things about the project is its creator, [Arcadia Labs]. [Arcadia] started from square one learning python just 1 year ago. Since then he’s become a proficient python coder, and created UnJailPi’s  entire user interface with pygame.

[Arcadia] is also working with simple hand tools. He has no access to the CNC routers, 3D printers, or milling machines used in many of the projects we see here on Hackaday. All the work on UnJailPi’s acrylic case was done with a handsaw, a file, and a heck of a lot of patience.

Currently [Arcadia’s] biggest hurdle is finding a good power supply for his project. UnJailPi is designed to work both on AC or an internal battery. His current power circuit throws off enough heat that the Raspberry Pi resets while the battery is charging.

We’re sure [Arcadia] will figure out his power issues, but if you have any suggestions, leave a comment here, or head over to the project page and let him know!


SpaceWrencherThe project featured in this post is a semifinalist in The Hackaday Prize.

Unlock on LAN

Unlock On LAN Apartment Security

Here’s a cool little variation of that handy little function called Wake on LAN — [Jonathan] found himself locked out of his apartment one too many times, so he decided to add his own fail safe backup in order to get inside without a key — using a Raspberry Pi of course.

His apartment is one of those older style ones where the door is always locked and you use a buzzer to let someone in (or a key to get in yourself). This made it super easy to add some internet connectivity to the system. [Jonathan] tapped into the buzzer with a relay since the system uses medium voltage AC to operate. A Raspberry Pi triggers a transistor using its GPIO to click the relay on and off, effectively controlling the lock.

Using a WiFi dongle he’s connected the Pi to his home network and written a simple perl script to trigger the relay — all he has to do is visit a URL on his phone or computer and the door will unlock instantly!

Once the system worked [Jonathan] soldered all the components onto a breadboard and hooked it up. He still needs an enclosure for it, but it’s been working well since he installed it.

Another option would be to use an RFID tag system through the door, which could be pretty cool as well.

The Pac-Man Bus Stop For Gamers At Heart

DSCF3537Combined

Waiting for the bus can be drag. You never know exactly when it will come, always looking down the road hoping to spot the vehicle as it turns a corner. When it doesn’t show up right away, the result is usually staring down at a ‘smart’ phone checking it for any incoming messages. Directing the attention up might produce a list of estimated arrival times and maybe even a map showing the routes that are taken throughout the day. But there is only one bus stop in the entire world, that we know of, where people can play Pac-Man while they watch for the bus to arrive.

It was created by the combining efforts of two maker communities in town. Norwegian Creations and Trondheim Makers teamed up to build an interactive gaming display that gave individuals the ability to pass the time by directing the famous video gaming character around a blue maze, eating yellow pellets and avoiding colorful ghosts along the way. This display was also made to raise awareness for the upcoming Trondheim Maker Faire that year. They choose Pac-Man as the foundation and integrated a slightly modified invention kit called Makey Makey with a Raspberry Pi running RetroPie into the actual frame of the bus stop. The people involved must have had some serious business connections in order to get approval for that. They figuratively hacked into the bus stop’s power grid gaining the necessary 230 volts required to energize the custom gaming unit. Once hooked up, anyone standing by could play Pac-Man until the bus came. [Ragnar] at Norwegian Creations told us in an email that future ideas of theirs include syncing up several stops that can communicate with each other, which could lead to some great multiplayer interactions. They also have a fantastic video that they uploaded that shows the building process of their current design. Check that out below, and let us know what other types of games you would like to see at a bus stop near you.

Continue reading “The Pac-Man Bus Stop For Gamers At Heart”

Make Your Own Mac Pi For Some Desktop Nostalgia

Mac Pi

Do you miss your Mac Classic? Well if you’re looking for a fun little project, why not build yourself a Mini Mac Pi that emulates Mac OS 7?

It’s a fairly simple project that makes use of the Raspberry Pi B, a 320×240 2.8″ touchscreen LCD (the PiTFT), a lithium-ion battery, a buck-boost circuit and of course, a power switch. The cute enclosure is made by 3D printing, and all the files are available on Thingiverse — they’ve been sliced up in a way that they will be printable on most consumer printer bed sizes.

Once everything is assembled, you’ll need to run Mini vMac alongside Raspbian in order to run Mac OS 7. There are a few caveats though — The original resolution is 512×342, so there’s a bit of screen clipping that occurs. There’s also minor application support, but for the purpose of nostalgia, we think the included selection is more than enough to satisfy most memories.

Continue reading “Make Your Own Mac Pi For Some Desktop Nostalgia”

RFID Audio Book Reader For The Visually Impaired

When [Willem] visited home last year, he stopped in at his grandparents’ house and found that his very active 93-year-old grandfather had recently gone almost completely blind and was passing the days just sitting in a chair. [Willem] suggested that he listen to audio books, but his grandfather wasn’t receptive to the idea until [Willem] convinced him that the well-narrated ones can be very gripping and entertaining. Once his grandfather was on board, [Willem] knew that he needed a much more accessible solution than a tiny device with tiny controls, so he built an RFID audio reader using a Raspberry Pi.

[Willem] has posted the build details at his personal site. Essentially, the box you see above contains a Raspi and an RFID reader. He created different ‘books’ by placing RFID cards inside of DVD boxes, which makes them more tangible and accessible. When a book is placed on the box, the RFID reader tells the Pi which mp3 files to load. The large colored buttons let the user pause, rewind 20 seconds, and control the volume.

We love to see this kind of build. It’s simple, effective, and greatly enhances the user’s quality of life. [Willem]’s grandfather loves it and uses it every day.

Introducing Hat A Day! Not To Be Confused With The Real HaD Of Course…

Hat a Day

With the release of the Raspberry Pi B+ model comes a whole slew of extra GPIO connectors, a whopping 40 of them in fact — Almost double the original B model! A HAT stands for Hardware Attached on Top, and Adafruit is celebrating by trying to create a new hat, every day.

A HAT is a rectangular board measuring 65x56mm with mounting holes for the Raspberry Pi B+ and a 40 pin GPIO header. That doesn’t sound too special by itself, but two of the header pins are reserved for a special auto-configuration system that allows your Pi to have automatic GPIO and driver setup! Now we’re talking!

So far Adafruit has made a handful of prototype HATs including the Perma-proto HAT, a GPS HAT, a TFT HAT, an Arcade HAT and even a Servo HAT. But they’re looking for more! We think they’ve slipped up on the one a day record though…

We’re excited to see more integrated projects with the B+ since it’s so much more friendly for add-on hardware than the original — What kind of hardware would you like to see in HAT form? Do you like the idea of HATs?