RFID Audio Book Reader For The Visually Impaired

When [Willem] visited home last year, he stopped in at his grandparents’ house and found that his very active 93-year-old grandfather had recently gone almost completely blind and was passing the days just sitting in a chair. [Willem] suggested that he listen to audio books, but his grandfather wasn’t receptive to the idea until [Willem] convinced him that the well-narrated ones can be very gripping and entertaining. Once his grandfather was on board, [Willem] knew that he needed a much more accessible solution than a tiny device with tiny controls, so he built an RFID audio reader using a Raspberry Pi.

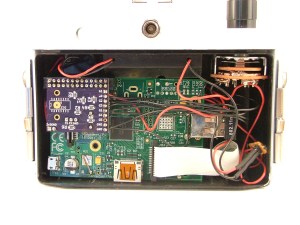
[Willem] has posted the build details at his personal site. Essentially, the box you see above contains a Raspi and an RFID reader. He created different ‘books’ by placing RFID cards inside of DVD boxes, which makes them more tangible and accessible. When a book is placed on the box, the RFID reader tells the Pi which mp3 files to load. The large colored buttons let the user pause, rewind 20 seconds, and control the volume.

We love to see this kind of build. It’s simple, effective, and greatly enhances the user’s quality of life. [Willem]’s grandfather loves it and uses it every day.

Introducing Hat A Day! Not To Be Confused With The Real HaD Of Course…

Hat a Day

With the release of the Raspberry Pi B+ model comes a whole slew of extra GPIO connectors, a whopping 40 of them in fact — Almost double the original B model! A HAT stands for Hardware Attached on Top, and Adafruit is celebrating by trying to create a new hat, every day.

A HAT is a rectangular board measuring 65x56mm with mounting holes for the Raspberry Pi B+ and a 40 pin GPIO header. That doesn’t sound too special by itself, but two of the header pins are reserved for a special auto-configuration system that allows your Pi to have automatic GPIO and driver setup! Now we’re talking!

So far Adafruit has made a handful of prototype HATs including the Perma-proto HAT, a GPS HAT, a TFT HAT, an Arcade HAT and even a Servo HAT. But they’re looking for more! We think they’ve slipped up on the one a day record though…

We’re excited to see more integrated projects with the B+ since it’s so much more friendly for add-on hardware than the original — What kind of hardware would you like to see in HAT form? Do you like the idea of HATs?

Pressure Gauge Used to Monitor Internet Usage

Steam Gauge Keeps Track Of Your Internet Usage

There’s a certain appeal to analog gauges in a vastly digital world. [Ed Konowal] is a Network Operations Supervisor for a school district in Florida — part of his job is to ensure a stable and fast internet connection, so he decided to make an internet usage gauge for his office.

What we really like about this hack is the fact that [Ed] had no idea how to do it. It’s a simple enough idea, right? Google was his friend and Ed started learning about all kinds of things. Raspberry Pi’s and Arduinos, wireless receiver/transmitters, servos and steppers, Python…

After quite a bit of trial and error, [Ed] eventually settled on a wired design which uses a Raspberry Pi running a Python program to poll the internet bandwidth, which in turn calculates the servo position for the dial and sends that number to the Arduino to move it into position. This repeats every 10 seconds. Pretty cool!

Kind of reminds us of this project to make custom gauges using a stepper motor breakout board!

[Thank Justin!]

Pivena – The Open Source Raspberry Pi Case

Raspberry Pi Laptop

Still not too sure how to house your awesome Raspberry Pi B model? Don’t worry, [Timothy Giles] has got you covered! He’s just finished this very sleek open source PIvena case for anyone to use.

Why is it called the PIvena? He’s basing it off of [Bunnie’s] Novena project which is a hobby-based open source laptop! For more information you can checkout the recent interview we had with [Bunnie] himself!

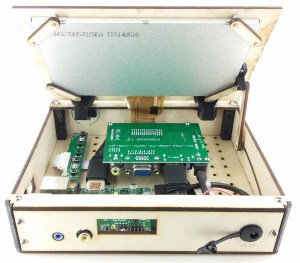
Anyway, back to the hack — it features a laser cut case which has plenty of room for the Pi and any additional hardware you want to add. Like the Novena, the screen also functions as a lid, opening up to reveal the electronics, allowing for easy tinkering. All the files can be acquired over at Thingiverse, and he has assembly instructions available on Instructables. Continue reading “Pivena – The Open Source Raspberry Pi Case”

PirateCade Is An Impressive Feat Of Woodworking And Design

Retro Arcade Machine Keeps the Classics

A six month journey of blood sweat and tears is finally over for [David Carver] and what he is left with is nothing short of beautiful. He calls it the PirateCade. We call it the perfect arcade cabinet.

This project is actually [David’s] very first Raspberry Pi project – at least it was, until his Pi crapped out on him. After running into too many problems with it and SD card corruptions, [David] decided against the RetroPie project platform and decided to upgrade to a full-blown PC, using an AtomicFE front-end and the Ultimark Ipac.

The entire cabinet is hand made out of solid wood; he didn’t have access to any fancy CNC routers or laser cutters. We gotta hand it to him, he’s quite the cabinet maker for an electronics guy. Continue reading “PirateCade Is An Impressive Feat Of Woodworking And Design”

Raspberry Pi Backup Scripts

Raspberry Pi

[Matthew’s] recent blog post does a good job explaining the basics of the Raspberry Pi’s file system. The Linux operating system installed on a Pi is generally installed on two different partitions on an SD card. The first partition is a small FAT partition. All of the files on this partition are used for the initial booting of the Pi. This partition also includes the kernel images. The second partition is the root file system and is generally formatted as ext4. This partition contains the rest of the operating system, user files, installed programs, etc.

With that in mind you can deduce that in order to backup your Pi, all you really need to do is backup all of these files. [Matt] has written some scripts to make this a piece of cake (or pie). The first script will simply copy all of the files into a gzipped archive. You can save this to an external SD card, USB drive, or network share.

The second script is perhaps more interesting. This script requires that you have one free USB port and a USB SD card reader. The script will automatically format the extra SD card to contain the two critical partitions. It will then copy the “boot” files to the new boot partition and the root file system files to the new SD card’s root partition. When all is said and done, you will end up with an SD card that is an exact copy of your current running file system.

This can be very handy if you have multiple Pi’s that you want to run the same software, such as in a Pi cluster. Another good example is if you have spent a lot of time tweaking your Pi installation and you want to make a copy for a friend. Of course there are many ways to skin this cat, but it’s always fun to see something custom-built by a creative hacker.

Raspberry Pi Spies On Your Front Door

doorbell pictures

One of [Sander]’s first projects with a Raspberry Pi was to get it to send messages to his iPhone. From there he decided to take it a step further and wire the tiny computer up to his doorbell, creating a system that can send push messages to his phone whenever someone is at the front door.

[Sander]’s doorbell is wireless, and he decided to keep all of its original functionality. All it took to signal the Pi was a simple circuit tied to the doorbell’s status LED which turns off whenever the doorbell is pushed.

The Raspberry Pi runs a python program that handles the GPIO pin which is wired to the doorbell. When the doorbell is pushed, the program processes and sends the push notification while taking pictures of the visitor with an attached webcam. The pictures are included in the message so [Sander] can see who is at the front door. The code for the project is included on his project page.

This project rang a bell for us since we’ve seen projects using a Raspberry Pi and push notifications. None of them so far have included a webcam or utilized an existing wireless doorbell though, and this is a great step forward!