Experimenting with embedded Linux used to mean reformatting an old PC, or buying an expensive dev board. In February of 2012, the Raspberry Pi was released, and it has proven to be a game changing platform. According to the Raspberry Pi Foundation, over 3.8 million boards have been sold. 3.8 million translates into a lot of great projects. This week’s Hacklet focuses on some of the best Raspberry Pi projects on Hackaday.io!
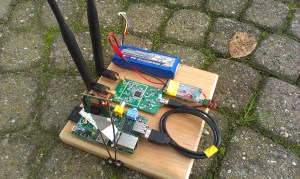 We start with [richardginus] and the RpiFPV (aka Raspberry Pi First Person View) project. [Richardginus] is trying to build a low latency WiFi streaming camera system for radio-controlled models using a Raspberry Pi and camera. He’s gotten the system down into a respectable 160 milliseconds on the bench, but in the field interference from the 2.4GHz R/C transmitter drives latency way up. To fix this, [Richardginus] is attempting to control the plane over the same WiFi link as the video stream. We’d also recommend checking out some of those “outdated” 72 MHz R/C systems on the used market.
 Next up is [James McDuffie] and his RPi Holga. Inspired by [Peter’s] Holga camera project, [James] has stuffed a Raspberry Pi model A, a camera module, and a WiFi adapter into a Holga camera body. The result looks like a stock Holga. We saw this camera up close at the Hackaday 10th Anniversary event, and it fooled us – we thought [James] was just a lomography buff. It was only after seeing his pictures that we realized there was a Pi hiding inside that white plastic body! Definitely check out [James’] instructions as he walks through everything from hardware mods to software installation.
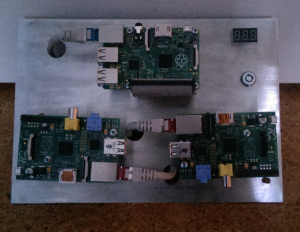 No Raspberry Pi list would be complete without a cluster or two, so we have [Tobias W.] and his 3 Node Raspberry Pi Cluster. The Raspberry Pi makes for a cheap and efficient platform to experiment with cluster computing. [Tobias] did a bit more than just slap a few Pis on a board and call it a day though. He custom machined an aluminum plate to hold his 3 node cluster. This makes wire management a snap. The Pi’s communicate through a four port Ethernet hub and all run from a single power supply. He even added a key switch, just like on the “old iron” mainframes. [Tobias] has been a bit quiet lately, so if you run into him, tell him we’re looking for an update on that cluster!
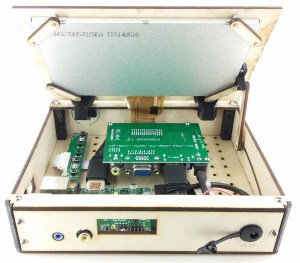 From [Tim] comes the PIvena, a Raspberry Pi laptop which takes its styling cues from [Bunnie Huang’s] Novena computer. Pivena is a bit smaller though, with a 7” HDMI LCD connected to the Pi. The case is made from laser cut wood and a few 3D printed parts. Everything else is just standard hardware. [Tim] kept the PIvena’s costs down by using a wooden kickstand to hold up the screen rather than Novena’s pneumatic spring system. The base plate of the PIvena includes a grid of mounting holes just like the Novena. There is also plenty of room for batteries to make this a truly portable machine. The end result is a slick setup that would look great at any Hackerspace. We hope [Tim] creates an update to support the new Raspberry Pi B+ boards!
Our Raspberry Pi-based alarm clock is chiming the hour, so that’s about it for this episode of the Hacklet! As always, see you next week. Same hack time, same hack channel, bringing you the best of Hackaday.io!