Turning A Broken Laptop’s LCD Into A Fancy Monitor

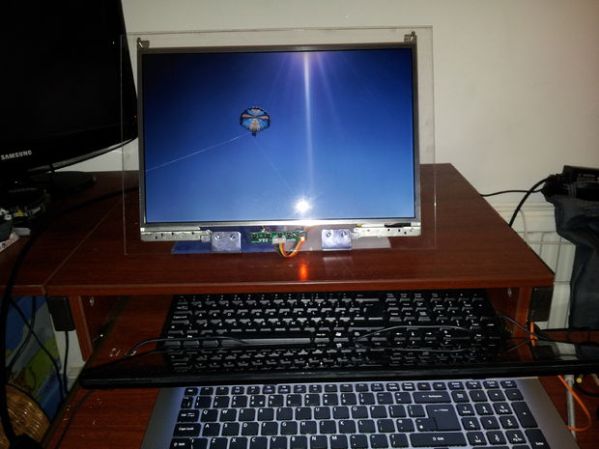
Seems like you can find broken laptops everywhere these days — so why not do something with them? [Damutsch] shows us how to make a rather cool looking monitor from a laptop’s LCD display.

First, you’ll need to salvage a working LCD from a dead laptop. Once you have the panel out you can identify the serial key and order a controller board off eBay, which will allow you to plug a normal video input such as VGA or HDMI into the panel. We browsed around a bit and it looks like you can get driver boards from around $15-$30, so not too bad price-wise. It wasn’t so long ago that salvaged LCD panels were basically unusable because of a lack of these driver boards. Continue reading “Turning A Broken Laptop’s LCD Into A Fancy Monitor”

Plastic Recycling At Home Promises A Revolution In Local Plastic Production

[Dave Hakkens] graduated from the Design Academy of Eindhoven and decided to try his hand at making affordable plastic recycling machines.

His reasoning?

“We recycle just 10% [of waste plastic],” says Hakkens. “I wondered why we recycle so little so I investigated it. I went to all these companies and I realized that they don’t really want to use recycled plastic. So I wanted to make my own tools so I could use recycled plastic locally.”

Typical plastic production, like injection molding, uses very large and expensive machines — so expensive that most of the time, companies don’t want to risk using inferior recycled plastic, as it might damage the machine, or slow production time. Not convinced that recycled plastic is “inferior”, [Dave] has built his own line of machines capable of making recycled plastic parts.

Continue reading “Plastic Recycling At Home Promises A Revolution In Local Plastic Production”

Pi-Powered Radio Over IP

Pi

[KP4TR] connected a Raspberry Pi to a small, cheap handheld radio, allowing anyone within a few miles of his house to connect to amateur radio operators all around the world.

For the hardware, [KP4TR] is using a Raspi, a Baofeng BF-888s 400MHz – 470MHz walkie-talkie radio, a USB sound card, and a pair of transformers for the 5V and 3.7V lines. All this is tucked away in a remakably vintage-looking plate and standoff enclosure, complete with acorn nuts and an RGB LED connected to the Raspi’s GPIO to indicate whether the radio is transmitting or receiving.

The software used is SVXLink, a Linux port of the Echolink software. This app allows hams the world over to connect to very distant radios over the Internet.

You can check out the video demos of the system below.

Continue reading “Pi-Powered Radio Over IP”

Exploded Hardware Wall Art

The gang at Bolt.io realized that the walls in their office deserved some special attention, and they got it by mounting exploded hardware throughout the space. They sourced the used devices from eBay, then carefully broken them down into their components and mounted each on its own sheet of PETG. The result: exploded views of some of their favorite hardware, including a MacBook Pro, a Roomba, a Dyson Air Multiplier, and more.

Is it a hack? Eh, maybe. This is the first example we’ve seen of a collection of devices on display in this fashion. Regardless, it’s worth a mention considering what happened in the office as a result of the installation. Though the original purpose was simply to decorate the walls, it seems employees have been staring at them regularly, learning more about the designs, the plastics, and the component choices. Think of it as still life—depicting that moment you cracked open a device to inspect its guts—frozen in permanence and on display for both inspiration and convenience.

[via reddit | Thanks Buddy]

Fail Of The Week: Oil Expeller And Hasty PCB Layout

fotw-oil-extractor-hasty-pcb-layout

This Fail of the Week is a twofer. On the left we have an attempt to heat the output of an oil expeller. After a bountiful crop of sunflower seeds [Mark] picked up the oil expeller to make is own cooking oil. He tried to use the soldering gun as a heat source but after just a couple of minutes of on-time it melted the soldering iron’s plastic case. He’s looking for an alternate heat source but we wonder why he can’t just ditch the plastic and bolt this to a heat sink?

To the right is the product of hasty PCB layout. [Andrew] needed a USB to GPIO converter to use with his Android stick. He had built several of these before, etching the PCBs himself. But now he didn’t have the time to do his own etching and figured he could lay out a revision of the board and have it fabbed. Turns out this isn’t the time saver he had hoped. Problems with the location of silk screen labels aren’t a huge deal, but the ‘V’ in the board where his USB connector is located blocked any cable he tried to plug in. A bit of cutting solved that but he also had to deal with spring terminals whose leads wouldn’t fit the diameter of holes drilled in the board. We always print out the Gerbers and compare the footprints to our parts before submitting to the fab house. But we’re not sure we would have caught the USB cable clearance issue doing it that way. What checklists do you use before submitting your own boards?


2013-09-05-Hackaday-Fail-tips-tileFail of the Week is a Hackaday column which runs every Wednesday. Help keep the fun rolling by writing about your past failures and sending us a link to the story — or sending in links to fail write ups you find in your Internet travels.

Oculus Releases Open Source Hardware

Latency

Oculus VR, makers of the very cool Oculus Rift VR display, are making their first steps towards open hardware. Their first project is a latency tester, meant to precisely measure the latency of a VR setup or application. This is true open hardware with everything – the firmware, schematics, and mechanical parts all available on GitHub

Inside this neat bit of hardware is a STM32F102 microcontroller and a TCS3414 color sensor. The firmware is designed to measure changes in color and send that data back to a computer with a timestamp.

Not only are the schematics and board files available, there are also a few links to buy the PCBs at OSH Park: for about $24, you can get three copies of the main PCB and sensor board delivered to your door. If you have a 3D printer, Oculus has provided the .STL files to print out the enclosure for this device.

While this is a fairly niche product, we’re amazed at how well the Oculus folk have put together this open source hardware project. Everything you need to replicate this product, from board files, mechanical design, firmware, and instructions on how to build everything is just right there, sitting it a GitHub. Wonderful work.

Building A Cessna 172 Simulator

plane

As anyone who has downloaded Microsoft Flight Simulator X or X-Plane knows, piloting an aircraft using a keyboard and mouse just doesn’t work. If you’re going to get in to the world of flight simulators, it’s best to go all-in. [Stevenarango] knows this and built a great Cessna 172 cockpit for his personal use.

All the gauges, instrument panels, and controls are from Saitek, one of the best manufacturers of home/hobbyist flight controls. The instruments were mounted on a 5mm piece of PVC, which is mounted on a C172 cockpit-sized wooden frame. All the instruments, from the throttle, pedals, yoke, trim wheel, individual LCD steam gauges, and multi panel are driven by USB.

As for the actual simulation, [Steven] is using a fairly powerful computer running Flight Simulator X with dual monitors – one for the glass cockpit and another for the windscreen. It’s not quite the same scale as building a 737 in your garage, but it’s more than sufficient for an awesome flight simulator experience at home.