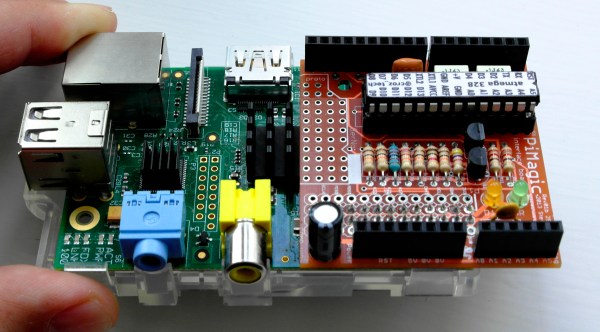
The Raspi GameBoy For The Rest Of Us

We’ve seen quite a few casemods that stuff a Raspberry Pi into a Game Boy with all the required to turn it into a very cool portable Pi and retro gaming device. Most of these builds use a modified 20-year-old Game Boy for the enclosure, and if you have an attachment to your old green screened friend, you might not want to cut it up for a Pi project. [Noe] over at Adafruit has a solution – a 3D printed Game Boy enclosure that turns a Pi and TFT screen into a barely pocketable Raspberry Pi, with all the buttons and batteries required for taking an installation of RetroPi on the road.

The PiGRRL, as this build is called, uses the Adafruit touchscreen TFT kit for the Pi, effectively turning the Pi into a very tiny tablet. This allows for normal desktop interaction with the Pi, and it’s also small enough to fit in the smallest of enclosures.

The 3D printed enclosure is the star of the show here, allowing complete access to most of the Pi’s ports, while allowing enough space in the rest of the enclosure for a largish battery, charging circuit, and buttons taken from an SNES controller.

The end result is a very usable portable Pi that just happens to be in the perfect form factor for loading up a few ROMs and playing some classic video games. Video below.

Continue reading “The Raspi GameBoy For The Rest Of Us”

Move Over Humans And Things, Flowers Now On The ‘Net

Tweeting Poppy Plants

The ‘Internet of Flowers’ is upon us thanks to an artist named [Adrian]. He has designed a project that not only monitors the growth of Poppy Flowers but also monitors the soil, air and surrounding activity.

The entire project is based on a Raspberry Pi mounted in a purpose-built enclosure made from laser cut birch plywood. The enclosure is mounted in a window of an adjacent building that has a view of the flower bed. An internally mounted camera was carefully aligned so its field of view was mostly of the plants and would limit taking photos of unknowing passersby. The camera takes a snap shot every 5 minutes, see the time lapse video below.

Tweeting Poppy PlantsA box containing sensors is installed in the flower bed. The intent of this project was not to have the Raspberry Pi spit out hard factual data regarding soil moistness, temperature and ambient noise, but to instead take that data from the sensors and send out a story-like narrative that makes the communication feel more personal. To receive these comments from the poppies, you can follow them on Twitter: @tweetingpoppy.

Continue reading “Move Over Humans And Things, Flowers Now On The ‘Net”

Retro Gaming Console, Now With Internet Radio

RaspPi Retro Gaming Console with Internet Radio

Do you ever miss your gaming system of yesteryear? [yv3] did so he built a retro gaming console. Even though [yv3] likes his old school games, he didn’t want to be stuck listening to old school 8-track tapes while playing those games. The solution for him was to build a retro gaming console with integrated internet radio.

The gaming portion of the build relies on RetroPie. The RetroPie disk image contains all of the software and emulators needed to turn a Raspberry Pi into a dedicated retro gaming system. The RetroPie project supports a lot of gaming systems, [yv3] chose to include Atari, Sega Master System and Genesis, NES, SNES, and Turbografx-16.

Raspberry Pi Internet Radio manages the radio portion of this project and is set up to start playing automatically when the unit is powered on. There are 5 buttons to change the station, volume and settings. The radio stations are managed by a text file residing on the SD card. Audio from the radio can be directed to either the HDMI or the analog out of the RaspPi.

Continue reading “Retro Gaming Console, Now With Internet Radio”

Tetris Duel With The Raspberry Pi

Tetris Duel

Building a multiplayer network game with multiple Raspberry Pis can be very difficult. Doing it in assembly is outright insane! This is exactly what a group of first year students at Imperial College London did; they created a network based multiplayer Tetris game for the Raspberry Pi.

[Han], [Piotr], [Michal], and [Utsav] have created this entire game from bare metal assembly, and it only consists of 4000 lines of code! The code is well documented, so be sure to look through their Github repository. This project is a great reference for those looking to learn bare metal assembly and networking. They even chose to use the old NES controllers, a very nice touch. While we have featured what seems like a million different Tetris games in the past, this is the first multiplayer version. See Tetris Duel in action in the video after the break!

This is a shout-out to all of you students out there. Take the time to create quality documentation for your class project, and upload it to the internet. Not only is it a great resume boost, but it could very well end up on Hackaday!

Continue reading “Tetris Duel With The Raspberry Pi”

Simple Touch Controller Frees Up USB Port

touch screen demonstration using text

[typ.o] was working on a Raspberry Pi project and found himself running short on USB ports. The project required a touch screen interface, which takes up one of the ports. Since he was only using the screen in text mode, he decided to ditch the original USB controller and make his own.

The ever popular Attiny85 is deployed to handle the task, and is interfaced between the resistive touch panel and the Raspberry pi, using only three pins from the GPIO port. The Attiny85 runs off the 3 volt supply from the raspi, so no level shifter is needed, helping to keep his board super simple.

The calibration and calculation of the touched character location is done by a Python script running on the raspi. [typ.o] is a fan of the KISS principle, and it shows. Be sure to check out his site for all source code, schematics and a video demonstrating this simple but effective solution.

Programming Pi Games With Bare Metal Assembly

pifoxWhile the most common use for a Raspberry Pi is probably a media center PC or retro game emulator, the Pi was designed as an educational computer meant to be an easy-to-use system in the hands of millions of students. Team 28 at Imperial College London certainly living up to the Raspberry Pi Foundation’s expectations with their bare metal assembly clone of Star Fox, aptly titled PiFox.

This isn’t the first time a college course has taken up the task of developing software for the Pi without an operating system; a few years ago, Cambridge University started that off with a series of bare metal tutorials for the Pi that included drawing graphics on the screen and playing around with USB keyboards. PiFox greatly expands on what those early tutorials could do, reading an NES joystick from the GPIO pins, sound with DMA, and rendering 3D objects.

If you’d like to build PiFox for yourself, or better yet, expand on the existing build, all the code is up on Github. There’s also a Raspberry Pi emulator for Linux, just in case you have an ARM assembly bug you just can’t scratch with a Raspberry Pi.

Continue reading “Programming Pi Games With Bare Metal Assembly”

Raspberry Pi Bluetooth Receiver For Your Car Stereo

RasPi Car Audio

The ability to play music in your car over a Bluetooth connection is very handy. You can typically just leave your phone’s Bluetooth module turned on and it will automatically pair to your car. Then all you have to do is load up a music player app and press play. You don’t have to worry about physically tethering your phone to the car every time you get in and out of the vehicle. Unfortunately Bluetooth is not a standard option in many cars, and it can be expensive to buy an aftermarket adapter.

[parkerlreed] built his own solution to this problem using a Raspberry Pi. He first installed arch Linux on his Pi. He also had to install pulseaudio and bluez, which is trivial if you use a package manager. He then modified some of the Linux configuration files to automatically bring the Pi’s Bluetooth adapter online once it is initialized by the kernel.

At the end of the boot sequence, the Pi is configured to automatically log in to a virtual console as [parkerlreed’s] user. The user’s bashrc file is then altered to start pulseaudio in daemon mode at the end of the login sequence. This allows the Pi to actually play the audio via the Pi’s sound card. The Pi’s stereo output jack is then plugged into the vehicle’s auxiliary input jack using a standard audio cable.

The Reddit post has all of the configuration details you would need to duplicate this setup. [parkerlreed] also includes some commands you will need to setup the initial pairing of the Raspberry Pi to your smart phone. Be sure to watch the video demonstration below. Continue reading “Raspberry Pi Bluetooth Receiver For Your Car Stereo”