In-N-Out Boards Sans Hamburgers

board Before this project, [David]’s office had a fairly terrible system to tell everyone who was in the office, who was out, and who wasn’t coming in today. Velcro and whiteboards will do the job, but arcade buttons and LEDs called to [David], leading him to create this In/Out Status Board.

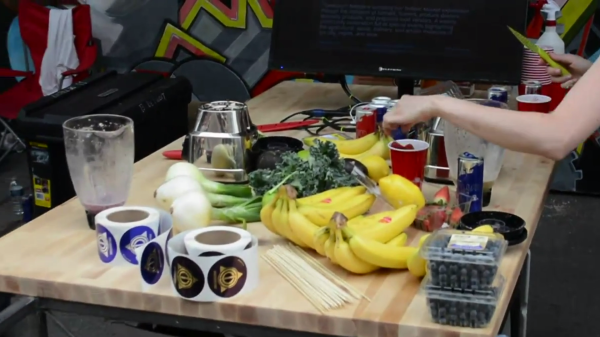
The old system consisted of a whiteboard on the side of each partition, with velcroed labels indicating if a particular person was in the office today, out, sick, or on holiday. Inconvenient to change, and there was no single place everyone could look to see if a particular person was in or not. The new system consists of a four-person pod with four arcade buttons and WS2811 LEDs, an Arduino Nano, and a 433 MHz radio. The main panel is just a bigger version of the four-person pod, keeping track of everyone in the office.

A single button switch will change a person from being in to being out, with longer presses necessary for ‘sick’ and ‘vacation’. It’s interesting to note what’s not included in this build: A fingerprint scanner was out of the question, because that would effectively eliminate anyone ever being marked as ‘sick’. An RFID tag reader was out for the same reason. Also not included is a display. That’s just fine, really – [David] won’t be changing the labels very often, anyway, and that would just add to the cost and complexity of the project.

Red Bull Creation: Omnicorp: This Time, They’re Not Evil

While the bulk of the building for the Red Bull Creation happened at a recycling center/art space in Detroit, the judging was at Detroit’s Eastern Market, a huge farmer’s market that has just about everything. The Omnicorp hackerspace is just off Eastern Market, so this is their territory: they know what will work. For their entry for this year’s RBC, they’re going local: a wheeled information kiosk that’s also a great place to make smoothies and grill up a few veggies and dogs.

While the information kiosk the team is commendable, the idea of giving all the visitors to the Red Bull Creation event a halfway decent lunch is a great idea: all the ingredients are already there, so all that’s needed is an extension cord and a little bit of charcoal.

After the Red Bull Creation event is where this project would have really shined: hundreds of people going through at least six kegs, fireworks, a friggin’ dragon dump truck, and a DJ loud enough to be heard a half mile away. We’ll get to that in a post tomorrow. Let’s just say our head editor had fun.

Demystifying NTSC Color And Progressive Scan

NTSC

Black and white NTSC is simple – it can, and was, done with vacuum tubes for a long, long time. Color is just weird, though. It runs at 29.976 frames per second, uses different phases of the carrier for different colors, and generally takes a while to wrap your head around. [Sagar] is doing a series on the intricacies of NTSC, and the latest post deals with color and progressive scanning versus interlacing, or as it is better known, how classic game consoles and home computers generate video.

The test bed for [Sagar]’s video experimentations is a circuit containing an ATMega16, a 4-bit shift register, and a 14.31818 MHz clock. This clock is much faster than the 3.579545 MHz clock in an NTSC carrier frequency – exactly four times as fast – allowing the shift register to output four different phases of the carrier frequency a 0°, 90°. 180°, and 270°. Playing with some of the pins on the ATMega in the circuit results in a palette being generated on any old TV.

NTSC requires interlaced scanning, or sending an entire screen of even lines, then an entire screen of odd lines, at around 60 fields per second. The Nintendos and Segas of yesteryear didn’t bother with this, instead opting to send half the vertical resolution at double the frame rate. This is known as a progressive scan. [Sagar] found that this resulted in some image artifacts when displayed on a modern LCD, and moving back to an interlaced mode fixed the problem. All the code and files are up on the gits. If you’re feeling adventurous, this is exactly how projects like the Uzebox have created homebrew game consoles using little more than the ATMega found in [Sagar]’s build.

Pinoccio: Mesh All The (Internet Of) Things

PinnThere’s a problem with products geared towards building the Internet of Things. Everyone building hardware needs investors, and thus some way to monetize their platform. This means all your data is pushed to ‘the cloud’, i.e. a server you don’t own. This is obviously not ideal for the Hackaday crowd. Yes, IoT can be done with a few cheap radios and a hacked router, but then you don’t get all the cool features of a real Things project – mesh networking and a well designed network. Pinoccio is the first Thing we’ve seen that puts a proper mesh network together with a server you can own. The Pinoccio team were kind enough to let us drop in while we were in Rock City last weekend, and we were able to get the scoop on these tiny boards from [Sally] and [Eric], along with a really cool demo of what they can do.

The hardware on the Pinoccio is basically an Arduino Mega with a LiPo battery and an 802.15.4 radio provided by an ATmega256RFR2. The base board – technically called a ‘field scout’ – can be equipped with a WiFi backpack that serves as a bridge for the WiFi network. It’s a pretty clever solution to putting a whole lot of Things on a network, without having all the Things directly connected to the Internet.

Programming these scouts can be done through Arduino, of course, but the folks at Pinoccio also came up with something called ScoutScript that allows you to send commands directly to any or all of the scouts on the mesh network. There’s a neat web-based GUI called HQ that allows you to command, control, and query all the little nodules remotely as well.

In the video below, [Sally] goes over the basic functions of the hardware and what it’s capable of. [Eric] was in Reno when we visited, but he was kind enough to get on a video chat and show off what a network of Pinoccios are capable of by emblazoning their web page with Hackaday logos whenever he presses a button.

Continue reading “Pinoccio: Mesh All The (Internet Of) Things”

Raspberry Pi Turns A Novelty Radio Into A Real Computer

picomp

[Strider19] remembers the 90’s, and a great little novelty radio he had back then. Shaped like a computer, the radio was a typical AM/FM affair, with the monitor serving as a speaker. His original radio was long gone, but [Strider19] was able to find a replacement on everyone’s favorite auction site. With the replacement radio in hand, he set his plan in motion: Turning it into an epic Raspberry Pi Case.

The Raspberry Pi fit great, but [Strider19’s] 3.5″ composite monitor didn’t quite make it. Following in [Ben Heck’s] footsteps, [Strider19] cut the LCD’s control PCB down to fit the case. A piece of clear polycarbonate protects the fragile LCD from poking fingers. The monitor’s button board, two USB ports, and an external composite input mounted nicely inside the former battery compartment at the rear of the CRT. There’s even enough room back there to hide a USB WiFi adapter.

The Raspi itself fit perfectly into the base of the radio, along with a DC to DC converter, USB hub, real-time clock module, and a whole bunch of wires used to extend the connectors.

The final result is awesome! Thanks to a request on [Strider19’s] Reddit thread, we have pictures of Doom running on a (former) radio.  Even Windows 3.1 runs under DosBox, though it took a bit of tweaking to get the display settings just right. Now [Strider19] just needs to figure out how to turn that tiny keyboard into a working model. We think some old school cell phone keyboard hacking may be in order!


Judge Spotlight: Joe Grand

judge-spotlight-joe-grand

We’ve been fascinated by [Joe Grand] for years. His early talks at DEFCON, and extensive work designing badges for it, helped to put the conference on our radar. We’ve seen many pieces of hardware come from his company Grand Idea Studio over the years, and of course there was the television show Prototype This! which must have been way too awesome for some TV exec to allow it to continue.

We asked [Joe], who is a judge for The Hackaday Prize, a few a questions. He sent back the video response embedded below. He talks about what he’s doing these days, the hacker community in Boston, shows off some hardware he uses when teaching about security, and much more.

Continue reading “Judge Spotlight: Joe Grand”

Retrotechtacular: AT&T’s Hello Machine

1ESS
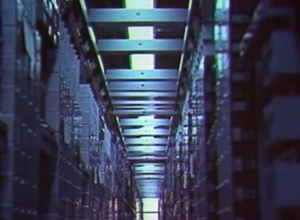
How many Ma Bell employees does it take to build an ESS mainframe? This week, Retrotechtacular takes you into the more poetic recesses of the AT&T Archive to answer that very question. This wordless 1974 gem is an 11-minute exploration of the construction and testing of a Western Electric 1ESS. It begins with circuit board population and ends with lots of testing.


tree

The film is really quite groovy, especially the extreme closeups of wire wrapping and relay construction. The soundtrack is a string-heavy suite that moves you through the phases of bringing up the 1ESS while drawing parallels to the wires of communication. You may lose count of the punch down blocks and miles of cables, but there are surprisingly few mustaches.

Continue reading “Retrotechtacular: AT&T’s Hello Machine”