Hackaday Prize Entry: An Electric Longboard

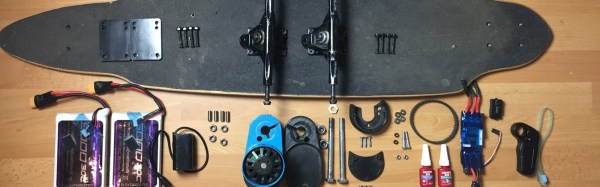
The Hackaday Prize is in full swing, and that means we’re starting to see all the builds a few select people have been saving up for the past few months. [yowhwui] has been working on a 3D printed electric longboard for a while now, and this build is really solid. He already has over 150km on the odometer, and the 3D printed parts are still holding up.

The power for this motor comes from a 6374 brushless motor running at 192 kV. This, plus two 4S 30C 5000mAh LiPo batteries propel this longboard to speeds up to 42 km/h (2.18 Saxon leagues per quarter hour), all while weighing about 8kg.

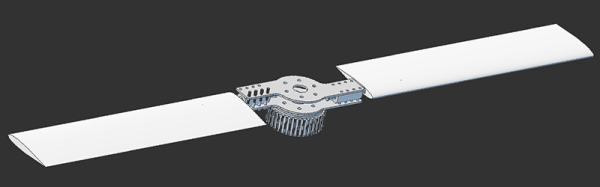
Since [yowhwui] is using the motor for power and braking (electric motors are neat), this longboard needs to be designed with belt skipping in mind. To that end, he’s designed a drive system with an idler, and nearly every single part is 3D printed. The first revision of the hardware was printed in PETG. While PETG was more than strong enough, it was also too brittle. This led to a few cracks. After printing the parts out again in ABS, [yowhwui] put a few more kilometers on this longboard, and there are no immediate signs of wear.

Hackaday Prize Entry: WiFi In Wall Switches

The Internet of Things and Home Automation are the next big thing, even though we’ve had X10 switches and controllers for forty years. Why the sudden interest in home automation? Cheap microcontrollers with WiFi, ZigBee, and Z-wave, apparently. For this Hackaday Prize entry, [Knudt] is building a WiFi switch, meant to be retrofitted into any Euro wall switch.

There are three parts of [Knudt]’s WiFi wall switch, each of them with different requirements. The top layer is the switch itself and a small OLED display. These switches are really two small capacitive switches, which means there’s no reason to go through the work of sourcing a proper mechanical switch. Good thinking, there. The second layer of this contraption is basically an ESP8266, providing all the logic for this wall switch. The bottom layer is a bit more interesting, housing the 110-230V input, with a Triac or relay. This is where the fun, burny stuff happens.

Right now, you can go down to your local home supply store and simply buy a device like this. History has shown that’s a terrible idea. With home automation cloud services shutting down and security vulnerabilities abound, a DIY or Open Source home automation project really is the best idea. That makes [Knudt]’s project a great entry for the Hackaday Prize.

Hackaday Prize Entry: Pocket Serial Terminal

When you have a microcontroller or other microcomputer on the bench in front of you and it lacks the familiar keyboard and display of a modern desktop computer, what do you do when you wish to program it or otherwise issue commands? Unless you are a retro computer enthusiast who longs for a set of Altair-style toggle switches, the chances are you’ll find its serial port and attach a terminal.

Serial terminals, devices containing a screen and keyboard hooked up to send and display text from a serial port, used to be a staple of computing, but as standalone devices, they’re now rather rare. In most cases nowadays using a serial terminal will mean opening up a terminal emulator in your modern OS, Linux, Windows, or MacOS, but there is still a use for standalone hardware. [Kuldeep Singh Dhaka] certainly thinks so, because he’s making an extremely nice portable terminal with an LCD screen.

The terminal emulates a venerable DEC VT-100 terminal, but since it’s built around an STM32F105 ARM microcontroller we’re sure it could emulate other models with appropriate software. It takes either a USB or a PS/2 keyboard, so we’d expect to see it paired with a suitably tiny portable keyboard when it in use. There is no source code available for it yet since this is very much still a project in development that we’re featuring now because it is a 2017 Hackaday Prize entry, but he assures us that code will be on its way and it will be GPL licenced.

He’s even posted a video that we’ve placed below the break of the device in operation, connected to a machine running MicroPython. We’d probably turn off that beep, though.

Continue reading “Hackaday Prize Entry: Pocket Serial Terminal”

Hackaday Prize Entry: Modular Instrumentation For Aircraft

Parts, tools, and components for aviation and aerospace are sold in ‘Aviation Monetary Units’ (AMU). Right now, the conversion factor from USD to AMU is about 1000 to 1. This stuff is expensive, but there is a small portion of the flying community that prides itself on not breaking the bank every time something needs to be replaced. Theses are often the microlight, ultralight, and experimental aircraft enthusiasts. Steam gauges are becoming obsolete and expensive to repair, and you’re not going to throw a 15 AMU Garmin G500 in an ultralight that only costs 10 AMU.

To solve this problem, [Rene] is turning to sensors, displays, and microcontrollers that are cheap and readily available to build modular aviation instruments.

As with all aviation gear, the first question that springs to mind is, ‘what will the FAA think about this?’. [Rene] is in South Africa, so the answer is, ‘nothing’. If a few American pilots decide to build one of these, that’ll fly too; these are instruments designed for non-type-certified aircraft. That’s not to say there are no rules for what goes into these aircraft, but the paperwork is much easier.

Right now, the design goals for [Rene]’s instruments is under 0.1 AMU per module, robust, RF shielded, with engine monitoring, fuel management, heading, air and ground speed, altitude, attitude, and all the other gauges that make flying easy. He’s using a CAN bus for all of these modules, and in the process slowly dragging the state of the art of ultralight aviation into the 1990s. It’s fantastic work, and we can’t wait to see some of these modules in the air.

World Create Day: The Hackaday Event In Your Town

It’s official, World Create Day is on April 22nd. Get together with hackers in your area and create something! This is best way to meet all the Hackaday readers in your area, and a great excuse to carve out a few hours of your busy life to have fun working on a project.

These are really easy to organize, but we can’t do it without you. Sign up now to host a meetup in your town!

The Hackaday community around the world will meetup and spend time building together on Saturday, April 22nd. If you’re like us you have a long list of projects you want to do ‘some day’, this is the day. Pack up your current build (or grab gear to start a new one), get together with some old and new friends, and hack on your projects with each other.

It’s traditional to block out a bit of time at the end for lightning talks to show off the builds each of you has been working on. Don’t forget to take pictures and post the story of your World Create Day meetup. We enjoyed getting a great look at many of last year’s meetups this way and want to expand the builds we feature on the front page this year.

Meetup Organizers Wanted

Fill out this form to let us know you want to host a meetup.

This is the second year of World Create Day. Last year we saw meetups in 64 cities. Many of those will happen again this year, but we also need you to organize an event in your area. We’ll help you get things set up and put your event up on the big map so others in your area will plan to join in. Do it now, if we get your shipping info early we’ll send you stickers and other swag to hand out at your gathering.

Build Something that Matters

The core of World Create Day is to stop making excuses and just build something. Since you’re already getting together with other people consider forming a team to enter the 2017 Hackaday Prize. Currently we’re in the idea phase: Design Your Concept means tackling a problem and planning a build to solve it. When you get a bunch of creative people together in one place, great ideas begin to flow. Seize the moment by turning that creativity into an entry for the Hackaday Prize and see where it takes you!

Hackaday Prize Entry: Micro Matrix Charlieplexed Displays

If you need a very thin, low power display that doesn’t use a whole bunch of pins on your microcontroller, [bobricius] has just the thing for you. His entry to the Hackaday Prize this year is a Charlieplexed LED display. With this board, you can drive 110 LEDs using only 11 GPIO pins.

Charlieplexing is a bit of a dark art around these parts. That’s not to say the theory is difficult; it’s really just sourcing or sinking current from a GPIO pin and arranging LEDs unparallel to each other. The theory is one thing, implementation is another. To build a Charlieplexed LED matrix, you need to go a bit crazy with the PCB layout, and god help you if you’re doing this point-to-point on a perf board.

Somehow, [bobricius] managed to fit 110 LEDs on a PCB, all while managing to break out those signal wires to a sensible set of pads on one side of the board. Only eleven pins are required to drive all these LEDs, making this project a great foundation for some very cool wearables or other projects that require a bright, low-res display.

Since [bobricius] can put 110 LEDs on a small board, he can obviously take LEDs away from that board. That’s what he did with his cut down version designed to be a clock. Both are great little boards, and the perfect solution for tiny displays for low-pin-count micros.

Continue reading “Hackaday Prize Entry: Micro Matrix Charlieplexed Displays”

Hackaday Prize Entry: Electric Variable Pitch Props

Barring the smallest manned airplanes, most aircraft that are pulled around by a prop have variable pitch propellers. The reason for this is simple efficiency. Internal combustion engines are most efficient at a specific RPM, and instead of giving the engine more gas to speed up, pilots can simply change the pitch of a propeller. With a gas powered engine, the mechanics and design of variable pitch propellers are well understood and haven’t really changed much in decades. Adding variable pitch props to something pulled around by an electric motor is another matter entirely. That’s what [Peter McCloud] is building for his entry to the Hackaday Prize, and it’s going into the coolest project imaginable.

This project is designed for a previous Hackaday Prize entry, and the only 2014 Hackaday Prize entry that hasn’t killed anyone yet. Goliath is a quadcopter powered by a lawnmower engine, and while it will hover in [Peter]’s test rig, he’s not getting the lift he expected and the control system needs work. There are two possible solutions to the problem of controlling the decapatron: an ingenious application of gimballed grid fins, or variable pitch rotors. [Peter] doesn’t know if either solution will work, so he’s working on both solutions in parallel.

[Peter]’s variable pitch rotor system is basically an electronic prop mount that connects directly to the driven shafts on his gas-powered quadcopter. To get power to the electronics, [Peter] is mounting permanent magnets to the quad’s frame, pulling power from coils in the rotor hub, and rectifying it to DC to drive the servos and electronics. Control of the props will be done wirelessly through an ESP32 microcontroller.

Variable pitch props are the standard for everything from puddle jumpers to acrobatic RC helis. In the quadcopter world, variable pitch props are at best a footnote. The MIT ACL lab has done something like this, but perhaps the best comparison to what [Peter] is doing is the incredible Stingray 500 quad. Flite Test did a great overview of this quad (YouTube), and it’s extremely similar to a future version of the Goliath. A big motor (in the Stingray’s case, a brushless motor) powers all the props via a belt, and the pitch of the props is controlled by four servos. The maneuverability of these variable pitch quads is unbelievable, but since the Goliath is so big and has so much mass, it’s doubtful [Peter] will be doing flips and rolls with his quads.

You can check out a video of [Peter]’s build below.

Continue reading “Hackaday Prize Entry: Electric Variable Pitch Props”