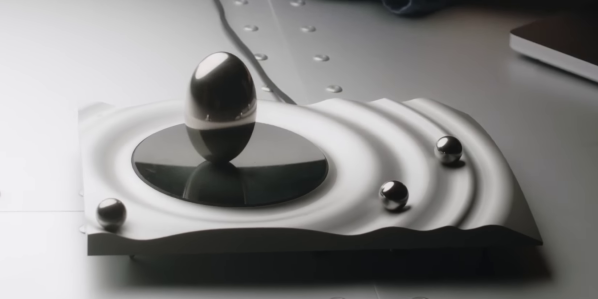
How Fast Can You Spin A LEGO Wheel By Hand?

It’s not a question you ask yourself every day, but it’s one that the [Brick Experiment Channel] set out to answer: how fast can you spin a LEGO wheel by hand? In their typical way, they set about building an increasingly complex contraption to optimize for the very specific case of maximum RPM.

The build starts with a LEGO wheel fitted to an axle, supported in two LEGO Technic beams. A white flash mark is also attached onto a part of the axle for measuring the rotational speed with a photo-tachometer. A first attempt gets as fast as 1,700 RPM. Upgrades come thick and fast , and with a three-stage compound geartrain, the handcranked wheel reaches 6,300 RPM.  Adding a further stage introduces the problem that the plastic Technic axle begins to twist under the torque input by the hand.

Taking a new approach of pulling on a string to turn the wheel, the first attempt nets 8,300 RPM. Gearing pushes this further to 12,900 revs, but adding more gears again leads to the problem of axles bending under the strain. A bidirectional rope pull design helps, though, and the system reaches 13,100 RPM.

Some of the parts have been damaged thus far, but a rebuild with fresh parts that are nicely lubricated provides a huge boost. The now-slippery shafts run smoother and the wheel hits a blistering 19,300 RPM as the mechanism disassembles itself.

It’s a less complex pursuit than some earlier works from [Brick Experiment Channel], like the impressive pole climbing designs we’ve seen previously. However, it’s a video that shows the power of iterative design and the gains possible from that process.
Continue reading “How Fast Can You Spin A LEGO Wheel By Hand?”

Homemade Toy Wind Tunnel Blows (Really Well)

Sometimes a kid wakes up on Christmas morning and runs downstairs, only hoping to see one thing: a shiny new wind tunnel. This past December, that’s exactly what [SparksAndCode]’s son found under beside the tree, complete with a bag of scarves, ping-pong balls, and other fun things to launch through it (in the name of physics, of course).

The real story here starts about a week before Christmas, when [SparksAndCode]’s son was enthralled by a similar device at a science museum. At his wife’s suggestion, [SparksAndCode] got to work designing a and building a wind tunnel with hardware-store parts, his deadline looming ahead. The basic structure of the tunnel is three rods which support plywood collars. The walls are formed by plastic sheets rolled inside the collars to make a tube. Underneath, a Harbor Freight fan supplies a nice, steady stream of air for endless entertainment.

After finding a few bugs during his son’s initial beta testing on Christmas morning, [SparksAndCode] brought the wind tunnel back into the shop for a few tweaks and upgrades, including a mesh cover on the air intake to stop things from getting sucked into the fan. The final result was a very functional (and fun!) column of air. Looking for even more function (but not necessarily less fun)? We’ve got you covered too with this home-built research wind tunnel from a few years back.

Continue reading “Homemade Toy Wind Tunnel Blows (Really Well)”

Color Dot Puzzle Will Wrinkle Your Brain

2022 is a good year for puzzles, and if you’re getting tired of Wordle, you might be after a new challenge. This color puzzle from [Sebastian Coddington] could be just what you’re looking for. 

[Sebastian] describes the 4×4 Color Dot Puzzle as a sort of combination of the ideas behind the Rubik’s Cube and the 15 puzzle. The aim is to arrange the 16 colored tiles on the board to form four single-colored 2×2 squares in the overall 4×4 board. The puzzle is 3D printed, using 6 colors of filament – black for the body of the puzzle, white for the control sticks, and yellow, green, red, and blue for the individual tiles.

We haven’t seen any mathematical proofs of how to beat the game, but we’re sure [Sebastian] has gotten good at beating the puzzle having designed it himself. According to tipster [Michael Gardi], who knows a thing or two about 3D printing games himself, the puzzle makes for a fun little mind teaser.

If you’re more of a jigsaw person, consider this advanced illuminated build.

Building Forged Carbon Fiber Wings For Radio Control Cars

When it comes to building decent aerodynamic devices, you want to focus on getting your geometry accurate, and making sure your parts are strong enough to deal with the force they’re generating. This build from [Engineering After Hours] delivers on those fronts, consisting of a high-downforce wing for a small RC car.

The video points out that, at best, even a decent RC car will have pretty crappy aerodynamic parts from the factory, with a lift-to-drag (L/D)ratio of 2-3:1 at best. This means that, while they may create some small amount of downforce, they’re also creating plenty of drag at the same time.

The dual-element wing designed here is much more efficient, hitting an L/D ratio in the vicinity of 17:1 – a huge improvement. Even a casual eye can note that the design looks a lot more like something you’d see on a full-size car, versus some of the whackier designs seen on toys.

The wing is built with a forged carbon fiber process using 3D-printed molds, to give the wing plenty of strength. Given that it’s built for an RC car that can do over 100 mph, making sure the wing is stiff enough to perform at speed is key.

[Engineering After Hours] does a great job of showing how to prepare the molds, fill them with carbon fiber, and pour the resin, and discusses plenty of useful tips on how to achieve good results with the forged carbon process.

The result is an incredibly impressive rear wing with aerodynamic performance to match its good looks. It may be more complicated than 3D printing, but the results of the work are that much tougher.

We’ve seen other aero experiments from [Engineering After Hours] before, too. Video after the break.

Continue reading “Building Forged Carbon Fiber Wings For Radio Control Cars”

The PawPet board in a 3D-printed case, with a d-pad on the right and four buttons on the left. On its small monochrome screen, there's a cat-like pet looking at you.

Reject Modernity; Return To Tamagotchi

Browsing through the recent projects on Hackaday.io, we’ve found this entry by [NanoCodeBug]: a single-PCB low-power trinket reviving the “pocket pet” concept while having some fun in the process! Some serious thought was put into making this device be as low-power as possible – with a gorgeous Sharp memory LCD and a low-power-friendly SAMD21, it can run for two weeks on a pair of mere AAA batteries, and possibly more given a sufficiently polished firmware. The hardware has some serious potential, with the gadget’s platform lending itself equally well to Arduino or CircuitPython environments, the LCD being overclock-able to 30 FPS, mass storage support to enable pet transfer and other PC integrations, a buzzer for all of your sound needs, and an assortment of buttons to help you create mini-games never seen before. [NanoCodeBug] has been working on the hardware diligently for the past month, having gone through a fair few revisions – this is shaping up to be a very polished gadget!

There’s no wonder that people love to start Tamagotchi-like projects – something special happens when an electronic device invokes the same feelings that we’d get while caring for our own pet, and this project does justice to the idea. With homebrew Tamagotchi projects, there’s a trend – once hardware is finished, the software doesn’t always get to a usable stage, feeling more like an afterthought. There’s a hacker twist that should help us subvert this trend, however – [NanoCodeBug] has shared all sources with us in a GitHub repository! If you would like to help with the “software” part, you can start working on that with just a few breakouts. The board files are also there, if you feel like the boards are marvelous enough for your liking to go through modern-day component sourcing pains.

Hackers have been playing with the “pocket pet” concept here and there, to delightful and unconventional results. If you’re on the lookout for other serious Tamagotchi recreation projects, this one takes the cake – otherwise, check out this furry Tamagotchi-like Tribble pet, disarming in its cuteness! If you’re one of our mischief-minded hackers, we have two posts to keep you entertained – one about dumping ROM on newer Tamagotchi toys, and another about building a WiFi-cracking one. And when it comes to the spirit of “what we have on hand” builds, this giant desktop-sized LED matrix Tamagotchi fits the bill pretty well!

Pi Powered 1:35 Scale Panther Tank

Tank aficionado [Daniel Zalega] has enjoyed playing around with armored fighting vehicles in the digital realm for years, but only recently realized he had the technology and skills necessary to take his passion into the physical world. Albeit on a slightly reduced scale. So he bought a 1:35 plastic model kit for the German WWII Panther tank from Tamiya, and started working on a way to make it move.

Luckily for [Daniel], the assembled model is essentially hollow. That gave him plenty of room to install the geared drive motors, batteries, motor controllers, voltage regulators, a servo for the turret, and the Raspberry Pi Zero that controls the whole show. Those with an aversion to hot glue would do well not to look too closely at the construction here, but it gets the job done. Besides, it’s not like this little Panther is going to see any front line combat.

Another element of the model kit that made it well-suited to motorization is the fact that it had real rubber treads. That meant [Daniel] just had to pop some holes in the side of the tank, and figure out how to mount the drive sprockets to his gear motors. Unfortunately it looks like the wheels are static on this model, meaning the tread has to be dragged over them. That’s certainly robbing the tank of some power and speed, but in the video after the break, you can see its movement is still fairly realistic.

To control the tank, he points his phone’s browser to a simple page running on the Raspberry Pi. By simply dragging a finger on the screen, you can operate the tank’s two independent treads and rotate the turret. [Daniel] said his original plan was more elaborate, with the web page displaying a live video feed from an onboard camera as well as the readings from various sensors. But at least for now, things are kept as straightforward as possible.

This certainly isn’t the first souped-up toy tank we’ve seen here at Hackaday. From gorgeous steam powered machines to this Tiger tank with a laser-assisted aiming system, these small tracked platforms have long been a favorite of hardware hackers.
Continue reading “Pi Powered 1:35 Scale Panther Tank”

The Cucumber House That LEGO Built

How far are you prepared to go to build a novelty seasonal ornament? Maybe a gingerbread house, or perhaps a bit of 3D printed glitter to hang on your Christmas tree. For [The Brick Wall], none of this was enough. Instead what was needed was a complete LEGO automated factory that builds a log cabin, from the unlikely raw material of cucumbers.

What has been created is the LEGO equivalent of a timber mill, with the various machines served by an overhead gantry crane. The cucumbers are trimmed to square, before being transferred to a saw which cuts out the notches for the interlocking corners. Another saw line chops the sections around door and windows to length, and finally the roof planks are cut in a vertical saw. The video below is reported as taking 83 days to complete from planning to filming, and 18 cucumbers to build the house. We’re not sure the cucumber will become a regular building material, but we salute the effort involved here.

Though this may be one of the biggest we’ve seen, we’ve featured many LEGO machines making things before.

Continue reading “The Cucumber House That LEGO Built”