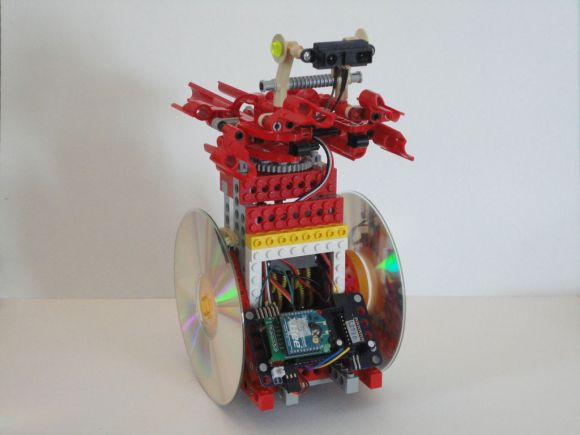
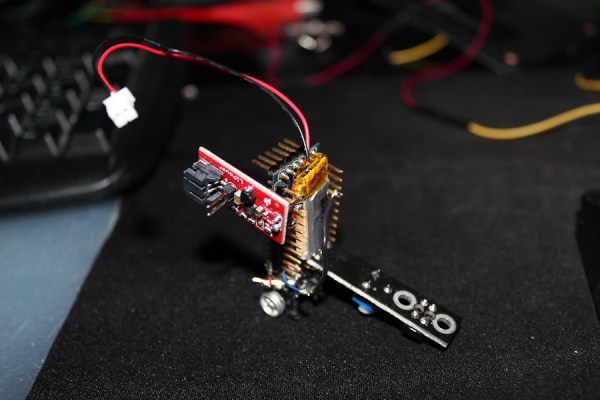
Becoming Gallagher In Your Mind

The folks at the Louisville hackerspace LVL1 created the handiest and the dandiest kitchen tool you’ve ever seen. It’s not a slicer, it’s not a dicer, or a chopper or a hopper; it’s… a Star Wars Force Trainer that blows up watermelons.

The project is called Mind Over Melon and was created by [Chris] and [Brad] at LVL1 for the CONNECT at Bernheim festival this past weekend. The idea behind the build is allowing people to explode a watermelon with their mind using a Star Wars Force Trainer EEG toy.

The build features the Force Trainer attached to an XBee module, wirelessly connected to the ground zero of watermelon destruction. When the operator of the device concentrates very hard, a series of LEDs light up and a solenoid dumps a shot of compressed CO2 into a watermelon.

[Brad] tells us instructions to build your own mental Sledge-O-Matic will be available on the LVL1 wiki shortly, but until then enjoy this video of the Mind Over Melon being featured on WHAS11 news.

S.H.I.E.L.D. Heli Carrier Brought To Life

This fantastic work by [Native18] shows a quad copter reproduction of the Heli carrier used by the Avengers. Following this thread (translated), you can follow along his thought process as well as his build process as he proceeds. The construction is mainly paper and lightweight foam, but it still manages to float and even take off from the water.

We’ve seen other aircraft carrier designs before, but not many this well polished, and none that took off from water.

[via technabob]

Continue reading “S.H.I.E.L.D. Heli Carrier Brought To Life”

The Dark Pi Rises

Ever wonder how an aerospace engineer would build a telepresence rover? Well, if [algorythmic] can be used as our reference, he’d cram a Raspberry Pi AND an Arduino into an RC truck frame.  The arduino is being used for motor control while the Raspberry pi is doing the communicating back and forth to the base. He’s using a ps3 controller as his interface and has slightly modified his PS3 eye for better night viewing.

Before you start shouting that using the raspberry pi AND the arduino is massive overkill, let us remind you that people don’t necessarily go buy/build all the parts for each project with a long-term goal in mind. He could have had both sitting there and realized that he didn’t need to add parts to either of them.

With the Raspberry Pi at the helm, this opens up all kinds of possibilities for adding features to make this an autonomous vehicle. Looking around his blog a little bit, it seems he’s done some visual recognition as well as voice control in the past. This could be interesting!


The $100 Tri-copter

We’ve seen lots of budget tri-copters, but $100 seems like a heck of a deal to us! Watching this video, you can see this home made tri-copter is incredibly agile and seems to handle quite well. Whats amazing is that [hallstudio] claims that it cost roughly $100. That price is really good compared to even the cheapest multi copters out there.

Much of the manufacturing cost associated with this kind of thing has been removed as the body is just cheap wood from the local hardware store. He even did an admittedly sloppy rig for his tail rotor, not that it looks like it has hurt his performance.  One cool feature is the fact that you can fold the front arms backward, allowing for the tri-copter to be shoved into a bag for easy transportation.

You can find a complete parts list on his video, but it looks like maybe his cost doesn’t figure in the cost of the radio controller. There are no build instructions, but a quick google search leads us to the rcexplorer tricopter which seems to be the template he used. There are full build details there.


[via Hackedgadgets]

Extending The Range Of The AR Drone, 2 Ways.

As I mentioned earlier, we’ve got an AR Drone to play with. One of the common mods that popped up on the internet were ways of extending the range on the AR Drone. It normally uses a local Wi-Fi connection to your phone or tablet for control and video signals. Many found this quite restrictive and have gone pretty far in extending that range.

The first and easiest was just to set up a higher power Wi-Fi Bridge where you’ll be flying. The Drone only has about 15db of wi-fi magic in it, so anything stronger than that is an improvement. There were too many variations on this to delve into the details, but as you see, there’s not much too it.

Continue reading “Extending The Range Of The AR Drone, 2 Ways.”

Controlling A Quadcopter With A Homebrew Remote

When [Matt] started building his multirotor helicopter, he was far too involved with building his craft than worrying about small details like how to actually control his helicopter. Everything worked out in the end, though, thanks to his homebrew RC setup built out of a USB joystick and a few XBees.

After a few initial revisions and a lot of chatting on a multirotor IRC room, [Matt] stumbled across the idea of using pulse-position modulation for his radio control setup.

After a few more revisions, [Matt] settled on using an Arduino Pro Mini for his flight computer, paired with a WiFly module. By putting his multicopter into Ad-hoc mode, he can connect to the copter with his laptop via WiFi and send commands without the need for a second XBee.

Now, whenever [Matt] wants to fly his multicopter, he plugs the WiFly module into his MultiWii board, connects his laptop to the copter, and runs a small Python script. It may not be easier than buying a nice Futaba transmitter, but [Matt] can easily expand his setup as the capabilities of his copter fleet grows.

Video of [Matt]’s copter in flight after the break.

Continue reading “Controlling A Quadcopter With A Homebrew Remote”

Lite Brites Fade, But LED Clocks Are Forever

litebrite-clock

Ahh, the Lite Brite.

What could be more fun than pushing dozens of little plastic pegs through a piece of black paper in order to create a pixelated, though colorful image? Well, I can think of quite a few things more engaging than that, and luckily so can [Lonnie Honeycutt] over at MeanPC.

While contemplating what to build with a pile of LEDs, his daughter came into the room with her portable Lite Brite. He thought that the pegs she was using looked awfully similar to the LEDs on his desk, so he did some test fitting and was surprised to see that they fit almost perfectly.

[Lonnie] thought that the toy would make an excellent clock, and his daughter happily agreed to let Dad do some tinkering. A few hours, an Arduino, and some Charlieplexing later, he had a nice looking clock that his kids were sure to enjoy.

If you’re interested in seeing more about how constructed, be sure to check out his YouTube channel and Instructable, where he happily provides all of the build details.