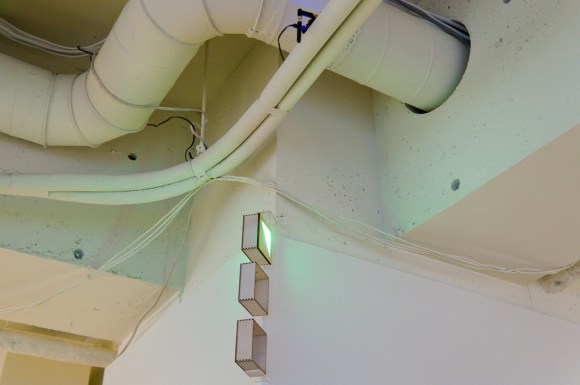
Cheap Biquad Antenna Extends LAN Between Apartments

[Danilo Larizza] is sharing a network connection between a couple of apartments. They are not far apart, but they are also not right next to each other so a set of external antennas is necessary. He built this 2.4 GHz biquad antenna on the cheap (translated) just to test if it improved the signal before he tried to buy a proper antenna. It turns out to work well enough that this is all that he needs.

The antenna itself is about one meter of thick wire bent into two squares which are 31mm on each side. The coaxial cable going to the router connects to the center portion of this antenna. For a bit better directional reception he added some tin foil as a reflector. Since this is outdoors he used a food storage container for protection (the antenna is mounted to the lid, the body has been removed for this picture). The whole things is perched on a stake in a flower pot with proper line of sight to the other antenna.

We’ve seen a very similar design used for an NRF 24L01+ radio. If you need more details that [Danilo] posted that would be a good project to study.

Wireless Speaker Made Using Arduinos And 2.4 GHz Tranceivers

[Texane] picked up a 2.4 GHz transmitter/receiver pair for transmitting sensor data wirelessly. After using them in a project he wanted to try pushing them a bit to see what the limits are when it comes to higher bandwidths. He ended up building a wireless speaker that transmits audio at about 90 KB/s. That link leads to a subfolder of his git repository. The code for this project is in the RX and TX folders, with images and video in the DOC folder.

The radio hardware that he’s using is a Nordic nRF24L01P chip which is available on a breakout board from Sparkfun. [Texane] mentioned to us that the chip includes error checking, packet ACK, and automatic retransmission. But these add overhead that can slow things down. The chip does offer the option to disable these features to get lower level access to the hardware. That’s exactly what he did and he mentions that the example code he wrote for the transmitter and receiver make every cycle count. This makes us wonder if it’s the speed of the ATmega328 chip that is the bottleneck, or the transceivers themselves?

EVE Radio Breakout Board For The Raspberry Pi

The Raspberry Pi is an excellent tool to build the ‘Internet of things’ we’ve been hearing about, but there’s still the issue of connecting the Raspi to other devices. The EVE Alpha – a breakout board for several wireless radio modules for the Raspberry Pi – hopes to change that with their Kickstarter campaign.

The idea behind the EVE is to provide a link between low-power radio modules found in a few of the microcontroller projects we’ve seen and the Raspberry Pi. It does this by simply serving as a breakout board, taking the GPIO pins on the Raspi and connecting them to solder pads for a few of the many radio modules currently available.

Already the EVE supports the RFM12B wireless tranciever, a Z-Wave module, 868-915Mhz SRF modules, and has a breakout for an XBee module, allowing the EVE to communicate using one of the many different XBee boards. There’s also a battery-backed real-time clock and temperature sensor thrown in for good measure making this board the perfect building block for an outdoor weather station or solar array.

It’s an awesome idea, and if you already have a few radio modules, incredibly cheap; just the PCB is only £6, and a board with all the SMD components is only £20.

Emulating A Student Clicker With An Arduino

When schools and universities have hundreds of students in a lecture course, they need a way to tell alumni and other potential benefactors that faculty/student relations are just as good as they were in the 1960s, when enrollment was just a fraction of current levels. Technology solves all problems, apparently, so administrators of these universities turn to ‘clickers’ – radio frequency remotes used to take attendance and administer quizzes.These clickers have absolutely no security, so it’s no surprise [Taylor Killian] was able to emulate one of these clickers with an Arduino allowing anyone with a laptop to cheat on a quiz, or have an entire class show up with only one student in the room.

Previously [Travis Goodspeed] (thanks for sending this in, [Travis]) tore apart one of these clickers – a TurningPoint ResponseCard RF – and discovered it uses a Nordic nRF24L01 wireless transceiver, commonly available on eBay for about two dollars.

[Taylor] connected this wireless module to an Arduino and whipped up a bit of code that allows him to listen to the audience responses, respond to a question as either a single clicker or all clickers, automatically respond with the most popular answer, and even block all audience responses to each question.

Perhaps technology doesn’t solve every problem, but at least [Taylor] learned something from a glorified remote control sold at the bookstore at an insane markup.

Roomba And Virtual Walls Make Up This Theme Family Halloween Costume

It figures. You spend a ton of time making a cool set of costumes and then you can’t get your kid to pose for a picture. It’s okay though, we still get the point. This themed set of costumes dresses the little one as a Roomba vacuuming robot while mom and dad are suited up as virtual walls (modules that are used to keep the bot from falling down stairs, etc.). It’s fun and unique, but had it not been for some additional electronics this would have been relegated to a links post. For safety sake each costume was outfitted with a ring of LEDs. As a challenge, the lights were given the ability to sync up patterns with each other.

Each costume has a circular frame at the top with a set of RGB LED strings attached. To get them to display synchronized patterns an IR transmitter/receiver board was designed and ordered from OSHPark. Each costume has four of these modules so no matter where the wearers are facing it should not break communications. A demo of the synchronized light rings can be seen after the break

Continue reading “Roomba And Virtual Walls Make Up This Theme Family Halloween Costume”

Directing An Alarm System Straight To The Internet

[Scott] has a pretty nice alarm system at his house – it will give the operator at his alarm company enough information to determine if it’s a fire alarm, burglary, or just a cat walking in front of a sensor. [Scott] wanted to cut out the middle man and receive notifications from his alarm system on his phone. He did just that, with the help of a trusty Arduino and the very cool Electric Imp.

[Scott]’s build began with an Arduino attach to a Raspi to monitor state changes in the alarm system. Because the designers of the alarm system included a very helpful four-wire bus between the alarm panels and the part connected to the phone line, [Scott] found it fairly easy to tap into these lines and read the current alarm status.

Dedicating a Raspberry Pi to the simple task of polling a few pins and sending data out over WiFi is a bit overkill, so [Scott] picked up an Electric Imp Arduino shield to transmit data over WiFi. We’ve played around with the Imp before, and [Scott] would be hard pressed to come up with a cleaner solution to putting his alarm monitor on the Internet.

Now [Scott] has a very tidy alarm monitor that sends updates straight to his cell phone, no middle man required. A very neat build, and an excellent use of a very cool WiFi device.

Building A Tilt Rotor UAV

We see a lot of quadcopters, and even the occasional octocopter around here. But this build does it with just two propellers. It’s a tiltrotor build which allows the two upward-pointing propellers to tilt forward and backward. The real world equivalent of this UAV design that pops to mind is the V-22 Osprey.

The motors are mounted on a beam running perpendicular to the direction of travel. Each of them is mounted on a bearing which can be rotated by a servo motor. They rotate independently of each other, which allows for yaw. Of course roll is controlled by driving the propellers at different speeds and pitch is adjusted by tilting both mounts at the same time.

[Stephen] mentions that the tiltrotor design has several advantages over its relatives that use more than two props. This design costs less to build, uses less electricity, and makes for an easier autopilot implementation. If you want to see it in the air, don’t miss the clip after the break.

This is just the second tiltrotor build we remember seeing. The other one was a Halloween prop.

Continue reading “Building A Tilt Rotor UAV”