Making A Nostalgic Apple Mouse Wireless

If you’ve got an old mouse sitting around that has that perfect retro look why not start using it again? We’d bet there’s just enough room in there to turn the input device wireless.

The hack does away with everything but the case. The guts from a brand new wireless laser mouse are used as replacements. For the most part this is a simple process of making room for the new board and laying it in place. It involves cutting off a few plastic case nubs, enlarging the hole on the bottom so that the laser has a clear line of sight to the desktop, and hot gluing the thing in place. The button cover had a bit of plastic glued in place so that it lines up correctly with the replacement mouse’s switch.

The only thing that didn’t work out well is the battery situation. The AA cell that the mouse needs was too big for the retrofit so it was swapped with an AAA. These have a lower capacity which means more frequent replacement.

[via Make]

3D Printing A Rocket Engine

Most any rocket engine you’d find on a spacecraft – save for solid or hybrid rockets – use an engine system that’s fairly complex. Because of the intense heat, the fuel is circulated around the chamber before ignition giving a motor its regeneratively cooled nomenclature. This arrangement leads to a few complicated welding and machining processes, but surprisingly these obstacles can be overcome by simply printing a rocket engine on a 3D printer.

The current engine is quite small, but still fueled just like any other proper rocket engine that makes it into Earth orbit. The fuel is propane, the oxidizer is NO2, and the entire device is ignited with an automotive spark plug. Of course this was an expensive proposition; a motor with 12 pounds of thrust cost somewhere in the range of four figures.

Printing a rocket engine has a few advantages over traditional manufacturing techniques. [Rocket Moonlighting] explains that traditional techniques (mills, lathes and other heavy equipment) are bound by labor, material, and time. The costs of printing a rocket engine are only bound by the volume of the finished piece, meaning the most expensive engine per unit of thrust is the one that will fit in your pocket; scaling up means more efficiency for less cost.

There are a few videos up after the break showing the engine in action at full throttle, a few start and restart tests, and a test that involved throttling the engine. It’s an extremely impressive piece of kit, and hopefully [Rocket Moonlighting] will release the CAD source so we can make our own.

EDIT: [RM] tells me his engine cost less than $2000 to make. If just 10 people wanted their own engine from a ‘group buy,’ the price would drop by more than half. If you’d like your own 3D printed rocket engine, you might do well to drop [Rocket Moonlighting] a line.

Continue reading “3D Printing A Rocket Engine”

Try Out Your Assembly And BASIC Skills With A ZX Spectrum Project

It can be really hard to warm up to coding in Assembly. But this tutorial looks to make it understandable and (almost) easy. It focuses on programming a game for the ZX Spectrum. But you won’t need the hardware on hand as you can just use the ZX Spin emulator as you work your way through the code.

Ostensibly this is a 30-minute tutorial but that’s a gross underestimate. We finished a cursory read of the tutorial and the building blocks are certainly clear and easy to understand. But we like to make sure we understand every line of code and plan to spread that out over the coming weekend.

The first chapter eases us into machine code by combining it with a bit of BASIC. You’ll see how to manipulate the ZX Spectrum memory and then pluck that value back out into the BASIC program. But once chapter 2 hits it’s pretty much all assembly from there on out. The nice thing is that as you go along you learn how the hardware works and there are quite a few references to pages in the manual so you can do some extra learning along the way.

[Thanks Mathilda]

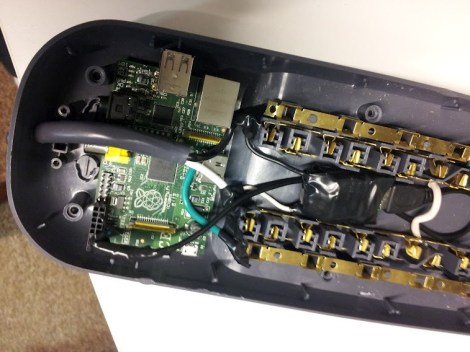
Malicious Raspberry Pi Power Strip Looks A Bit Scary

What you see here is a Raspberry Pi shoehorned into a power strip. The idea is to leverage the power and low-cost of this board into a stealthy network observation device. It packs a similar punch as the Power Pwn but should cost at least $1100 less!

The fact that when you plug your Ethernet into this ‘surge protector’ it starts sniffing your traffic doesn’t really scare us. It’s the mains wiring that traverses the RPi itself that’s a bit unnerving. Call us overly-protective, but we like to see some shielding between our high-voltage and low-voltage components. But that aside, the rest of the hack is pretty solid. That item wrapped in electrical tape is a power converter for the board itself. It’s not shown here, but the NIC is patched into the surge protector’s RJ-45 connector. The one thing that might be nice to include is a WiFi nub so that you can access the strip wirelessly. This would open the door for other snooping items, like a small microphone.

Wrapping Up Maker Faire With [Ben Heck], Giant Arduinos, And An Apple Lisa

All good things, and apparently our coverage of Maker Faire, must come to an end. Here’s a few more things we saw in New York this last weekend that piqued our interest:

A 10x scale Arduino

[Robert Fitzsimons] of Part Fusion Electronics made a gigantic Arduino. It wasn’t quite functional, but [Robert] did manage to make a few 10:1 scale LEDs (with built-in circuit protection), 1 inch pitch headers, and a few other miscellaneous components out of foam and paint.

Since he’s from Dublin, Ireland, [Robert] didn’t want to take this giant board home with him. He graciously gave it to me in the hopes of turning it in to a proper working Arduino. I’ll do my best, [Robert].

There are hundreds of Lisas buried in a landfill in Utah.

Tekserve, an indie Apple store located in the heart of Manhattan, really knows how to put on a good show. For the entirety of their stay at Maker Faire, they had people showing off one of the first digital cameras, Apple Newtons, and an awesome collection of vintage Macs. No, your eyes do not deceive you; that’s a real Lisa there in the bunch.

Sadly, they didn’t have the boot disk to turn any of these on. Pity.

Yes, there were celebrities at Maker Faire

Well, celebrities to the Hackaday crowd, at least. [Ben Heck] showed off the electronic automatic sunglasses he built. It’s a pair of lensless glasses, a servo, light detector, and a pair of clip-on sunglasses. When [Ben] is out in daylight, the sunglasses swivel down. Inside, the amount of light received by the detector decreases and the shades rotate up.

Continue reading “Wrapping Up Maker Faire With [Ben Heck], Giant Arduinos, And An Apple Lisa”

DIY Armor Starts With This Gauntlet Tutorial

This is not photoshopped, it’s a real gauntlet made of brass. [David Guyton] crafted it for some promotional photos for his book. But he also took the time to put together a step-by-step build tutorial.

The process starts with paper templates. These are much easier to work with than metal stock so [David] spends quite a bit of time trimming each piece to fit correctly. They are hinged together using thumb tacks which he crimps with a pair of pliers. With all the templates tuned to perfection he uses an awl to scratch the outline in his brass stock (you can use the metal of your choice). All of the holes are drilled and a bit of hammering flattens the parts before he heads to the grinder to smooth the cut edges.

To make the curves [David] fabricated his own jigs from pieces of pipe and carved wood squeezed together with a bench vice. It’s time-consuming, but the skills needed should be rather easy to develop with a little practice. You can catch his entire build in the video after the break.

Continue reading “DIY Armor Starts With This Gauntlet Tutorial”

How To Convert An Internal Combustion Engine To Run From Steam Power

We had no idea that what’s needed to convert an internal combustion engine to steam power is actually rather trivial. [David Nash] shows us how it’s done by performing the alterations on the engine of a string trimmer. These are the tools used to cut down vegetation around obstacles in your yard. The source of the engine doesn’t really matter as long as it’s a 2-cycle motor.

This engine had one spark plug which is threaded into the top of the block. [David] removed this and attached his replacement hardware. For now he’s using compressed air for development, but will connected the final version to a boiler.

There are only a couple of important parts between the engine and the boiler. There’s an in-line oil reservoir to help combat the corrosive nature of the steam. There is also a check valve. In the video after the break [David] shows the hunk of a ball-point pen that he uses to actuate the check valve. It’s really just a spacer that the piston pushes up to open the valve. This will be replaced with a metal rod in the final version.

Continue reading “How To Convert An Internal Combustion Engine To Run From Steam Power”