Assuming you’re not stuck in a prison cell without windows, you could feasibly keep track of the moon and tides by walking outside and jotting things down in your notebook. Alternatively, you could save a lot of hassle by just building this moon and tide clock from [pjdines1994] instead.
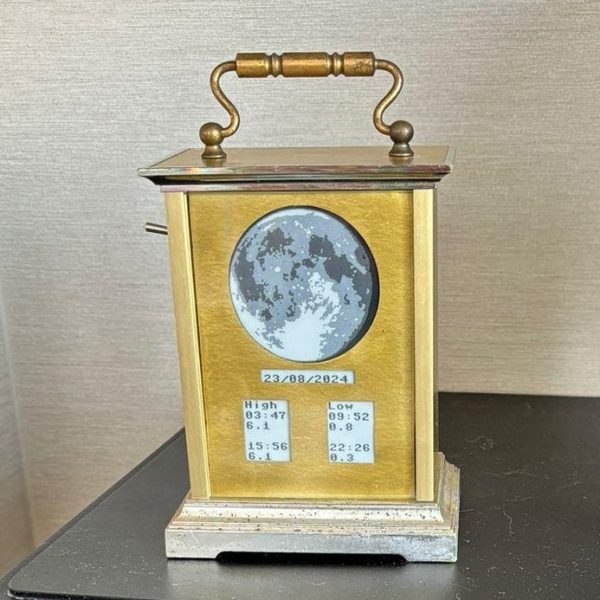
The build is based on a Raspberry Pi Pico W, which is hooked up to a real-time clock module and a Waveshare 3.7-inch e-paper display. Upon this display, the clock draws an image relevant to the current phase of the moon. As the write-up notes, it was a tad fussy to store 24 images for all the different lunar phases within the Pi Pico, but it was achieved nonetheless with a touch of compression. As for tides, it covers those too by pulling in tide information from an online resource.
It’s specifically set up to report the local tides for [pjdines1994], reporting the high tide and low tide times for Whitstable in the United Kingdom. If you’re not in Whitstable, you’d probably want to reconfigure the clock before using it yourself. Unless you really want to know what’s up in Whitstable, of course. If you so wish, you can set the clock up to make its own tide predictions by running local calculations, but [pjdines1994] notes that this is rather more complicated to do. The finished result look quite good, because [pjdines1994] decided to build it inside an old carriage clock that only reveals parts of the display showing the moon and the relevant tide numbers.
We’ve featured some other great tide clocks before, like this grand 3D printed design. If you’ve built your own arcane machine to plot the dances of celestial objects, do be sure to let us know on the tipsline!