Illustrated Kristina with an IBM Model M keyboard floating between her hands.

Keebin’ With Kristina: The One With The Batwing Typewriter

[Alex] of YouTube channel [EastMakes] wrote into tell me about his fantastic QWERTY ‘hexpansion’ board for the 2024 EMF Tildagon badge, and [Alex], I’m super glad you did. The system works!

Let’s back up a bit. Essentially, the idea is to have a badge that can be used beyond a single camp, with the creation of expansion boards being the other main attraction. Our own [Jenny List] covered the badge in detail back in June 2024 when she got her hands on one.

A pair of hands holds the 2024 EMF Tildagon badge with a QWERTY keyboard Hexpansion built by [EastMakes].
Image by [EastMakes] via YouTube
[Alex] started by importing the Tildagon into Fusion360 and designing a way for the keyboard to attach to it physically. He then modeled the keyboard after the Blackberry types that can be found on Ali using the official EMF buttons established in earlier badges.

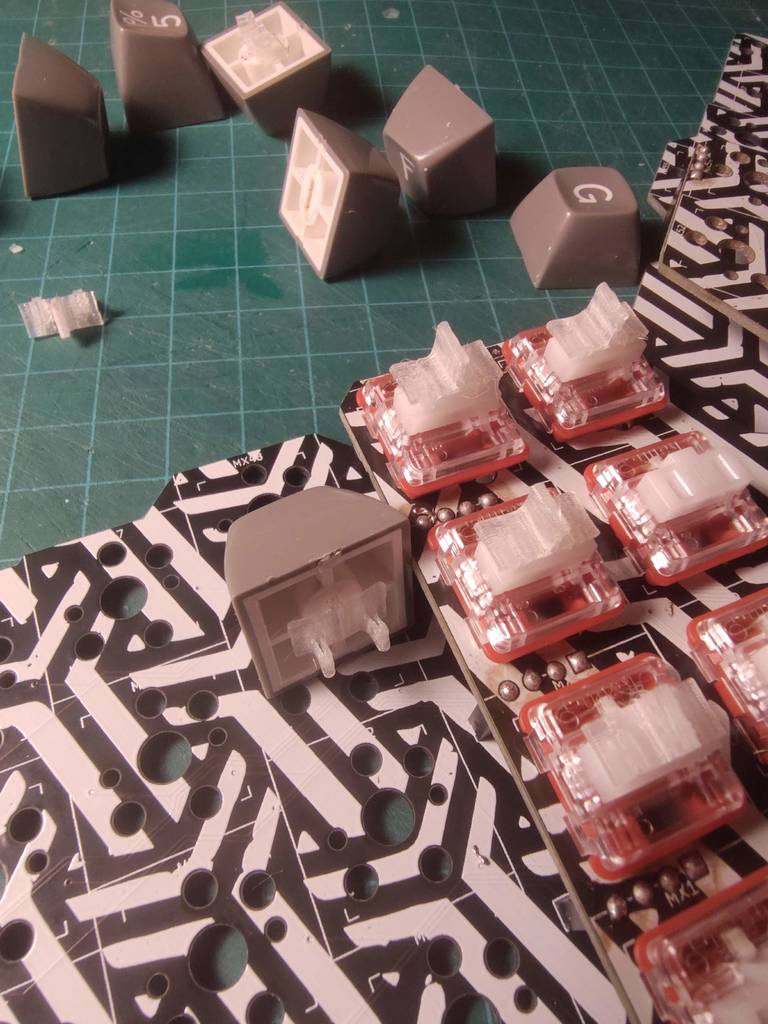
This QWERTY hexpansion is based on the RP2040, which is soldered around back and visible through the 3D-printed backplate. In order for the 90°-oriented board to align with the… not-90° connector, [Alex] built a little meander into the PCB.

The default OS on the Tildagon doesn’t know natively what to do with the serial messages from the keyboard, so [Alex] wrote an application that reads them in and decodes them. Be sure to check out the build and walk-through video after the break.

Continue reading “Keebin’ With Kristina: The One With The Batwing Typewriter”

Illustrated Kristina with an IBM Model M keyboard floating between her hands.

Keebin’ With Kristina: The One With The Schreibmaschine

Choc switches on a ThumbsUp! v8 keyboard with IBM Selectric typewriter keycaps, thanks to some 3D-printed adapters.
Image by [Sasha K.] via reddit
Remember that lovely Hacktric centerfold from a couple Keebins ago with the Selectric keycaps? Yeah you do. Well, so does [Sasha K.], who saw the original reddit post and got inspired. [Sasha K.] has more than one IBM Selectric lying around, which is a nice problem to have, and decided to strip one of its keycaps and get to experimenting.

The result is a nice adapter that allows them to be used with Kailh chocs — you can find the file on Thingiverse, and check out the video after the break to see how they sound on a set of clicky white chocs.

Those white chocs are attached to a ThumbsUp! v8 keyboard, a line that [Sasha K.] designed. His daily driver boards are on v9 and v10, but the caps were getting jammed up because of the spacing on those. So instead, he used v8 which has Cherry MX spacing but also supports chocs.

As you can see, there is not much to the adapter, which essentially plugs the Selectric keycap’s slot and splits the force into the electrical outlet-style pair of holes that chocs bear This feels like an easier problem to solve than making an adapter for MX-style switches. What do you think?

Continue reading “Keebin’ With Kristina: The One With The Schreibmaschine”

Illustrated Kristina with an IBM Model M keyboard floating between her hands.

Keebin’ With Kristina: The One With All The Green Keyboards

Okay, you have to see the gallery to appreciate it, but this keyboard was designed to resemble a red cedar tree with the green shell and wood bottom and the copper PCB showing through the tree cutouts on the sides.

A lovely green split keyboard with PlayStation buttons.
Image by [WesternRedCdar] via reddit
But you know why I chose this picture — those PS2 buttons. According to [WesternRedCdar] they are just for fun, although they do allow for pressing Ctrl and Alt at the same time with a single thumb.

Oh, and are those Nintendo Switch joysticks above the PS2 buttons? Those are for the mouse and vertical/horizontal scrolling. Honestly, this seems like a great amount of thumb controls. The basics are there (presumably), and there isn’t any thumb-extending excess, like keys on the insides by the mouse.

This bad mama jama runs on an RP2040 and has 50 hand-wired Cherry Brown switches plus the PS2 buttons. In the build guide, you can read all about [WesternRedCdar]’s troubles with integrating those. The Nintendo Switch joysticks weren’t terribly easy, either, since the ribbon connector can’t be soldered directly.

The final issue was one of weight. Since many of the switches stand quite tall, it sort of jostles the keyboard to actuate them. [WesternRedCdar] opined that that the ideal solution would have been to use metal base plates instead of wood, but took care of the issue by adding layers of 1/8″ steel flat bar inside the case.

Continue reading “Keebin’ With Kristina: The One With All The Green Keyboards”

Illustrated Kristina with an IBM Model M keyboard floating between her hands.

Keebin’ With Kristina: The One With The Cutting Board Keyboard

Doesn’t this look fantastic? Hard to believe it, but the base of this keyboard began life as a cutting board, and there’s a gallery to prove it. This is actually [androidbrick]’s second foray into this type of upcycling.

This time, [androidbrick] used a FiiO KB3 and replaced the bottom half of the plastic shell with a hand-routed kitchen cutting board. The battery has been disabled and it works only in wired mode, which is fine with me, because then you get to use a curly cord if you want.

A lovely keyboard built into a kitchen cutting board.
Image by [androidbrick] via reddit
The switches are mostly Gateron EF Currys, though [androidbrick] left some of the original Gateron G Pro 3.0 on the stabilized keys just for comparison. As you might imagine, the overall sound is much deeper with a wooden bottom. You can check out the sound test on YouTube if you’d like, though it’s pretty quiet, so turn it up.

Those keycaps look even nicer from top-down, which you’ll see in the sound test video linked above. Just search ‘JCM MOA GMK’ on Ali and you’ll find them in a bunch of colorways for around $20. Apparently, [androidbrick] was saving them for months, just waiting for this build.

Via reddit

Continue reading “Keebin’ With Kristina: The One With The Cutting Board Keyboard”

Illustrated Kristina with an IBM Model M keyboard floating between her hands.

Keebin’ With Kristina: The One With The SEGA Pico Keyboard

It’s been a minute since I featured a tiny keyboard, and that’s okay. But if you want to get your feet wet in the DIY keyboarding community, making a little macro pad like [Arnov Sharma]’s Paste Pal is a great place to start.

A macro pad with five switches and a small OLED display.
Image by [Arnov Sharma] via Hackaday.IO
This is a follow-up to his original Paste Pal, which only had two buttons for copy and paste plus an OLED display. This updated version does three more things thanks to a total of five blue (!) switches. The selected command shows up on the screen so you know what you’ve done.

Right now, [Arnov] has the Paste Pal set up to do Copy, Paste, Enter, Scroll Up, and Scroll Down, but changing the assignments is as easy as updating a few lines of code.

Paste Pal Mk. II is at heart a Seeed Xiao SAMD21, which in this case is programmed in Arduino. If you want to make things easier on yourself, you could program it in CircuitPython instead, although [Arnov] includes the Arduino code in his excellent build guide.

Continue reading “Keebin’ With Kristina: The One With The SEGA Pico Keyboard”

Illustrated Kristina with an IBM Model M keyboard floating between her hands.

Keebin’ With Kristina: The One With The Keyboard Configurator

Have you ever wished you could experiment with different layouts super easily, just by adding or removing a few switches here and there and printing a new case? Well, [heyisjambo] says that it’s more than possible with menura, the modular keyboard system.

A collage of menura keyboards, which are modular via the VIK standard.
So many lovely options! Image by [heyisjambo] via GitHub
[heyisjambo] is happy with 36 keys, but is reduced-count-curious and wanted a way to explore without a lot of wasted time and PCBs.

At the same time, [heyisjambo] wanted to experiment with split vs. uni-body construction, and especially the different shapes that are possible when tweaking the angle and distance between them.

And as if that weren’t enough, there’s support for [Sadek Baroudi]’s VIK standard for interfacing data between PCBs, which calls for an FPC 12-pin, 0.5 mm pitch connector and allows for ultra-cool magnetic connectors. This way, you can easily add things like displays, trackpads, and trackballs in the between the halves.

Thanks for the tip, [calculus]!

Continue reading “Keebin’ With Kristina: The One With The Keyboard Configurator”

Illustrated Kristina with an IBM Model M keyboard floating between her hands.

Keebin’ With Kristina: The One With The DIY Homing Keys

r/keebgirlies Is Totally a Thing Now

When [coral-bells] posted her first build to r/mechanicalkeyboards, she likely felt some trepidation. After all this is reddit we’re talking about, so right away you’ve got two layers of male-domination hobby.

Most of a lovely plant-themed keyboard.
Image by [coral-bells] via reddit
What she likely didn’t expect was to be upvoted into the tens of thousands, or to receive such a response from other girlies who came out of the woodwork to share their builds.

And so r/keebgirlies was born, and already has a few thousand members. This is a brand-new subreddit for women and non-binary folks who are into mechanical keyboards. As it says in the sidebar, men are welcome but limited to the comments for now, so don’t go trying to post your builds. The girlies are currently seeking moderators, so give that some thought.

As for [coral-bells]’ lovely build, this is an Epomaker MS68 with MMD Vivian V2 switches, and those flowery keycaps are from Etsy. She is currently waiting for supplies to mod a Yunzii AL66, but wants to build a kit at some point.

Continue reading “Keebin’ With Kristina: The One With The DIY Homing Keys”