Check Out This PDP-11 Running Unix With A Teletype Terminal

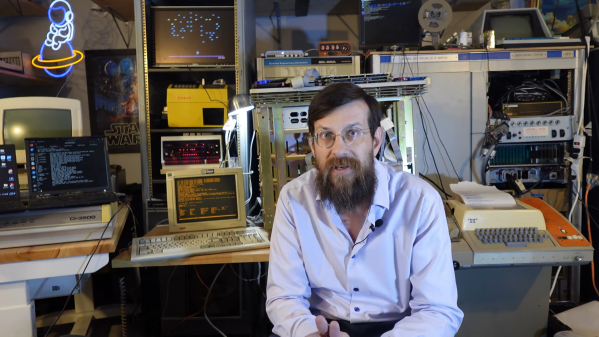
If you’ve spent a few years around Hackaday, you’ve probably seen or heard of the DEC PDP-11 before. It was one of the great machines of the minicomputer era, back when machines like the Apple ][ and the Commodore 64 weren’t even a gleam in their creator’s eyes. You’ve also probably heard of Unix, given that so many of us use Linux on the regular. Well, now you can see them both in action, as [HappyComputerGuy] fires up real Unix on a real PDP-11/73… with a real Teletype Model 33 to boot!

It’s a fascinating dive into the tech of yesteryear, with a rich dose of history to boot. It’s mindboggling to think that video terminals were once prohibitively expensive and that teletype printers were the norm for interacting with computers. The idea of interacting with a live machine via a printed page is alien, but it’s how things were done! We’re also treated to a lesson on how to boot the PDP-11 with 2.11BSD which is a hilariously manual process. It also takes a very long time. [HappyComputerGuy] then shows off the Teletype Model 33 rocking the banner command to great effect.

It’s awesome to see this hardware as it would really have been used back in its heyday. Computing really was different before the microcomputer format became mainstream. It’s not the only PDP-11 we’ve seen lately, either! Video after the break.

Continue reading “Check Out This PDP-11 Running Unix With A Teletype Terminal”

Need A Refresher On RMS?

If you mostly deal with DC current, you might not think much of root mean square or RMS measurements. Sure, you’ve seen meters that have “true RMS” settings, but what does it mean? If you don’t know — or you want a refresher — watch [Prof MAD’s] recent video explaining the topic.

There are two things to remember when working with RMS. If you put, say, 100VDC through a 100-ohm resistor, you’ll draw 1A and use 100W of power. However, since AC gradually makes its way to a peak value and then starts ramping down immediately, you can’t use the peak value or anything like it to figure out AC power. After all, the voltage is only at that peak for an instant. That’s where RMS comes in. 100 VAC RMS through a 100-ohm resistor will also consume an average of 100W over time.

Continue reading “Need A Refresher On RMS?”

Reverse-Engineering A Russian Tornado-S Guidance Circuit Board

With Russian military hardware quite literally raining down onto the ground in Ukraine, it’s little wonder that a sizeable part of PCBs and more from these end up being sold on EBay. This was thus where [msylvain] got a guidance board from a 300 mm Tornado-S 9M542 GLONASS-guided projectile from, for some exploration and reverse-engineering. The first interesting surprise was that the board was produced in February of 2023, with the Tornado-S system having begun production in 2016.

Presumed location of the PCB under investigation in the Tornado-S rocket.

The 9M542 and similar rocket projectiles are designed to reach their designated area with as much precision as possible, which where the guidance system comes into play. Using both GLONASS and inertial navigation, the rocket’s stack of PCBs (pictured) are supposed to process the sensor information and direct the control system, which for the 9M542 consists out of four canards. The board that [msylvain] is looking at appears to be one of the primary PCBs, containing some DC-DC and logic components, as well as three beefy gate arrays (ULAs). While somewhat similar to FPGAs, these are far less configurable, which is why the logic ICs around it are needed to tie everything together. For this reason, gate array technology was phased out globally by the 1990s due to the competition of FPGAs, which makes this dual-sided PCB both very modern and instantly vintage.

This is where a distinct 1980s Soviet electronics vibe begins, as along the way of noting the function of each identified IC, it’s clear that these are produced by the same Soviet-era factories, just with date stamps ranging from 2018 to more recent and surface-mount DIP-sized packages rather than through-hole.

Continue reading “Reverse-Engineering A Russian Tornado-S Guidance Circuit Board”

Kinetic Clock Is A Clean Modern Way To Tell Time

Hackers and makers aren’t usually too interested in basic round analog clocks. They tend to prefer building altogether more arcane and complicated contraptions to display numbers for the telling of time. [alstroemeria] did just that with this nifty kinetic clock build.

The basic concept of the kinetic clock is to have a flat plate, which individual segments raise out of to create a physical (instead of illuminated) 7-segment display. This is achieved with servos which push the segments in and out using a small rack mechanism. It’s not a sophisticated build; it simply uses 30 servos to handle all the segments needed to tell time. Thus, the Arduino Mega was the perfect tool for the job. With a sensor shield added on, it has an abundance of IO, driving a ton of servos is a cinch. There’s also a DS3231 real time clock to help it keep accurate time.

Incidentally, it’s a hefty thing to print, according to YouTuber [Lukas Deem] who replicated the project. It took around 85 hours to print, and a total of 655 grams of filament – not counting mistakes and trashed parts.

And if you think you’re having deja-vu, you might well be. We’ve seen a take on this exquisite design before. We liked it then, and we like it now.

Overall, it’s a stylish build that looks as good as your 3D printer’s output will allow. A resin printer would be a massive boon in this regard. Video after the break.

Continue reading “Kinetic Clock Is A Clean Modern Way To Tell Time”

$50 10Gbps Mesh Network Uses USB4

You want to build a cluster of computers, but you need a high-speed network fabric that can connect anything to anything. Big bucks, right? [Fang-Pen] developed a 10 Gbps full-mesh network using USB4 that cost him under $50. The first part of the post is about selecting a low-power mini PC, but if you skip down to the “Networking” section, you’ll find the details on the cluster.

The machines selected have two USB4 ports. In theory, you can transfer 40 Gbps on these ports. In reality, the cluster only hit 11 Gbps, but that’s still well above common Ethernet speeds. [Fang-Pen] has yet to determine why he isn’t getting even faster speeds.

Since Linux is Linux, there is a module for networking over Thunderbolt, so the rest is basically set up. There are, of course, some limitations. First, it is only fully connected because the cluster has three computers. More computers would need more USB4 ports or more hardware.

In addition, the standard says you can only count on full speed with cables 0.8 meters or shorter. However, that’s the 40 Gbps number. We wondered if a 2 m cable, rated at 20 Gbps, would have still managed 11 Gbps in this setup. A 10GBASE-T network, on the other hand, should allow 100-meter cables. But for a cluster of computers, do you really care?

We’d be interested to see this idea extended to more nodes. High-speed fabric can be useful in networked disk servers, parallel computing, and probably some other scenarios. We’ve seen 10G Ethernet on the Pi, although the PCI bus limited it to about 3.6 Gbps. For reference, we saw another three computer networks with 10GBASE-T done for about $130 with similar limitations.

Ask Hackaday: Why Are Self-Checkouts Failing?

Most people who read Hackaday have positive feelings about automation. (Notice we said most.) How many times have you been behind someone in a grocery store line waiting for them to find a coupon, or a cashier who can’t make change without reading the screen and thought: “There has to be a better way.” The last few years have seen that better way, but now, companies are deciding the grass isn’t greener after all. The BBC reports that self-checkouts have been a “spectacular failure.” That led us to wonder why that should be true.

As a concept, everyone loves it. Stores can hire fewer cashiers. Customers, generally, like having every line open and having a speedy exit from the store. The problem is, it hasn’t really panned out that way. Self-checkout stations frequently need maintenance, often because it can’t figure out that you put something in the bag. Even when they work flawlessly, a customer might have an issue or not understand what to do. Maybe you’ve scanned something twice and need one of them backed off. Then, there are the age-restricted products that require verification. So now you have to hire a crew of not-cashiers to work at the automated not-register. Sure, you can have one person cover many registers, but when one machine is out of change, another won’t print a receipt, and two people are waiting for you to verify their beer purchase, you are back to waiting. Next thing you know, there’s a line.

Continue reading “Ask Hackaday: Why Are Self-Checkouts Failing?”

A Practical Open Source Air Purifier

In the years since the start of the coronavirus pandemic, it’s fair to say we’ve all become a lot more aware of the air quality surrounding us. Many of us have added a CO2 monitor to our collection of tools, and quite a few will have an air filtration system too. There are plenty of devices on the market that fulfill this niche at varying qualities and prices, but shouldn’t a decent filter be something to make for yourself? [Naomi Wu] thinks so, and she’s put up the design for her Nukit open air purifier online under the GPLv3.

The principle of the unit is simple enough: it’s a box with an HVAC filter on the front and a set of computer fans on its side to draw air through. But it’s more than just a box, as there are three separate versions for wall-mount, hanging mount or a freestanding tower, and each one comes as a DXF file with all parts ready for laser cutting. It’s about as straightforward a way to get your hands on a well-designed and high quality air purifier as could be imagined.

[Naomi] has been quiet for a while in her familiar role as YouTube maker and guide to the nooks and crannies of her native Shenzhen, so it’s very positive to see her still active and producing projects after being warned off social media by the authorities. If you’d like to see another recent project of hers, look no further than her update to [Bunnie Huang]’s Shenzhen guide.