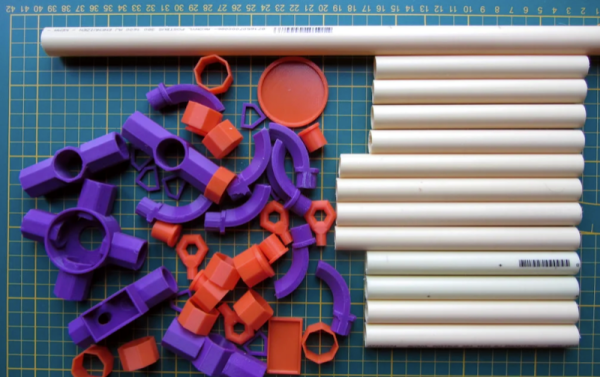
Building antennas is a time-honored ham radio tradition. Shortwave antennas tend to be bulky but at VHF frequencies the antenna sizes are pretty manageable. [Fjkaan’s] 2 meter quadrifilar helicoidal antenna is a good example and the structure for it can be created with 3D printing combined with electrical conduit.
Many people, including [G4ILO] use PVC pipe for the structure, and that design inspired [Fjkaan]. Despite being a bit less substantial, the conduit seems to work well and it is easy to cut. The helical design is common for satellite work owing to its circular polarization and omnidirectional pattern.
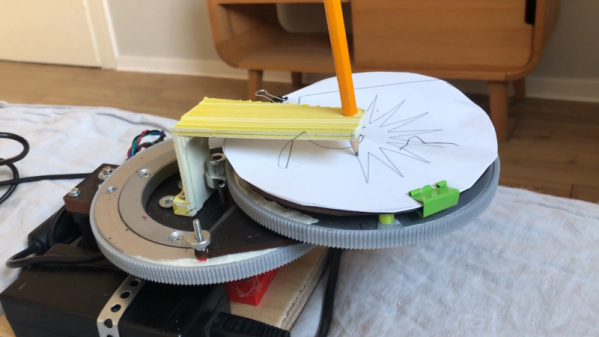
If you want to move a pen (or a CNC tool, or a 3D printing hot end) in the X and Y plane, your choices are typically pretty simple. Many machines use a simple cartesian XY motion using two motors and some sort of linear drive. There’s also the core-XY arrangement where two motors move belts that cause the head to travel in two directions. Delta printers use yet another arrangement, but one of the stranger methods we’ve seen is the dual disk polar printer which — as its name implies — uses two rotating disks.
The unique mechanism uses one motor to rotate a disk and another motor to rotate the entire assembly. The print head — in this case a pencil — stays stationary. as you can see in the video below.
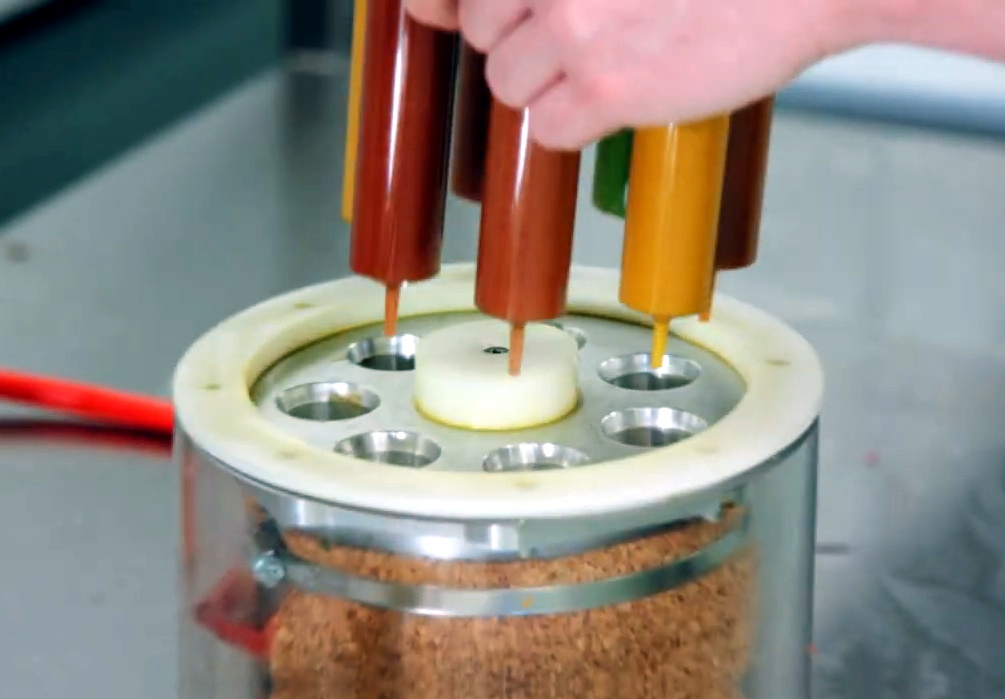
It’s recently come to our attention that a company by the name of Nourished has carved out a niche for themselves by offering made-to-order gummy vitamins produced with their own custom designed 3D printers. Customers can either select from an array of pre-configured “stacks”, or dial in their own seven layers of gelatinous goodness for a completely bespoke supplement.
Now we can’t vouch for whether or not taking a custom supplement like this is any better than just popping a traditional multi-vitamin, but we’ll admit the hardware Nourished has developed is pretty interesting. As briefly seen in the video after the break, large syringes are filled with the seven different vitamin suspensions, and then loaded into what appears to be a heated chamber for extrusion. This is not unlike other food-grade 3D printers we’ve seen, such as the Cocoa Press.
It looks like all of the syringes are being depressed simultaneously with a plate and a pair of beefy lead screws, so it seems the order in which the layers are placed down must be different for each nozzle. A blog post on the company’s site from early last year shows a wildly different machine being used to produce the vitamins, so either their core technology is changing rapidly, or perhaps the printer being used depends on whether they’re running off the customized stacks versus the standard formulations.
Interestingly, this is very similar to a concept floated by the U.S. Army’s Combat Feeding Directorate (CFD) back in 2014. They reasoned that a 3D printer could be used to produce meal bars that were customized for each soldier’s personal nutritional needs. Being largely impractical for the battlefield, the program didn’t get very far. But thanks to consumers who are willing to pay the premium that Nourished is charging for this service, it seems the idea has turned into a lucrative business model.
If you’re a maker that publishes projects online, you’ll be well across the production values arms race that’s been raging over the past decade. For those in the 3D printing space, this means that you’ll need to be producing slick timelapse videos of your prints. [BuildComics] is now doing just that, with a custom camera arm to help do the job. (Video, embedded below.)
The arm relies on a 3D-printed gear train that allows a stepper motor to turn it slowly throughout the print’s duration. It’s controlled by an Arduino that receives commands via Firmata. The arm is mounted on top of the printer, holding a webcam above the build plate for a good view. It’s setup via Octolapse to take images as each layer is finished, giving that haunting look of a model materialising on the print bed throughout the duration of the timelapse.
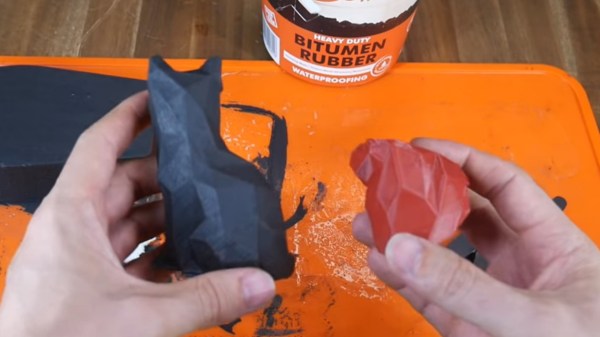
There are at least two kinds of 3D printer operators: those who work hard to make their prints look better after they come off the bed and those who settle for whatever comes off the printer. If you are in the latter camp, you probably envy people who have smooth prints with no visible layer lines. But the sanding and priming and multiple coats of paint can put you off.
[Teaching Tech] has a few tricks that might change your mind. He shares his technique for using different coatings for 3D prints that provide good quality with a lot less effort. The coatings in question are polyurethane used for coating pickup truck beds and bitumen rubber used for waterproofing. In the United States, bitumen is known as asphalt, and both materials are relatively cheap, available, and safe to use.
According to the video you can see below, there’s no need to sand or prime the print. In addition to covering imperfections and sealing gaps, it produces watertight prints that have UV resistance and some measure of protection against heating.
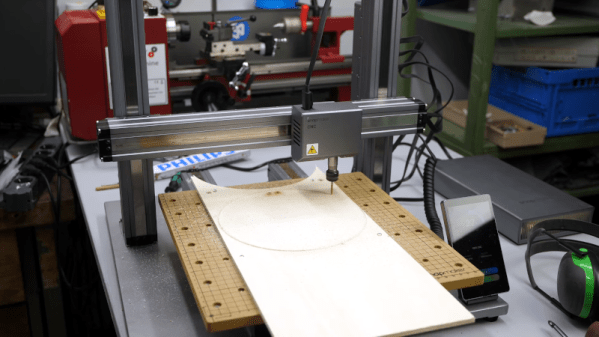
Most of us have, or, would like to have a 3D printer, a laser engraver, and a CNC machine. However, if you think about it naively, these machines are not too different. You need some way to move in the XY plane and, usually, on the Z axis, as well.
Sure, people mount extruders on CNCs, or even lasers or Dremel tools on 3D printers. However, each machine has its own peculiarities. CNCs need rigidity. 3D printers should be fast. Laser engravers and CNCs don’t typically need much Z motion. So common sense would tell you that it would be tough to make a machine to do all three functions work well in each use case. [Stefan] thought that, too, until he got his hands on a Snapmaker 2.0.
As you can see in the video below, the machine uses different tool heads for each function. The motion system stays the same and, curiously, there are three identical linear motion modules, one for each axis.
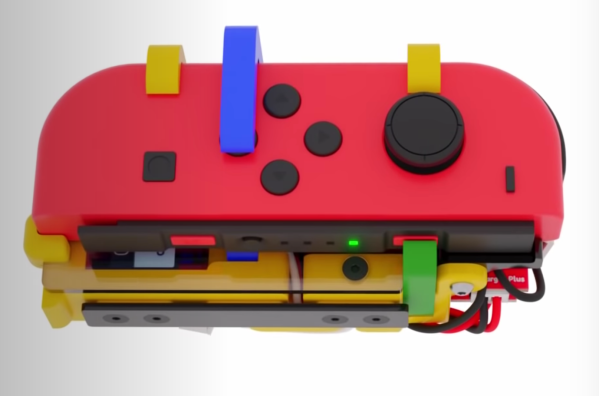
Here at Hackaday we’re always exited to see hacks that recycle our favorite childhood consoles into something new and interesting. In that context, it’s not so uncommon to see mods which combine new and unusual control methods with old devices in ways that their manufacturers never intended. What [Mike Choi] has built with the Labo Fit Adventure Kit is the rare hack that combines radically new control schemes with a modern console: without actually modifying any hardware.
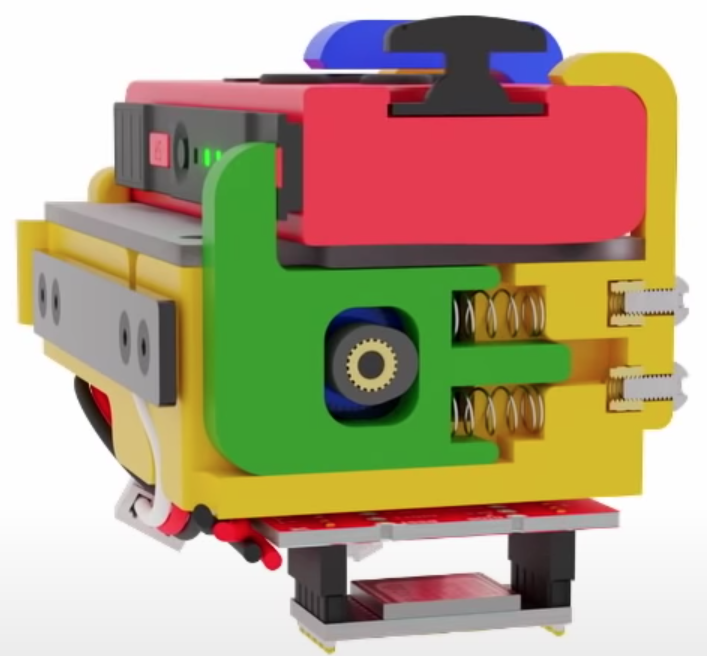
Face button pusher in blue
In short, the Labo Fit Adventure Kit lets the player play Mario Kart on the Nintendo Switch by riding a stationary exercise bike, steering with a wheel, and squeezing that wheel to use items. The Fit Kit combines the theme of Labo, Nintendo’s excellent cardboard building kit for the Nintendo Switch with the existing Ring-Con accessory for the unrelated Nintendo game Ring Fit Adventure plus a collection of custom hardware to tie it all together. That hardware senses cadence on the stationary bike, watches for the user to squeeze the handheld wheel controller, and translates those inputs to button presses on the controller to play the game.
Shoulder button pusher in green
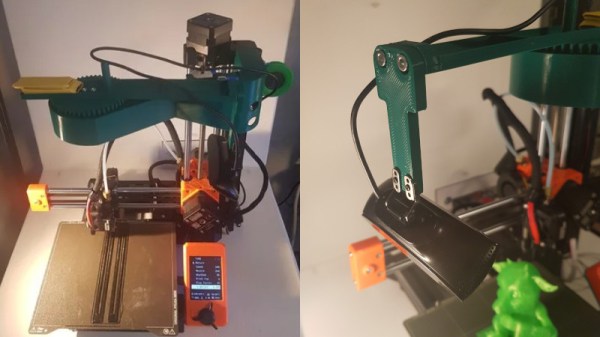
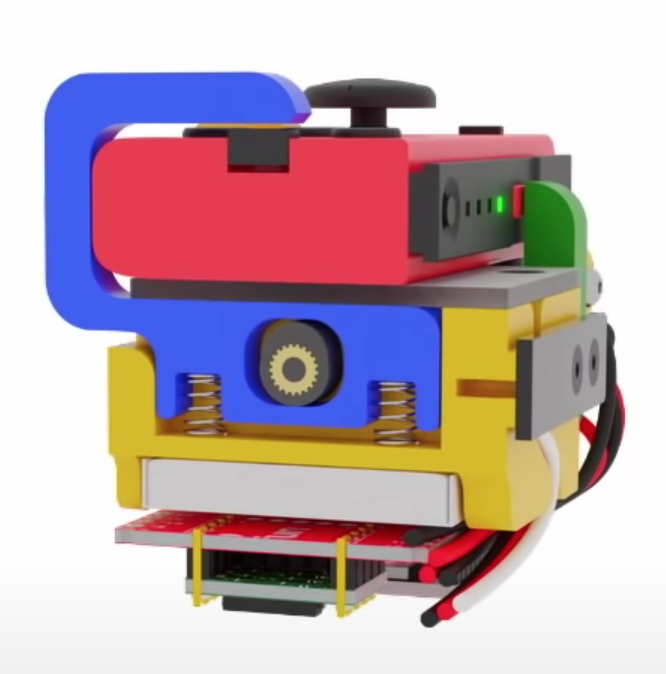
The most fascinating element of this project is the TAPBO module which adapts the Joy-Con controller to remote input. The module includes electronics, actuators, and a clever mechanical design to allow it to be mounted to the Ring-Con in place of an unmodified Joy-Con. Electrically the components will be familiar to regular Hackaday readers; there is a breakout board for a Teensy which also holds an XBee module to receive inputs remotely and drive a pair of servos. The entire module is described in detail starting at 4:42 in the video.
Mechanically the TAPBO relies on a pair of cam-actuated arms which translate rotational servo motion into linear action to press shoulder or face buttons. The module directly measures flex of the Ring-Con with an added flexible resistor and receives cadence information from another module embedded in the stationary bike via Zigbee. When these inputs exceed set thresholds they drive the servos to press the appropriate controller buttons to accelerate or use an item.
We’ve focused pretty heavily on the technical aspects of this project, but this significantly undersells the level of polish and easy to understand documentation [Mike] has produced. It includes a TAPBO Amiibo in customized packaging, and more. Check out the full video to get the complete scope of this project.