640k Was Never Enough For Anyone: How DOS Broke Free

On modern desktop and laptop computers, there is rarely a need to think about memory. We all have many gigabytes of the stuff, and it’s just there. Our operating system does the heavy lifting of working out what goes where and what needs to be paged to disk, and we just get on with reading Hackaday, that noblest of computing pursuits. This was not always the case though, and for early PCs in particular the limitations of the 8086 processor gave the need for some significant gymnastics in search of an extra few kilobytes. [Julio Merion] has an interesting run-down of the DOS memory map, and how memory expansion happened on computers physically unable to see much of it.

The 8086 has a 20-bit address bus, giving it access to a maximum of 1 megabyte. When IBM made the PC they needed space for the BIOS, the display, and the various accessory ROMs intended to come with expansion cards. Thus they allocated a maximum 640k of the map for RAM, and many early machines shipped with much less than that. The quote from Bill Gates about 640k being enough for anyone is probably apocryphal, but it was pretty clear as the 1980s wore on that more would be needed. The post goes into how memory expansion worked, with a 64k page mapped to switchable RAM on a card, and touches on how DOS managed extended memory above 1 Mb on the later processors that supported it. We dimly remember there also being a device driver that would map the unused graphics memory as EMS when the graphics card was running in text mode, but such horrors are best left behind.

Of course, some of the tricks to boost RAM were nothing but snake oil.

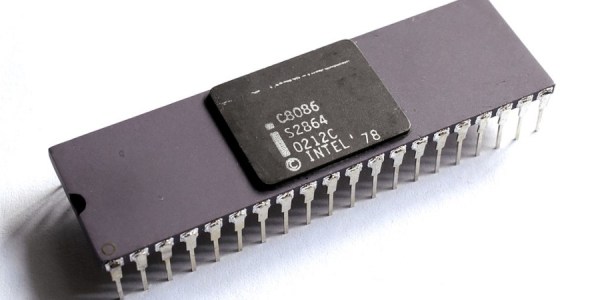
8086 header: Thomas Nguyen, CC BY-SA 4.0

Finding Undocumented 8086 Instructions Via Microcode

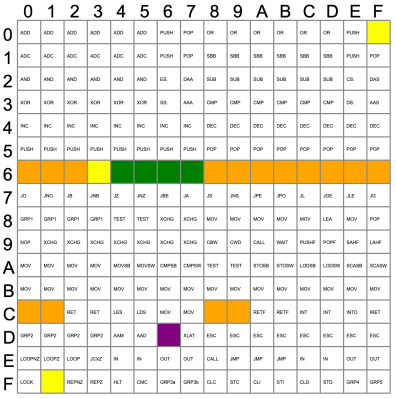
Video gamers know about cheat codes, but assembly language programmers are often in search of undocumented instructions. One way to find them is to map out all of a CPU’s opcodes and where there are holes, try those values, and see what happens. Not good enough for [Ken Shirriff]. He prefers examining the CPU’s microcode and deducing what each part of it does.

Microcode is a feature of many modern CPUs. The CPU runs several “microcode” instructions to process a single opcode. For the Intel 8086, there are 512 micro instructions, each with 21 bits. Each instruction has two parts: a part that moves a source to a destination and another that performs some other operation, such as an ALU operation. [Ken] explains it all in the post, including several hidden registers you can’t see, but the microcode can.

Searching for holes in the opcode table.

Some of the undocumented instructions are probably not useful. They are either impractical or duplicate a function you can already do another way. Not all of the instructions are there for technical reasons. For example, opcode D6, commonly known as SALC for “Set AL to Carry”, seems to exist only as a trap for anyone making a carbon copy of Intel’s microcode. When other companies like NEC made 8086 clones, having an undocumented instruction would strongly suggest they just copied Intel’s intellectual property (in NECs case, they didn’t).

Other cases happen where an instruction just doesn’t make sense. For example, you can pop all segment registers, and though it is not documented, you can deduce that POP CS should be opcode 0F. The problem is there is no sane reason to pop CS off the stack. The instruction works; it just isn’t useful. The opcodes from 60-6F are conditional jumps that are no different from the instructions at 70-7F because of decoding. There is no reason to document both identical instruction ranges.

The plot thickens when you go to two-byte instructions. You’ll find plenty of instructions of dubious value. You don’t hear much about undocumented instructions anymore. Why? Because modern CPUs have enough circuitry to dedicate some to detecting illegal instructions and halting the CPU. But the 8086 was squeezed too tight to allow for such a luxury. Good thing for people like us who enjoy solving puzzles.

You can still get a modern CPU to tell you more about instructions even if it won’t run them. Even the 80286 had some secret opcodes.

It Isn’t WebAssembly, But It Is Assembly In Your Browser

You might think assembly language on a PC is passe. After all, we have a host of efficient high-level languages and plenty of resources. But there are times you want to use assembly for some reason. Even if you don’t, the art of writing assembly language is very satisfying for some people — like an intricate logic puzzle. Getting your assembly language fix on a microcontroller is usually pretty simple, but on a PC there are a lot of hoops to jump. So why not use your browser? That’s the point of this snazzy 8086 assembler and emulator that runs in your browser. Actually, it is not native to the browser, but thanks to WebAssembly, it works fine there, too.

No need to set up strange operating system environments or link to an executable file format. Just write some code, watch it run, and examine all the resulting registers. You can do things using BIOS interrupts, though, so if you want to write to the screen or whatnot, you can do that, too.

The emulation isn’t very fast, but if you are single-stepping or watching, that’s not a bad thing. It does mean you may want to adjust your timing loops, though. We didn’t test our theory, but we expect this is only real mode 8086 emulation because we don’t see any protected mode registers. That’s not a problem, though. For a learning tool, you’d probably want to stick with real mode, anyway. The GitHub page has many examples, ranging from a sort to factorials. Just the kind of programs you want for learning about the language.

Why not learn on any of a number of other simulated processors? The 8086 architecture is still dominant, and even though x86_64 isn’t exactly the same, there is a lot of commonalities. Besides, you have to pretend to be an 8086, at least through part of the boot sequence.

If you’d rather compile “real” programs, it isn’t that hard. There are some excellent tutorials available, too.

String Operations The Hard(ware) Way

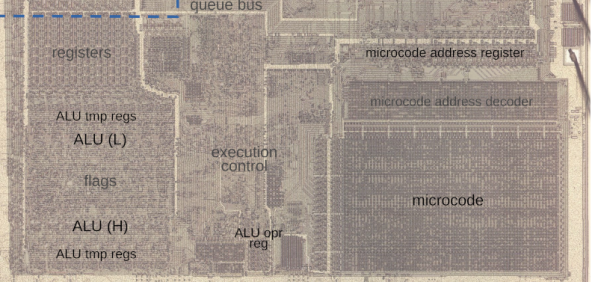
One of the interesting features of the 8086 back in 1978 was the provision for “string” instructions. These took the form of prefixes that would repeat the next instruction a certain number of times. The next instruction was meant to be one of a few string instructions that operated on memory regions and updated pointers to the memory region with each repeated operation. [Ken Shirriff] examines the 8086 die up close and personal to explain how the 8086 microcode pulled this off and it is a great read, as usual.

In general, the string instructions wanted memory pointers in the SI and DI registers and a count in CX. The flags also have a direction bit that determines if the SI and DI registers will increase or decrease on each execution. The repeat prefix could also have conditions on it. In other words, a REP prefix will execute the following string instruction until CX is zero. The REPZ and REPNZ prefixes would do the same but also stop early if the zero flag was set (REPZ) or not set (REPNZ) after each operation. The instructions can work on 8-bit data or 16-bit data and oddly, as [Ken] points out — the microcode is the same either way.

[Ken] does a great job of explaining it all, so we won’t try to repeat it here. But it is more complicated than you’d initially expect. Partially this is because the instruction can be interrupted after any operation. Also, changing the SI and DI registers not only have to account for increment or decrement, but also needs to understand the byte or word size in play. Worse still, an unaligned word had to be broken up into two different accesses. A lot of logic to put in a relatively small amount of silicon.

Even if you never design a microcoded CPU, the discussion is fascinating, and the microphotography is fun to look at, too. We always enjoy [Ken’s] posts on little CPUs and big computers.

8086 Multiply Algorithm Gets Reverse Engineered

The 8086 has been around since 1978, so it’s pretty well understood. As the namesake of the prevalent x86 architecture, it’s often studied by those looking to learn more about microprocessors in general. To this end, [Ken Shirriff] set about reverse engineering the 8086’s multiplication algorithm.

[Ken]’s efforts were achieved by using die photos of the 8086 chip. Taken under a microscope, they can be used to map out the various functional blocks of the microprocessor. The multiplication algorithm can be nutted out by looking at the arithmetic/logic unit, or ALU. However, it’s also important to understand the role that microcode plays, too. Even as far back as 1978, designers were using microcode to simplify the control logic used in microprocessors.

[Ken] breaks down his investigation into manageable chunks, exploring how the chip achieves both 8-bit and 16-bit multiplication in detail. He covers how the numbers make their way through various instructions and registers to come out with the right result in the end.

It’s a fun look at what’s going on at the ground level in a chip that’s been around since before the personal computer revolution. For any budding chip designers, it’s a great academic exercise to follow along at home. If you’ve been doing your own digging deep into CPU architectures, don’t hesitate to drop us a line!

A Cycle-Accurate Intel 8088 Core For All Your Retro PC Needs

A problem faced increasingly by retrocomputer enthusiasts everywhere is the supply of chips. Once a piece of silicon goes out of production its demand can be supplied for a time by old stock and second hand parts, but as they become rare so the cost of what can be dubious parts accelerates out of reach. Happily for CPUs at least, there’s a ray of hope in the form of FPGA-based cores which can replace the real thing, and for early PC owners there’s a new one from [Ted Fried]. MCL86 is a cycle accurate Intel 8088 FPGA Core that can be used within an FPGA design or as a standalone in-circuit replacement for a real 8088. It even has a full-speed mode that sacrifices cycle accuracy and can accelerate those 8088 instructions by 400%.

Reading the posts on his blog, it’s clear that this is a capable design, and it’s even been extended with a mode that adds cache RAM to mirror the system memory at the processor’s speed. You can find all the code in a GitHub repository should you be curious enough to investigate for yourself. We’ve pondered in the past where the x86 single board computers are, perhaps it could be projects like this that provide some of them.

Silicon Sleuthing: Finding A Ancient Bugfix On The 8086

Few CPUs have had the long-lasting influence that the 8086 did. It is hard to believe that when your modern desktop computer boots, it probably thinks it is an 8086 from 1978 until some software gooses it into a more modern state. When [Ken] was examining an 8086 die, however, he noticed that part of the die didn’t look like the rest. Turns out, Intel had a bug in the original version of the 8086. In those days you couldn’t patch the microcode. It was more like a PC board — you had to change the layout and make a new one to fix it.

The affected area is the Group Decode ROM. The area is responsible for categorizing instructions based on the type of decoding they require. While it is marked as a ROM, it is more of a programmable logic array. The bug was pretty intense. If an interrupt followed either a MOV SS or POP SS instruction, havoc ensues.

Continue reading “Silicon Sleuthing: Finding A Ancient Bugfix On The 8086”