A Smarter Solar Water Heater

Installing solar power at a home is a great way to reduce electricity bills, especially as the cost of solar panels and their associated electronics continue to plummet. Not every utility allows selling solar back to the grid, though, so if you’re like [Rogan] who lives in South Africa you’ll need to come up with some clever tricks to use the solar energy each day while it’s available to keep from wasting any. He’s devised this system for his water heater that takes care of some of this excess incoming energy.

A normal water heater, at least one based on electric resistive heaters, attempts to maintain a small range of temperatures within the insulated tank. If the temperature drops due to use or loss to the environment, the heaters turn on to bring the temperature back up. This automation system does essentially the same thing, but allows a much wider range of temperatures depending on the time of day. Essentially, it allows the water heater to get much hotter during times when solar energy is available, and lets it drop to lower values before running the heater on utility electricity during times when it isn’t. Using a combination ESP32 and ATtiny to both control the heater and report its temperature, all that’s left is to program Home Assistant to get the new system to interact with the solar system’s battery charge state and available incoming solar energy.

While it’s an elegantly simple system that also affords ample hot water for morning showers, large efficiency gains like this can be low-hanging fruit to even more home energy savings than solar alone provides on paper. Effectively the water heater becomes another type of battery in [Rogan]’s home, capable of storing energy at least for the day in the form of hot water. There are a few other ways of storing excess renewable energy as well, although they might require more resources than are typically available at home.

ESP32 Oscilloscope Skips Screen For The Browser

An oscilloscope can be an expensive piece of equipment, but not every measurement needs four channels and gigahertz sampling rates. For plenty of home labs, old oscilloscopes with CRTs can be found on the used marketplace for a song that are still more than capable of getting the job done, but even these can be overpowered (not to mention extremely bulky). If you’re looking for something even cheaper, and quite a bit smaller, this ESP32 scope from [BojanJurca] might fit the bill.

The resulting device manages to keep costs extremely low, but not without a trade-off. For this piece of test equipment, sampling is done over the I2C bus on the ESP32, which can manage a little over 700 samples per second with support for two channels. With the ESP32 connected to a wireless network, the data it captures can be viewed from a browser in lieu of an attached screen, which also keeps the size of the device exceptionally small. While it’s not a speed demon, that’s more than fast enough to capture waveforms from plenty of devices or our own circuit prototypes in a form factor that can fit even the smallest spaces.

Of course for work on devices with faster switching times, it’s always good to keep a benchtop oscilloscope around. But as far as we can tell this one is the least expensive, smallest, and most capable we’ve come across that would work for plenty of troubleshooting or testing scenarios in a pinch. We’ve seen others based on slightly more powerful microcontrollers like this one based on the STM32 and this other built around the Wio Terminal with a SAMD51, both of which also include built-in screens.

Solar E-Ink Weather Station Works On Dark Days, Too

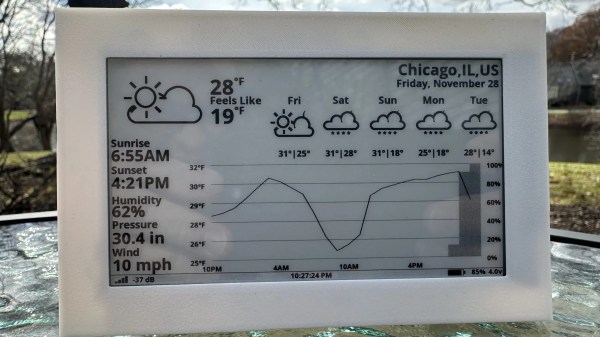
One way to get through the winter doldrums is to take notice of the minuscule positive changes in weather as spring approaches. Although much of the US is experiencing a particularly warm month, that’s not the case in Germany where [rsappiawf] resides. Even so, they are having a good time charting the weather on their new solar-powered E-ink weather station.

And in spite of the dark winter days, the device has been delivering weather updates for over a week on solar power alone. The brains of this operation is an ESP32 S3 Mini, which [rsappiawf] operated on a little bit. For starters, they removed the integrated RGB LED in order to save precious milliamps. Then they upgraded the voltage regulator to a TPS73733DCQR.

[rsappiawf] also has a TPL5110 power timer breakout module in the mix, which saves even more power by only turning on every once in a while according to the potentiometer setting, and only then turning on the project’s power. Check out the brief demo after the break, including the cool sliding action into the 3D-printed holder.

There’s a lot you can do to lower power consumption in a project like this. Here’s one that will go 60 days on a charge.

Continue reading “Solar E-Ink Weather Station Works On Dark Days, Too”

A render of the Melodio Self Mate music player with it's front plate removed. It's a grey device with a small screen and navigation wheel, similar to a chunky iPod. It has an IR blaster LED in the top and various exposed screw holes letting everyone know that this is a device you can open.

Melodio Self Mate

While the proliferation of the smartphone has caused the personal music player (PMP) market to mostly evaporate, there are still those who prefer a standalone device for their music. The Melodio Self-Mate is one such spiritual successor to the iPod.

Music-only devices really benefit from the wheel interface pioneered by Apple, so we still see it in many of the new Open Source PMPs including this one and the Tangara. The Melodio uses the ubiquitous ESP32 for its brains coupled with a TI PCM5102A DAC and TI TPA6130A2 headphone amp for audio. A slider on the side of the device allows you to switch it between mass storage mode and programming mode for the ESP32.

Since this device packs a little more horsepower and connectivity than the original iPods, things like listening to Spotify are doable once assembled, instead of having to completely rebuild the device. Speaking of building, there are only renders on the GitHub, so we’re not sure if this project has made the jump IRL yet. With more people concerned about the distractions of smartphones, maybe this renaissance of open PMPs will lead to a new golden age of music on the go?

Miss the halcyon days of the iPod? They’re easier to hack now than ever, and if you really want to go old school, how about a podcast on a floppy?

IoT Air Purifier Makes A Great Case Study In Reverse Engineering

Here at Hackaday, about the only thing we like more than writing up tales of reverse engineering heroics is writing up tales of reverse engineering heroics that succeed in jailbreaking expensive widgets from their needless IoT dependency. It’s got a real “stick it to the man” vibe that’s hard to resist.

The thing is, we rarely see a reverse engineering write-up as thorough as the one [James Warner] did while integrating an IoT air purifier into Home Assistant, so we just had to make sure we called this one out. Buckle up; it’s a long, detailed post that really gets down into the weeds, but not unnecessarily so. [James] doesn’t cloud-shame the appliance manufacturer, so we can’t be sure who built this, but it’s someone who thought it’d be a swell idea to make the thing completely dependent on their servers for remote control via smartphone. The reverse engineering effort started with a quick look at the phone app, but when that didn’t pay off in any useful way, [James] started snooping on what the device was talking about using Wireshark.

One thing led to another, wires were soldered to the serial pins on the ESP32 on the purifier’s main board, and with the help of a FlipperZero as a UART bridge, the firmware was soon in hand. This gave [James] clues about the filesystem, which led to a whole Ghidra side quest into learning how to flash the firmware. [James] then dug into the meat of the problem: figuring out the packet structure used to talk to the server, and getting the private key used to encrypt the packets. This allowed a classic man-in-the-middle attack to figure out the contents of each packet and eventually, an MQTT bridge to let Home Assistant control the purifier.

If it sounds like we glossed over a lot, we know — this article is like a master class on reverse engineering. [James] pulled a lot of tools out of his kit for this, and the write-up is clear and concise. You may not have the same mystery fan to work with, but this would be a great place to start reverse engineering just about anything.

Thanks to [ThoriumBR] for the tip.

A General-Purpose PID Controller

For those new to fields like robotics or aerospace, it can seem at first glance that a problem like moving a robot arm or flying an RC airplane might be simple problems to solve. It turns out, however, that control of systems like these can get complicated quickly; so much so that these types of problems have spawned their own dedicated branch of engineering. As controls engineers delve into this field, one of their initial encounters with a control system is often with the PID controller, and this open source project delivers two of these general-purpose controllers in one box.

The dual-channel PID controller was originally meant as a humidity and temperature controller and was based on existing software for an ATmega328. But after years of tinkering, adding new features, and moving the controller to an ESP32 platform, [knifter] has essentially a brand new piece of software for this controller. Configuring the controller itself is done before the software is compiled, and it includes a GUI since one of the design goals of the project was ease-of-use. He’s used it to control humidity, temperature and CO2 levels in his own work at the University of Amsterdam, but imagines that it could see further use outside of his use cases in things like reflow ovens which need simple on/off control or for motors which can be controlled through an H-bridge.

The PID controller itself seems fairly robust, and includes a number of features that seasoned controls engineers would look for in their PID controllers. There are additionally some other open-source PID controllers to take a look at like this one built for an Arduino, and if you’re still looking for interesting use cases for these types of controllers one of our favorites is this PID controller built into a charcoal grill.

Alarm Panel Hack Defeats Encryption By Ignoring It

As frustrating as it may be for a company to lock you into its ecosystem by encrypting their protocols, you have to admit that it presents an enticing challenge. Cracking encryption can be more trouble than it’s worth, though, especially when a device gives you all the tools you need to do an end-run around their encryption.

We’ll explain. For [Valdez], the encrypted communication protocols between a DSC alarm panel and the control pads on the system were serious impediments to integration into Home Assistant. While there are integrations available for these alarm panels, they rely on third-party clouds, which means that not only is your security system potentially telling another computer all your juicy details, but there’s also the very real possibility that the cloud system can either break or be shut down; remember the Chamberlain MyQ fiasco?

With these facts in mind, [Valdez] came up with a clever workaround to DSC encryption by focusing on physically interfacing with the keypad. The device has a common 16×2 LCD and a 25-key keypad, and a little poking around with a multimeter and a $20 logic analyzer eventually showed that the LCD had an HD44780 controller, and revealed all the lines needed to decode the display with an ESP32. Next up was interfacing with the keypad, which also involved a little multimeter work to determine that the keys were hooked up in a 5×5 matrix. Ten GPIOs on the ESP32 made it possible to virtually push any key; however, the ten relays [Valdez] originally used to do the switching proved unwieldy. That led to an optocoupler design, sadly not as clicky but certainly more compact and streamlined, and enabling complete control over the alarm system from Home Assistant.

We love this solution because, as [Valdez] aptly points out, the weakest point in any system is the place where it can’t be encrypted. Information has to flow between the user and the control panel, and by providing the electronic equivalents to eyes and fingers, the underlying encryption is moot. Hats off to [Valdez] for an excellent hack, and for sharing the wealth with the HA community.