Minimalist RGB LED Cube Has A Very Short BoM

charlieplexed-led-cube

[Asher Glick] wrote in to share a project he has been working on with his friend [Kevin Baker], a 4x4x4 RGB LED cube. The pair are students at Rensselaer Polytechnic Institute and also members of the newly-formed Embedded Hardware Club on campus. As their first collaborative project, they decided to take on the ubiquitous LED cube, trimming down the component count to nothing more than 64 LEDs, a protoboard, some wire, and a single Arduino.

Many cubes we have seen use shift registers or decade counters to account for all the I/O required to drive so many LEDs. Their version of the cube has none of these extra components, solely relying on 16 of the Arduino’s I/O pins for control instead. You might notice something a bit different about the structure of their cube as well. Rather than using a grid of LEDs like we see in most Charlieplexed cubes, they constructed theirs using 16 LED “spires”, tucking the additional wiring underneath the board.

The result looks great, as you can see in the videos below. The cube looks pretty easy to build, and with a cost around $60 it is a reasonably cheap project as well.

Nice job, we look forward to seeing all sorts of fun projects from the Embedded Hardware Club in the future!

Continue reading “Minimalist RGB LED Cube Has A Very Short BoM”

GSM Remote Control With The TiDiGino

tidigino-gsm-remote

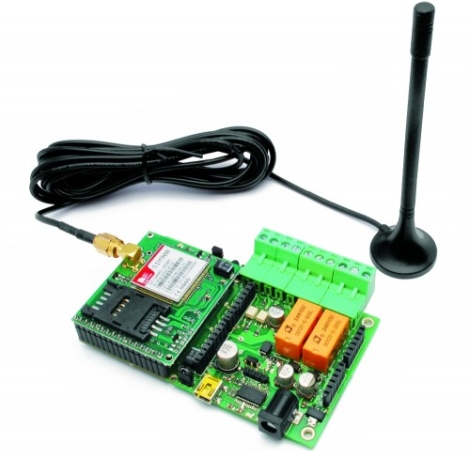
If you’re looking to remotely control things around the house, but can’t do it over the Internet or via WiFi, the TiDiGino just might have what you’re looking for. [Boris Landoni] from Open Electronics sent some information on the TiDiGino our way, and it certainly looks like a useful device if you’re in need of a solid GSM remote control module.

At the heart of the TiDiGino lies an ATmega2560, which is normally used in the Arduino Mega, so there’s plenty of processing power to go around. While the form factor differs just a wee bit from what you would expect from an Arduino, the TiDiGino sports all the proper connectivity to support any standard Arduino shield along with the requisite libraries required for use.

Through a contest/community effort, the TiDiGino supports remote alarm, gate control, remote thermostat control, and DTMF remote control functionality right out of the box. We imagine that our readers can dream up a litany of other uses as well, since GSM remote control tends to be pretty popular around here.

Be sure to check out the Open Electronics site if you’re interested in learning more about the TiDiGino – you’ll find a complete BoM along with code and schematics, making it easy to build your own.

OsPID: The Open Source PID Controller

Need PID control in your next project? Perhaps this little beauty can help. It’s an Open Source PID controller that also follows the Open Hardware guidelines. [Brett Beauregard] based the project on the newly minted Arduino PID library which he wrote. In the video after the break [Brett] takes apart the device, walking through some of the ways this might be hacked. If you want an overview of every part of this project to-date the best resource is probably his personal blog post.
The front circuit board is the meat and potatoes of the device. It hosts the user interface in the form of buttons, LEDs, and a graphic LCD screen. You can also see the USB mini-b connector which gives you access to the Arduino compatible ATmega328 microcontroller on the back. There is also a piezo buzzer for your alarm needs.
The prototype that [Brett] shows off uses pin connectors to join the main board to the two daughter boards. Unfortunately, the production model moved to dual-sided edge connectors. That’s fine if you you’re using it in its stock condition, but it makes it a bit harder to replace those boards with your own hardware. None-the-less, we love to see great Open Hardware projects brought to market! Continue reading “OsPID: The Open Source PID Controller”

Reading NAND Flash With An Arduino

[HC] took a gander around the Googles and saw a number of people trying to read NAND flash chips with an Arduino. It’s an interesting problem; at 16 Megahertz, [HC] is looking at about 60 nanoseconds per instruction cycle, and flash chips normally operate around 20 ns. He got the build working, and was able to read the memory contents and ID of a flash chip.

Right now, it’s just a proof-of-concept to demonstrate that reading flash memory is possible. [HC] used an Arduino Mega to pull the manufacture ID off a flash chip. Because there isn’t exactly a whole lot of storage on an Arduino to hold Megabytes of data, so [HC] is looking for a way to pull data off his flash chip. He’s considering sending it over Ethernet or storing it on an SD card.

This isn’t the first time we’ve seen a roundabout way to use those cheap, ubiquitous NAND flash chips. Considering we’ve got a few dozen of them housed in unused thumb drives, [HC]’s work shows a lot of potential. He posted a topic on his forum to see if there’s any interest in further developments, something we’d like to see.

Securing Your Keurig With RFID

keurig-hacking

[Andrew Robinson] and his co-workers are lucky enough to have a Keurig coffee maker in their office, though they have a hard time keeping track of who owes what to the community coffee fund. Since K-Cups are more expensive than bulk coffee, [Andrew] decided that they needed a better way to log everyone’s drinking habits in order to know who needs to cough up the most cash at the end of the month.

He started by tearing down the Keurig B40, making note of the various PCBs inside while identifying the best way to go about hacking the device. The coffee maker is controlled by a PIC, and rather than try to re-engineer things from the bottom up, he left the core of the machine intact and focused on the control panel instead.

He disconnected all of the unit’s buttons from the control board, routing them through an Arduino before reconnecting them to the machine. This essentially rendered the machine inoperable unless triggered by the Arduino, giving [Andrew] control over the brewing process. He wired in an RFID reader from SparkFun, then got busy coding his security/inventory system. Now, when someone wants coffee, they merely need to swipe their office access card over the machine, which enables the use of its control panel.

As you can see in the video below the system seems to work well. If we were to offer some constructive criticism, we would suggest ditching the laptop and rolling the RFID reading/verification into the Arduino instead – other than that, we think it’s great.

Continue reading “Securing Your Keurig With RFID”

Zombie [Jackson] Bot Dances To Thriller

[Marc Cryan] built this little bugger which he calls Wendell the Robot. But what good is an animatronic piece like this unless you do something fun with it? That’s why you can catch the movements matching [Michael Jackson’s] choreography from the music video Thriller in the clip after the break.

This is a ground-up build for [Marc]. He started by designing templates for each of the wood parts using Inkscape. After printing them out, he glued each to a piece of 1/4″ plywood and cut along the lines using a band saw. We don’t have a lot of adhesive spray experience, but he mentions that the can should have directions for temporary adhesion so that the template can be removed after cutting.

During assembly he makes sure to add servo horns for easy connection when adding the motors. All together he’s using five; two for the wheels, two for the arms, and one for the neck. A protoboard shield makes it easy to connect them to the Arduino which is used as a controller.

Continue reading “Zombie [Jackson] Bot Dances To Thriller”

dinos-new-years-ball-drop

Build Your Own Mini Ball Drop For New Year’s Eve

[Dino] wanted to make this New Year’s celebration a bit more interesting, but he can’t make it to New York for the ball drop. Instead, he decided to make his own mini display in his workshop. Obviously he’s working with a slightly smaller budget than the folks at Times Square, but we think his display is pretty neat. If anything, [Dino] can at least guarantee that his New Year’s is 100% Seacrest-free.

The ball drop is made up of five ping pong balls, each backlit by a 10mm LED. The LEDs and ping pong balls were mounted on the electron gun from a broken oscilloscope, giving it a cool look. The balls are lit one at a time by an Arduino, which illuminates each one for 15 seconds while the final minute of 2011 is counted down. Once midnight hits, a flashing “2012” sign illuminates while Auld Lang Syne plays from a tiny speaker.

The musical part of this build is something that [Dino] spent a lot of time on. He thoroughly explains how he translated the song from sheet music into its digital form, a process that would be helpful for beginners to watch.

Continue reading to see how the display was built, and if you’re just antsy to see the ball drop in action, a short demo can be found at 12:13.

Continue reading “Build Your Own Mini Ball Drop For New Year’s Eve”