Build Your Own Radio Clock Transmitter

Deep in the Colorado foothills, there are two radio transmitters that control the time on millions of clocks all across North America. It’s WWVB, the NIST time signal radio station that sends the time from several atomic clocks over the airwaves to radio controlled clocks across the continent. You might think replicating a 70 kW, multi-million dollar radio transmitter to set your own clock might be out of reach, but with a single ATtiny45, just about everything is possible.

Even though WWVB has enough power to set clocks in LA, New York, and the far reaches of Canada, even a pitifully underpowered transmitter – such as a microcontroller with a long wire attached to a pin PWMing at 60kHz – will be more than enough to overpower the official signal and set a custom time on a WWVB-controlled clock. This signal must be modulated, of course, and the most common radio controlled clocks use an extremely simple amplitude modulation that can be easily replicated by changing the duty cycle of the carrier. After that, it’s a simple matter of encoding the time signal.

The end result of this build is an extremely small one-chip device that can change the time of any remote-controlled clock. We can guess this would be useful if your radio controlled clock isn’t receiving a signal for some reason, but the fact that April 1st is just a few days away gives us a much, much better idea.

USB On The ATtiny10

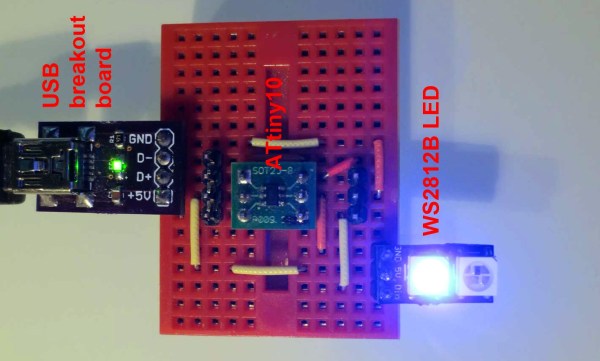
Atmel’s ATtiny10 is their smallest microcontroller in terms of physical size – it’s an SOT-23-6 package, or about the same size as surface mount transistors. The hardware inside this extremely bare-bones; three I/O lines, 1kB of Flash, 32 bytes of RAM, and a reduced AVR core with 16 registers instead of 32. With such a minimal feature set, you would think the only thing this micro would be good for is blinking a LED. You’d be right, but [cpldcpu] can blink a LED with the ‘tiny10 over USB.

The V-USB interface usually requires about 1.5kB of Flash in its most minimal implementation, and uses 50 bytes of RAM. This just wouldn’t do for the ‘tiny10, and although [cpldcpu] is working on a smaller, interrupt-free V-USB, there were still some hurdles to overcome.

The biggest issue with putting code on the ‘tiny10 is its reduced AVR core – on the ‘big’ 32-register core, direct memory access is two words. On the ’10, it’s only one word. AVR-GCC doesn’t know this, and no one at Atmel seems to care. [cpldcpu] worked around this problem using defines, and further reduced the code size by completely gutting V-USB and putting it in the main loop.

It’s not much, but now [cpldcpu] can blink an LED with a ‘tiny10 over USB. If you’re wondering, 96.4% of the Flash and 93.8% of the SRAM was used for this project.

Interrupt Free V-USB

resync

[Tim’s] new version of Micronucleus, Micronucleus 2.0, improves upon V-USB by removing the need for interrupts. The original Micronucleus was a very small implementation of V-USB that took up only 2KB. Removing the need for interrupts is a big leap forward for V-USB.

For those of you that do not know, “V-USB is a software-only implementation of a low-speed USB device for Atmel’s AVR® microcontrollers, making it possible to build USB hardware with almost any AVR® microcontroller, not requiring any additional chip.” One tricky aspect of using V-USB is that the bootloader requires interrupts, which can lead to messy problems within the user program. By removing the need for interrupts, Micronucleus 2.0 reduces the complexity of the bootloader by removing the need to patch the interrupt vector for the user program.

With the added benefit of  speeding up the V-USB data transmission, Micronucleus 2.0 is very exciting for those minimal embedded platforms based on V-USB. Go ahead and try out Micronucleus 2.0! Leave a comment and let us know what you think.

ATMega & ATtiny Core Temperature Sensors

temp

We don’t know if this will come as a surprise to the regular Hackaday reader, but a whole bunch of Atmel microcontrollers have a very cool feature hidden away in their datasheets. Most of them – everything from the ATMega 168, 328, 32u4, to the ATtiny85 and  84 have a temperature sensor right on the chip. [Connor] did a little bit of research on this sensor and came up with a little bit of code that spits out the core temperature of these Atmel chips over the serial port.

The temperature sensor on these Atmel chips is accessed by writing a code – ‘100111’ for the Mega32u4 and ‘100010’ for the tiny84, for example – into the ADMUX register on the chip. According to the datasheet, the returned temperature is accurate to +- 10°C, but that can be easily calibrated by holding an ice cube (in a plastic bag, of course) up to the chip.

With a little more code, [Connor] is able to output the temperature of the microcontroller core over a serial port. In testing, his chip started out at 20°C and reached equilibrium at 24°C after about a minute. Pretty neat, and could be used as a temperature sensor for a project in a pinch.

Software Half Duplex UART For AVRs

If you have worked with very low cost microcontroller in the past, such as the ATtiny series from AVR, you’ve probably been stuck without a UART peripheral. The usual answer to this problem is to implement the UART in software. It’s not fast, but it works.

Lets say you’re even more limited on resources, and only have a single pin for UART. [Ralph] created a software library and a small circuit that enables half duplex UART using only one pin. With the above circuit, and a 62 byte Arduino compatible library, you can add UART to the tiniest of ATtinys.

In this circuit, the Tx/Rx pin is on the AVR, and the Tx and Rx pins are another device. The circuit relies on the idle state of UART being a logic high signal. When the Tx pin is idle, the transistor stays on. This allows the Tx/Rx pin to pull Rx low when the AVR sends a 0. When the Tx pin sends a 0, the Tx/Rx pin gets pulled low through the diode.

It’s a clever hack, and could definitely help add communication to your next tiny project.

Trimming The Fat From AVR GCC

avr

[Ralph] has been working on an extraordinarily tiny bootloader for the ATtiny85, and although coding in assembly does have some merits in this regard, writing in C and using AVR Libc is so much more convenient. Through his trials of slimming down pieces of code to the bare minimum, he’s found a few ways to easily trim a few bytes off code compiled with AVR-GCC.

To test his ideas out, [Ralph] first coded up a short program that reads the ATtiny85’s internal temperature sensor. Dissassembling the code, he found the a jump to a function called __ctors_end: before the jump to main. According to the ATtiny85 datasheet, this call sets the IO registers to their initial values. These initial values are 0, so that’s 16 bytes that can be saved. This function also sets the stack pointer to its initial value, so another 16 bytes can be optimized out.

If you’re not using interrupts on an ATtiny, you can get rid of 30 bytes of code by getting rid of the interrupt vector table. In the end, [Ralph] was able to take a 274 byte program and trim it down to 190 bytes. Compared to the 8k of Flash on the ‘tiny85, it’s a small amount saved, but if you’re banging your head against the limitations of this micro’s storage, this might be a good place to start.

Now if you want to hear some stories about optimizing code you’ve got to check out the Once Upon Atari documentary. They spent months hand optimizing code to make it fit on the cartridges.

Turn A PC On With A Knock And An ATTiny

knockAttiny

Pressing the power button on your computer usually isn’t too much trouble, unless your computer is stored away somewhere hard to reach. [Joonas] has been hard at work on a solution that would also impress his friends, building a knock sensor to turn on his PC.

For around $10 in parts he put together an ATTiny45 that emulates a PS/2 device, which takes advantage of his computer’s ability to boot upon receiving PS/2 input. The build uses a Piezo buzzer and a 1M Ohm resistor as a knock sensor exactly as the official Arduino tutorial demonstrates, and one of those PS/2-to-USB adapters that are most likely lurking in the back corner of every drawer in your office.

[Joonas] used AVRweb to disable the 8X clock divider so there’d be enough clock cycles for PS/2 communication, then loaded some test code to make sure the vibrations were being detected correctly. You can check out his Github for the final code here, and stick around after the break for a quick video demo. Then check out a similar hack with [Mathieu’s] home automation knock sensor.

Continue reading “Turn A PC On With A Knock And An ATTiny”