New Part Day: ATtiny102 And 104

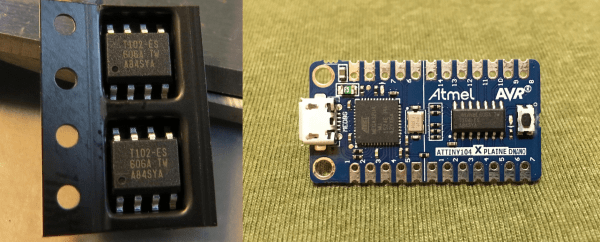
Atmel put out some new, small microcontroller chips early this year, and we’re just now starting to think about how we’d use them. The ATtiny102 and ATtiny104 (datasheet) sell for about a buck (US) and come in manageable SOIC packages with eight and fourteen pins respectively. It’s a strange chip though, with capabilities that fit somewhere between the grain-of-rice-sized ATtiny10 and the hacker-staple ATtiny25-45-85 series.

The ATtiny104 has a bunch of pins for not much money. It’s got a real hardware USART, which none of the other low-end AVRs do, and it’s capable of SPI in master mode. It has only one counter, but it’s a 16-bit counter, and it’s got the full AVR 10-bit ADC instead of the ATtiny10’s limited 8-bit ADC. The biggest limitation, that it shares with the ATtiny10, is that it has only 1 KB of program flash memory and 32 bytes (!) of RAM. You’re probably going to want to program this beast in assembler.

Read on for more reviews, and check out [kodera2t]’s video review at the end.

Continue reading “New Part Day: ATtiny102 And 104”

Hackaday Prize Entry: A Minimal ATtiny Voltage And Frequency Counter

Sometimes when you build something it is because you have set out with a clear idea or specification in mind, but it’s not always that way. Take [kodera2t]’s project, he set out to master the ATtiny series of microcontrollers and started with simple LED flashers, but arrived eventually at something rather useful. An ATtiny10 DVM and DFM all-in-one with an i2c LCD display and a minimum of other components.

The DFM uses the ATtiny’s internal 16 bit timer, which has the convenient property of being able to be driven by an external clock. The frequency to be measured drives the timer, and the time it returns is compared to the system clock. It’s not the finest of frequency counters, depending as it does on the ATtiny’s clock rather than a calibrated crystal reference, but it does the job.

The results are shown in the video below, and all the code has been posted in his GitHub repository. We can see that there is the basis of a handy little instrument in this circuit, though with the price of cheap multimeters being so low even a circuit this minimal would struggle to compete on cost.

Continue reading “Hackaday Prize Entry: A Minimal ATtiny Voltage And Frequency Counter”

Breaking Out The ATtiny10

Atmel’s ATtiny10 is the one microcontroller in their portfolio that earns its name. It doesn’t have a lot of Flash – only 1 kilobyte. It doesn’t have a lot of RAM – only thirty two bytes. It is, however, very, very small. Atmel stuffed this tiny microcontroller into an SOT-23 package, more commonly used for surface mount transistors. It’s small, and unless your ideal application is losing this chip in your carpet, you’re going to need a breakout board. [Dan] has just the solution. He could have made this breakout board smaller, but OSHpark has a minimum size limit. Yes, this chip is very, very small.

Because this chip is so small, it doesn’t use the normal in-system programming port of its larger brethren. The ATtiny10 uses the Tiny Programming Interface, or TPI, which only requires power, ground, data, clock, and a reset pin. Connecting these pins to the proper programming header is easy enough, and with a careful layout, [Dan] fit everything into a breakout board that’s a hair smaller than a normal 8-pin DIP.

The board works perfectly, but simply soldering the ATtiny10 to a breakout board and using it as is probably isn’t the best idea. The reason you use such a small microcontroller is to put a microcontroller into something really, really small like ridiculous LED cufflinks. A breakout board is much too large for a project like this, but SOT23 test adapters exist, and they’re only $25 or so.

Either way, [Dan] now has a very, very small microcontroller board that can fit just about anywhere. There’s a lot you can do with one kilobyte of Flash, and with an easy way to program these chips, we can’t wait to see what [Dan] comes up with.

USB On The ATtiny10

Atmel’s ATtiny10 is their smallest microcontroller in terms of physical size – it’s an SOT-23-6 package, or about the same size as surface mount transistors. The hardware inside this extremely bare-bones; three I/O lines, 1kB of Flash, 32 bytes of RAM, and a reduced AVR core with 16 registers instead of 32. With such a minimal feature set, you would think the only thing this micro would be good for is blinking a LED. You’d be right, but [cpldcpu] can blink a LED with the ‘tiny10 over USB.

The V-USB interface usually requires about 1.5kB of Flash in its most minimal implementation, and uses 50 bytes of RAM. This just wouldn’t do for the ‘tiny10, and although [cpldcpu] is working on a smaller, interrupt-free V-USB, there were still some hurdles to overcome.

The biggest issue with putting code on the ‘tiny10 is its reduced AVR core – on the ‘big’ 32-register core, direct memory access is two words. On the ’10, it’s only one word. AVR-GCC doesn’t know this, and no one at Atmel seems to care. [cpldcpu] worked around this problem using defines, and further reduced the code size by completely gutting V-USB and putting it in the main loop.

It’s not much, but now [cpldcpu] can blink an LED with a ‘tiny10 over USB. If you’re wondering, 96.4% of the Flash and 93.8% of the SRAM was used for this project.

Rickrolling Remote Control Prank

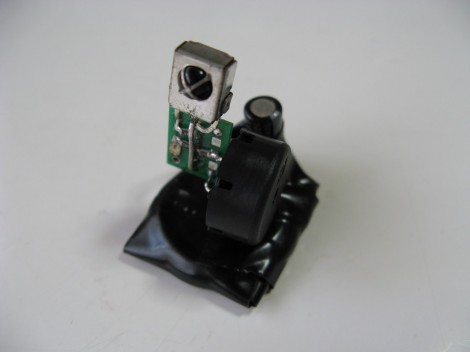
This device is a prank or gag that [Eric Heisler] came up with. It will intercept IR remote control codes and play them back after a bit of a delay. The example he shows in the video (embedded after the break) catches the television power signal from a remote, then sends it again after about thirty seconds. This shuts off the TV and would be extremely annoying if you were unable to find the device. Fortunately (for the victim), [Eric] included a piezo buzzer that Rickrolls after sending each code. Just follow that tune to find the offending hardware.

He chose to use an ATtiny10 microcontroller. It looks like it’s realizing its full potential as the six-pin package use all available I/O to control the IR receiver module, an IR led, and the buzzer. It runs from a coin cell without regulation and the circuit was free-formed on a tiny surface mount breakout board which hosts the microprocessor.

Programming The ATtiny10 With An Arduino

The ATtiny10 – along with its younger siblings that go by the names ATtiny 4, 5, and 9 – are the smallest microcontrollers Atmel makes. With only 32 bytes of RAM and 1 kB of Flash, there’s still whole lot you can do with this tiny six-pin chip. [feynman17] figured out a way to program this chip using an Arduino, allowing him to throw just about anything at this absurdly small microcontroller.

The ATtiny10 doesn’t use the familiar ISP programming header found on other Atmel-based boards. Instead, it uses the exceedingly odd Tiny Programming Interface to write bits to the Flash on the chip. [feynman17] realized he could use the Arduino SPI library to communicate with this chip and built a small programming shield with just a few resistors and a 8-pin DIP socket to mount an ATtiny10 breakout board.

After writing a sketch to upload a .hex file from the Arduino serial console, [feynman] had a programmed ATtiny10, ready to be dropped into whatever astonishingly small project he had in mind.

As for what you can do with this small microcontroller, chiptunes are always an option, as is making a very, very small Simon clone. It may not be a powerhouse, but there’s still a lot you can do with this very inexpensive microcontroller.

The Many Iterations Of [Joe’s] PCB Business Card

[Joe Colosimo] is putting on a show with his PCB business card project. The idea isn’t new, but his goal is to keep it simple and undercut the cost of all other PCB cards he’s seen. This is the third generation of the board design, and he’s just waiting on some solder mask solution before he tries running it through the reflow oven.

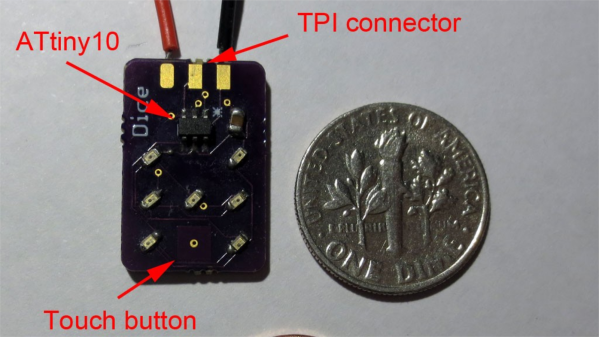
The first two prototypes used some through-hole parts. Notably, the battery was to be positioned in a circular cut-out and held in place by a metal strap and some bare wires. But he couldn’t quite get it to work right so this design will transition to a surface-mount strap for one side, and the large circular pad for the other. At each corner of the board there is a footprint for an LED. He tried milling holes in the board to edge-light the substrate. Now he just mounts the LED upside down to give the board a blue glow. The LEDs are driven by an ATtiny10 microcontroller which takes input from the touch sensor array at the bottom right.

He etched a QR code on the board which seems to work better than the milled QR experiments we saw back in April. The link at the top point’s to [Joe’s] main page on the card. Don’t forget to follow the links at the bottom which cover each part of the development more in-depth.

[Thanks Skitchin]