An Eye-Catching Raspberry Pi Smart Speaker

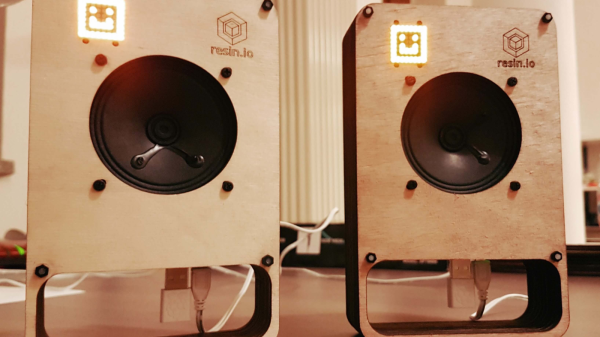
[curcuz]’s BoomBeastic mini is a Raspberry Pi based smart connected speaker. But don’t dis it as just another media center kind of project. His blog post is more of a How-To guide on setting up container software, enabling OTA updates and such, and can be a good learning project for some. Besides, the design is quite elegant and nice.

boombeastic_02
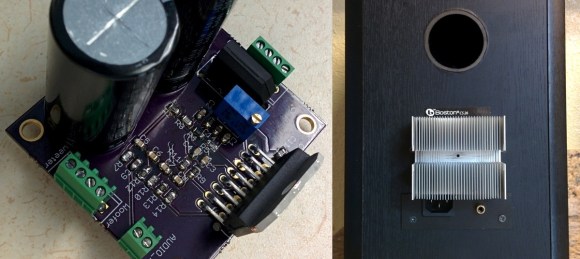
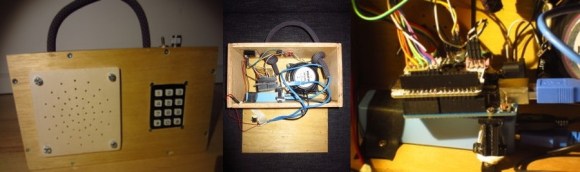
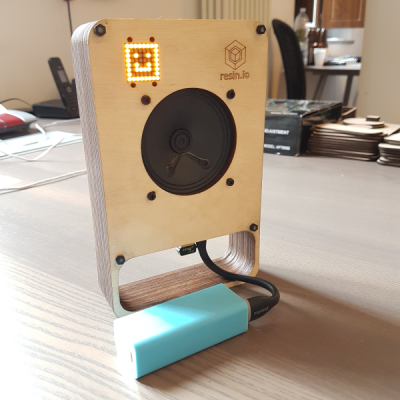
The hardware is simple. There’s the Raspberry-Pi — he’s got instructions on making it work with the Pi2, Pi2+, Pi3 or the Pi0. Since the Pi’s have limited audio capabilities, he’s using a DAC, the Adafruit I2S 3W Class D Amplifier Breakout for the MAX98357A, to drive the Speaker. The I2S used by that part is Inter-IC Sound — a 3 wire peer to peer audio bus — and not to be confused with I2C. For some basic visual feedback, he’s added an 8×8 LED matrix with I2C interface. A Speaker rounds out the BoM. The enclosure is inspired by the Pimoroni PiBow which is a stack of laser cut MDF sheets. The case design went through four iterations, but the final result looks very polished.

On the software side, the project uses Mopidy — a Python application that runs in a terminal or in the background on devices that have network connectivity and audio output. Out of the box, it is an MPD and HTTP server. Additional front-ends for controlling Mopidy can be installed from extensions, enabling Spotify, Soundcloud and Google Music support, for example. To allow over-the-air programming, [curcuz] is using resin.io which helps streamline management of devices that are hard to reach physically. The whole thing is containerized using Docker. Additional instructions on setting up all of the software and libraries are posted on his blog post, and the code is hosted on GitHub.

There’s a couple of “To-Do’s” on his list which would make this even more interesting. Synced audio being one: in a multi-device environment, have the possibility to sync them and reproduce the same audio. The other would be to add an Emoji and Equalizer display mode for the LED matrix. Let [curcuz] know if you have any suggestions.

Continue reading “An Eye-Catching Raspberry Pi Smart Speaker”

‘Nutclough’ Circuit Board Design Is Stylishly Amplified

Though there is nothing wrong with the raw functionality of a plain rectangular PCB, boards that work an edge of aesthetic flare into their layout leave a lasting impression on those who see them. This is the philosophy of circuit artist [Saar Drimer] of Boldport, and the reason why he was commissioned by Calrec Audio to create the look for their anniversary edition amplifier kit. We’ve seen project’s by [Saar] before and this ‘Nutclough18’ amplifier is another great example of his artistic handy work.

nutclough2
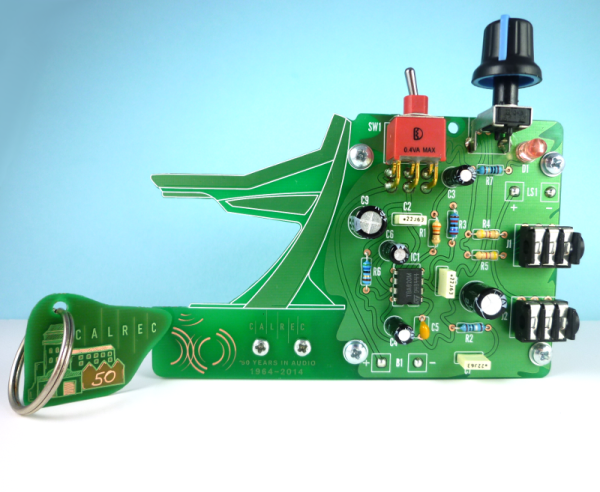
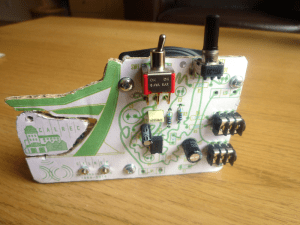
For the special occasion of their 50th anniversary, Calrec Audio contacted [Saar] requesting he create something a bit more enticing than their standard rectangular design from previous years. With their schematic as a starting point, [Saar] used cardboard to mock-up a few of his ideas in order to get a feel for the placement of the components. Several renditions later, [Saar] decided to implement the exact proportions of the company’s iconic Apollo desk into the heart of the design as an added nod back to the company itself. In the negative space between the lines of the Apollo desk there is a small perforated piece depicting the mill where the Calrec offices are located. The image of the mill makes use of different combinations of copper, silk and solder mask either absent or present to create shading and depth as the light passes through the board. This small piece that would have otherwise been removed as scrap can be snapped off from the body of the PCB and used as a commemorative keychain.

With the battery and speaker mounted behind the completed circuit board, [Saar’s] design succeeds in being a unique memento with a stylish appeal. There is a complete case study with detailed documentation on the Nutclough from cardboard to product on the Boldport website. Here you can also see some other examples of their gorgeous circuit art, or checkout their opensource software to help in designing your own alternative PCBs.

Fully Integrated HiFi Studio Monitor

Studio Monitor and PCB

Have you ever wanted to build a high quality audio crossover and amplifier? [Rouslan] has put a lot of thought into making his dual amplifier studio monitor both high quality and simple to build.

With a concise schematic, a meaningful block diagram, and simulation results to boot, his well-written post has everything you need to build self-powered bi-amped speakers based on the LM4766 from Texas Instruments. It is great to see simulations which verify the functionality of the circuit, this can go a long way when working with complicated analog filters and audio circuitry. For those of you who do not have access to PSPICE (an expensive professional simulation tool), [Rouslan] uses LTspice from Linear Technology. TINA-TI from Texas Instruments is another great free alternative.

Additionally, [Rouslan] goes over the typical issues one has with a bi-amplifier studio monitor, such as phase misalignment and turn-on pop, and then provides a solution. Note that his project is powered by 20VAC, which requires an external transformer to convert the 120VAC in the wall to 20VAC. Be careful with high voltages! In the future, adding a high quality voltage regulator will most likely increase the performance.

His post finishes up with a very clean circuit board, which he ordered from OSH Park. With such a complete design, there is nothing keeping you from building your own. Go out and put that old speaker sitting in your basement to good use!

If you don’t have an old speaker sitting around, check out these very cool DIY speakers.

MBox: A Child’s MP3 Player

mobx

For young children, music is a wonderful and exciting thing — but do you really want them playing with your phone, or worse yet, an iPod? [Arons] decided to make the MBox, an Arduino powered MP3 player.

He was inspired by hörbert, a very similar wooden MP3 player for children. Apparently it’s a great product, but it also costs 239€. We don’t blame him for wanting to make his own.

The MBox follows the same exterior design as hörbert — though we must admit, he could have spiced it up a bit! It uses an Arduino Uno at its core with a Freaduino MP3 music shield, capable of playing all the typical formats like MP3, MIDI, WAV, and even Ogg Vorbis. To amplify the sound he’s using a Mono Audio Amp Breakout board from SparkFun which drives an 8Ω loudspeaker. A mini USB power brick provides the juice, and a 12-digit keypad provides the ability to select music — each number plays from a different directory on the SD card.

[Arons’] daughter loves it, and he probably only spent a fifth of what the real hörbert costs!

[Thanks for the tip Renzo!]

Build A Simple Audio Amp

[Ynze] has built an audio amplifier that looks and sounds great. His amplifier uses a National Instruments (now TI) LM3886 Overture series 68 Watt power amp. The LM3886 places [Ynze’s] amp squarely in the “Gainclone” catagory. Gainclone or Chipamp are terms long used by the DIY community to describe audio amps based upon highly integrated semiconductor amplifiers. The Gainclone name stems from the original Gaincard audio amplifier sold by 47 labs. The Gaincard used less than $100 USD of parts when it was introduced in 1999. It sounded good enough to command a $3300 USD price tag on the audiophile market. The low parts count and simple construction spawned the audio DIY community to build their own versions of the Gaincard. Hundreds of variants exist now, and wading through the different versions can be a bit of a daunting task. [Ynze] found a basic design that works, and built from there.

One of the interesting things about [Ynze’s] amp, as well as many of the Gainclones, is the fact that they use no circuit board. All wiring is done point to point. resistors are soldered directly to the pins of the amplifier chip. This can be some tricky soldering for beginners, but several PCB kits are available. [Ynze] built his amp in two cases. One case holds the power supply, and the other contains the amplifier itself. [Ynze] is using a large toroid transformer to drop his local 230V mains down to +25V and -25V. The amplifier circuit itself is simple – a few discrete components surround the LM3886 and it’s heat sink. [Ynze] also did some very nice carpentry work on his wood chassis. The resulting amp looks like it’s right out of the 1960’s – but hides 1990’s electronics inside.

Continue reading “Build A Simple Audio Amp”

Bizarre Mini Amplifier + White Noise Generator?

bma_finished_a

[Jordi] made this awesome looking mini amplifier which has a rather unusual feature. He’s calling it the Bizarre Mini Amplifier because it also has a white noise generator built right into it! Bizarre right?

Now, most people would just find a suitable amplifier and put it into a nice box, but not [Jordi]! He’s designed the amplifier circuit from the ground up! It features four distinct stages like most typical amplifiers:

  1. Impedance Adapt Stage: Two OPAMPS for both the left and right channels — The high input impedance allows for different audio sources to be connected without affecting the output.
  2. Mixer stage: Combines the left, right and noise signals into one, using a third OPAMP. A potentiometer is the output resistor which allows for the volume control.
  3. Filter Stage: A simple filter stage that uses a R-C low-pass filter, another potentiometer controls the tone.
  4. Power Stage: A final power amplifier to boost the output.

After building the circuit, there was a bit of troubleshooting to get it to work properly, so if you’re interested [Jordi] has done a great write-up of this on his blog.

Finally, he decided to add a white noise generator after he discovered it helps him sleep. This is the one part of the project that he didn’t actually go into detail for! But, considering it’s just white noise, we could probably figure out what he did. Stick around after the break to see the device in action!

Continue reading “Bizarre Mini Amplifier + White Noise Generator?”

Improving Terrible Computer Speakers

[Victor] likes to watch movies on his laptop, but the tiny speakers in his machine don’t do [John Williams] and other perfectly fine soundtracks justice. To pump up the jams a little bit, [Victor] got a pair of Trust Mila 2.0 speakers for Sinterklaas. Unfortunately, these speakers were terrible – noise everywhere, tinny output and a brighter-than-the-sun blue LED. These problems were fixed once [Victor] replaced the amplifier in both speakers.

After shopping around for a new power amp to go in each speaker, [Vic] hit upon the MAX9575 3.2 Watt amplifier. This little guy met all of [Victor]’s requirements. The only problem is that the MAX9575 is only available in a TQFN package.

After a deep breath and much sweat of the brow, both amps found a new home in their respective speakers, deadbug style. It probably would have been easier to etch a PCB, but we’ll give a tip of the hat to [Victor]’s fine motor skills anyway.

Because of the insane soldering skill demonstrated in the title pic, [Vic] now has a really nice pair of speakers. Check out the demo of the improved speakers after the break.

Continue reading “Improving Terrible Computer Speakers”