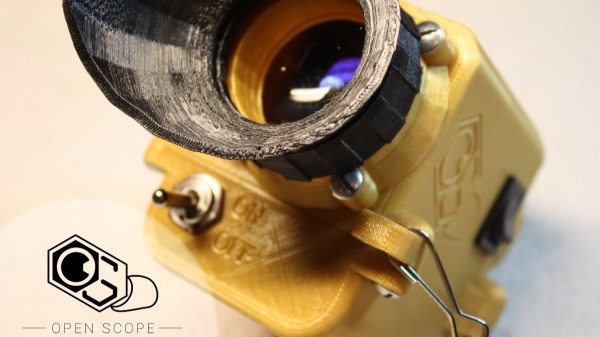
If you’ve always wanted to see in the dark but haven’t been able to score those perfect Soviet-era military surplus night vision goggles, you may be in luck. Now there’s an open-source night vision monocular that you can build to keep tabs on the nighttime goings-on in your yard.
Where this project stands out is not so much the electronics — it’s really just a simple CCD camera module with the IR pass filter removed, an LCD screen to display the image, and a big fat IR LED to throw some light around. [MattGyver92] seemed to put most of his effort into designing a great case for the monocular, at the price of 25 hours of 3D printer time. The main body of the case is nicely contoured, the eyepiece has a comfortable eyecup printed in NinjaFlex, and the camera is mounted on a ball-and-socket gimbal to allow fine off-axis angle adjustments. That comes in handy to eliminate parallax errors while using the monocular for nighttime walks with both eyes open. One quibble: the faux mil-surp look is achieved with a green filter over the TFT LCD panel. We wonder if somehow eliminating the red and blue channels from the camera might not have been slightly more elegant.
Overall, though, we like the way this project came out, and we also like the way [MattGyver92] bucked the Fusion 360 trend and used SketchUp to design the case. But if walking around at night with a monocular at your face isn’t appealing, you can always try biohacking yourself to achieve night vision.
Like any Moore’s Law-inspired race, the megapixel race in digital cameras in the late 1990s and into the 2000s was a harsh battleground for every manufacturer. With the development of the smartphone, it became a war on two fronts, with Samsung eventually cramming twenty megapixels into a handheld. Although no clear winner of consumer-grade cameras was ever announced (and Samsung ended up reducing their flagship phone’s cameras to sixteen megapixels for reasons we’ll discuss) it seems as though this race is over, fizzling out into a void where even marketing and advertising groups don’t readily venture. What happened?
The Technology
A brief overview of Moore’s Law predicts that transistor density on a given computer chip should double about every two years. A digital camera’s sensor is remarkably similar, using the same silicon to form charge-coupled devices or CMOS sensors (the same CMOS technology used in some RAM and other digital logic technology) to detect photons that hit it. It’s not too far of a leap to realize how Moore’s Law would apply to the number of photo detectors on a digital camera’s image sensor. Like transistor density, however, there’s also a limit to how many photo detectors will fit in a given area before undesirable effects start to appear.
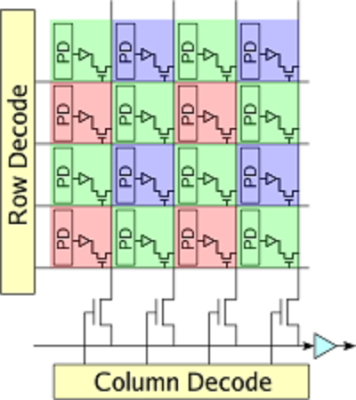
Image sensors have come a long way since video camera tubes. In the ’70s, the charge-coupled device (CCD) replaced the cathode ray tube as the dominant video capturing technology. A CCD works by arranging capacitors into an array and biasing them with a small voltage. When a photon hits one of the capacitors, it is converted into an electrical charge which can then be stored as digital information. While there are still specialty CCD sensors for some niche applications, most image sensors are now of the CMOS variety. CMOS uses photodiodes, rather than capacitors, along with a few other transistors for every pixel. CMOS sensors perform better than CCD sensors because each pixel has an amplifier which results in more accurate capturing of data. They are also faster, scale more readily, use fewer components in general, and use less power than a comparably sized CCD. Despite all of these advantages, however, there are still many limitations to modern sensors when more and more of them get packed onto a single piece of silicon.
While transistor density tends to be limited by quantum effects, image sensor density is limited by what is effectively a “noisy” picture. Noise can be introduced in an image as a result of thermal fluctuations within the material, so if the voltage threshold for a single pixel is so low that it falsely registers a photon when it shouldn’t, the image quality will be greatly reduced. This is more noticeable in CCD sensors (one effect is called “blooming“) but similar defects can happen in CMOS sensors as well. There are a few ways to solve these problems, though.
First, the voltage threshold can be raised so that random thermal fluctuations don’t rise above the threshold to trigger the pixels. In a DSLR, this typically means changing the ISO setting of a camera, where a lower ISO setting means more light is required to trigger a pixel, but that random fluctuations are less likely to happen. From a camera designer’s point-of-view, however, a higher voltage generally implies greater power consumption and some speed considerations, so there are some tradeoffs to make in this area.
Another reason that thermal fluctuations cause noise in image sensors is that the pixels themselves are so close together that they influence their neighbors. The answer here seems obvious: simply increase the area of the sensor, make the pixels of the sensor bigger, or both. This is a good solution if you have unlimited area, but in something like a cell phone this isn’t practical. This gets to the core of the reason that most modern cell phones seem to be practically limited somewhere in the sixteen-to-twenty megapixel range. If the pixels are made too small to increase megapixel count, the noise will start to ruin the images. If the pixels are too big, the picture will have a low resolution.
There are some non-technological ways of increasing megapixel count for an image as well. For example, a panoramic image will have a megapixel count much higher than that of the camera that took the picture simply because each part of the panorama has the full mexapixel count. It’s also possible to reduce noise in a single frame of any picture by using lenses that collect more light (lenses with a lower f-number) which allows the photographer to use a lower ISO setting to reduce the camera’s sensitivity.
Gigapixels!
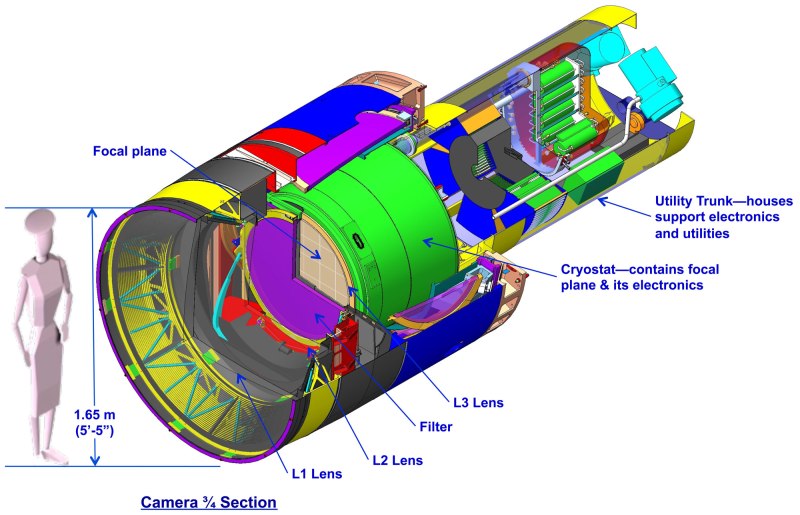
Of course, if you have unlimited area you can make image sensors of virtually any size. There are some extremely large, expensive cameras called gigapixel cameras that can take pictures of unimaginable detail. Their size and cost is a limiting factor for consumer devices, though, and as such are generally used for specialty purposes only. The largest image sensor ever built has a surface of almost five square meters and is the size of a car. The camera will be put to use in 2019 in the Large Synoptic Survey Telescope in South America where it will capture images of the night sky with its 8.4 meter primary mirror. If this was part of the megapixel race in consumer goods, it would certainly be the winner.
With all of this being said, it becomes obvious that there are many more considerations in a digital camera than just the megapixel count. With so many facets of a camera such as physical sensor size, lenses, camera settings, post-processing capabilities, filters, etc., the megapixel number was essentially an easy way for marketers to advertise the claimed superiority of their products until the practical limits of image sensors was reached. Beyond a certain limit, more megapixels doesn’t automatically translate into a better picture. As already mentioned, however, the megapixel count can be important, but there are so many ways to make up for a lower megapixel count if you have to. For example, images with high dynamic range are becoming the norm even in cell phones, which also helps eliminate the need for a flash. Whatever you decide, though, if you want to start taking great pictures don’t worry about specs; just go out and take some photographs!
(Title image: VISTA gigapixel mosaic of the central parts of the Milky Way, produced by European Southern Observatory (ESO) and released under Creative Commons Attribution 4.0 International License. This is a scaled version of the original 108,500 x 81,500, 9-gigapixel image.)
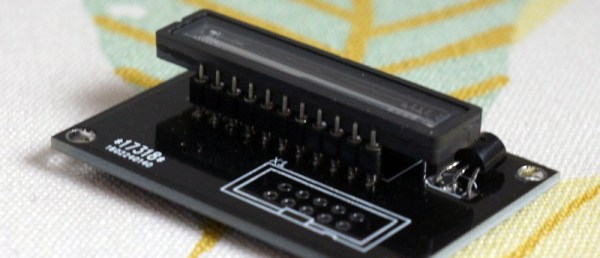
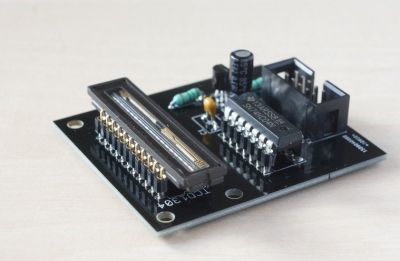
Linear CCDs are an exceptionally cool component. They can be used for DIY spectrometers, and if you’re feeling very adventurous, a homemade version of those crappy handheld scanners of the early 90s. Linear CCDs don’t see much use around these parts, though, which makes [esben]’s Hackaday Prize entry very cool. He’s building a breakout to make using these linear CCDs easier.
A linear CCD module looks like an overgrown DIP chip with a glass window right on top of a few thousand pixels laid out in a straight line. The data from these pixels isn’t output as a series of ones and zeros, though: its old school, and the data this CCD produces is analog. This means reading light from one of these modules requires a fast microcontroller with a good ADC.
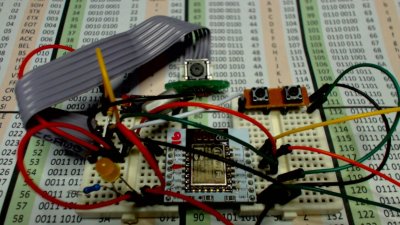
For this project, [esben] is using a Nucleo F401RE, a development board built around an STM32F4 microcontroller. This processor is fast enough to read the data off its 12 bit ADC, and store all three thousand pixels. Now the problem is getting this data off the microcontroller and onto some storage. With a UART limited to 230kB/s, each ‘frame’ of the CCD takes 300ms to transfer to a computer. [esben] really wishes that could be done a little faster, so he’s trying to hack the DMA controller to do his bidding. It looks like [esben] is on track to make a fast interface for a very common linear CCD, which means more cool tools and toys for all of us.
We last covered camera projects way back in Hacklet #11. A ton of camera projects have been added to Hackaday.io since then. While the rest of the world is taking selfies, hackers, makers, and engineers have been coming up with new ways to hack their image capture devices. This week on the Hacklet, we’re taking a look at some of the best camera projects on Hackaday.io!
First up is [aleksey.grishchenko] with PiXel camera. PiXel is a camera and a live video display all in one, We wouldn’t exactly call it high-definition though! A Raspberry Pi uses its camera module to capture images of the world. [Aleksey] then processes those images and displays them on a 32 x 32 RGB LED matrix. This matrix is the same kind of tile used in large outdoor LED signs. The result is a surreal low resolution view of the world. Since the Pi, batteries, and camera all hide behind the LED matrix, there is an unobstructed view of the world around you. [Aleksey] used [Henner Zeller’s] matrix library to make this hack happen.
Next up is [Esben Rossel] with Linear CCD module. [Esben] is building a Raman spectrometer, much like 2014 Hackaday Prize finalist [fl@C@] with his own ramanPi. The heart of a spectrometer is the linear image capture device. Both of these projects use the same TCD1304 linear CCD. Linear Charge Coupled Devices (CCDs) are the same type of device used in flatbed document scanners. The output of the CCD is analog, so an ADC must be used to capture the data. [Esben] is using an STM32F401RE on a Nucleo board as the control logic. The ST’s internal ADC converts the analog signal to digital. From there, it’s time to process all the spectra.
[Chiprobot] brings the classic Wii remote camera to the internet of things with ESP8266 meets Wii Mote Camera. The Wii remote uses a camera which doesn’t output images, instead it plots the location of up to four IR LEDs. Normally these LEDs are located in the poorly named sensor bar that is sold with the Wii. Hackers have been using these cameras in projects for years now. [Chiprobot] paired his camera with the modern classic ESP8266 WiFi module. The ‘8266 is programmed to read data from the camera’s I2C bus. It then sends the data as an SVG request to the W3C website. W3C returns a formatted image based on those coordinates. The resulting image is a picture of the IR LEDs seen by the camera. Kind of like sending your negatives out to be developed.
Finally, we have [GuyisIT] with Raspberry Pi Photobooth. Photo booths are all the rage these days. First it was weddings, but now it seems like every kids party has one. [GuyisIT] didn’t rent a booth for his daughter’s birthday, he built one using his Raspberry Pi and Pi camera. The project is written in python, based upon [John Croucher’s] code. When the kids press a button, the Pi Snaps a series of pictures. The tiny Linux computer then joins and rotates the images while adding in some superhero themed graphics. Finally the Pi prints the image on to a photo printer. The biggest problem with this hack is re-triggering. The kids loved it so much, they kept pressing the big red button!
If you want to see more camera projects, check out our updated camera projects list! If I missed your project, don’t be shy! Just drop me a message on Hackaday.io. That’s it for this week’s Hacklet. As always, see you next week. Same hack time, same hack channel, bringing you the best of Hackaday.io!
After 20 or so years of development, digital cameras may soon be superior to film in almost every way, but there are a few niches where film cameras reign supreme. Large format cameras, for example, are able to produce amazing images, but short of renting one for thousands of dollars a day, you’ll probably never get your hands on one. For his entry to The Hackaday Prize, [Jimmy.c..alzen] decided to build a digital large format camera, using an interesting device you don’t see used very often these days – a linear CCD.
[Jimmy]’s camera is built around a TAOS TS1412S, a linear CCD that is able to capture a line of light 1536 pixels across. The analog values are clocked out from this chip in sequence, going straight into an Arduino Due for processing, saving, and displaying on a small screen.
Inside the camera, the sensor is on a pair of rails and driven across the focal plane with the help of a stepper motor. The effect is something like the flatbed scanner to camera conversions we’ve seen in the past, but [Jimmy] is able to adjust the exposure of the camera simply by changing the integration time of the sensor. He can also change the delay between scanning each column of pixels, making for some really cool long-exposure photography techniques; one side of an image could be captured at noon, while the other side could be from a beautiful sunset. That’s something you just can’t do otherwise without significant digital manipulation outside the camera.
The project featured in this post is an entry in The Hackaday Prize. Build something awesome and win a trip to space or hundreds of other prizes.
This picture was taken by using a DRAM chip as an image sensor (translated). A decapped 64k DRAM chip was combined with optics that could focus an image onto the die. By reading data out of the DRAM, the image could be constructed.
DRAM is the type of RAM you find on the RAM cards inserted into your motherboard. It consists of a massive array of capacitors and transistors. Each bit requires one transistor and one capacitor, which is quite efficient. The downside is that the memory needs to be refreshed periodically to prevent the capacitors from discharging.
Exposing the capacitor to light causes it to discharge faster. Once it has discharged past a certain threshold, the bit will flip from one to zero. To take a picture, ones are written to every bit in the DRAM array. By timing how long it takes a bit to flip from one to zero, the amount of light exposure can be determined. Since the DRAM is laid out in an array, each bit can be treated as a pixel to reconstruct the image.
Sure, modern CCDs are better, cheaper, and faster, but this hack is a neat way to totally re-purpose a chip. There’s even Turbo Pascal source if you’d like to recreate the project.
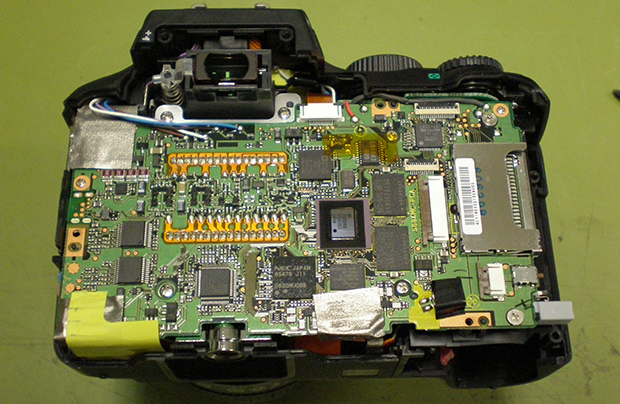
To take a color image, modern digicams have something called a Bayer pattern – small red green and blue filters, one color for each pixel – that drastically reduce the resolution if all you’re doing is taking black and white pictures. [Lasse] is an astrophotographer, and doesn’t exactly need color pictures, so he decided to swap the color sensor in his camera with a monochrome CCD.
Most DSLRs have CCD sensors on strange surface mount packages or put everything on flex PCBs. [Lasse]’s Olympus E-500, though, features an 8 Megapixel CCD on a ceramic DIP that is actually fairly easy to remove given the right tools and just a little bit of mechanical encouragement.
After putting in a new monochrome CCD, [Lasse] had a much more sensitive sensor in his camera, and processing the RAW files off the camera gives him a great improvement for his astrophotography.
This isn’t [Lasse]’s first adventure in tearing apart DSLRs for astrophotography. Earlier, he uncovered the secrets of the Four Thirds lens format with a logic analyzer, making his Olympus camera a wonderful tool for looking into the heavens.