You need to replicate a small part on a 3-D printer, so you start getting your tools together. Calipers, rulers, and a sketch pad at a minimum, and if you’re extra fancy, maybe you pull out a 3D-scanner to make the job really easy. But would you raid your kid’s stash of Play-Doh too?
You might, if you want to follow [Vladimir Mariano]’s lead and use Play-Doh for accurately modeling surface features in the part to be replicated. Play-Doh is a modeling compound that kids and obsolete kids alike love to play with, especially a nice fresh can before it gets all dried out or mixed in with other colors or gets dog hair stuck in it.
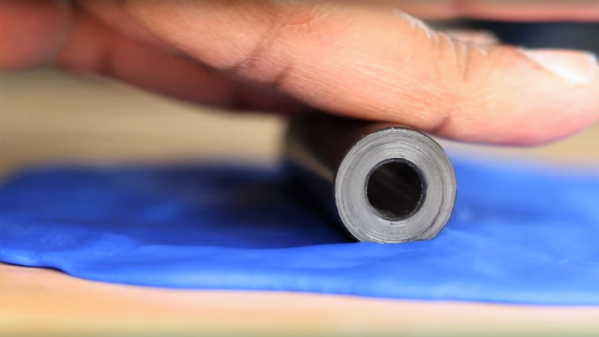
For [Vladimir], the soft, smooth stuff was the perfect solution to the problem of measuring the spacing of small divots in the surface of a cylinder that he was asked to replicate. Rather than measuring the features directly on the curved surface, he simply rolled it across a flattened wad of Play-Doh. The goop picked up the impressions on the divots, which were then easy to measure and transfer to Fusion 360. The video below shows the Play-Doh trick up front, but stay tuned through the whole thing to get some great tips on using the sheet metal tool to wrap and unwrap cylinders, as well as learning how to import images and recalibrate them in Fusion 360.
Run into a modeling problem that Play-Doh can’t solve? Relax, we’ve got a rundown on the basics for you.
Continue reading “Make 3D-Modeling Child’s Play With A Can Of Play-Doh”