Bluetooth Thermometer Minds Your Meats

The summer may have come to a close here in the USA, but any time of the year is a good time for grilling. In the colder weather, it’s a drag to have to stay near the hot grill to keep an eye on your burgers and franks. [Eric Ely] thought it would be smarter to have a meat thermometer that sent his phone the current reading via Bluetooth.

Instead of starting from scratch, [Eric] took an off the shelf electronic thermometer and removed its temperature probe (which was a thermistor). The hardware used an off the shelf Bluetooth board with a companion battery board and prototype board. If you can’t bear to cut up a good thermometer, you can get replacement probes that ought to work just as well.

In addition to the boards and the scavenged thermistor, [Eric] used a couple of resistors. One resistor is in parallel with the thermistor to improve the linearity of the device’s response curve. The second resistor forms a voltage divider that the Bluetooth board reads.

The software (using Node.js and C) is available on Github. The C program reads the temperature and pushes it out using JSON. Node.js provides a server that [Eric] can hit with his phone’s Web browser.

Sure, you can buy wireless thermometers, but what self-respecting hacker wants to carry around a store-bought box just to display meat temperature? Viewing it on your phone has much more street cred.  Of course, a real hacker isn’t going to cook on a conventional grill, either.

Continue reading “Bluetooth Thermometer Minds Your Meats”

Arduino-Based Dispenser Delivers Liquids, Powders

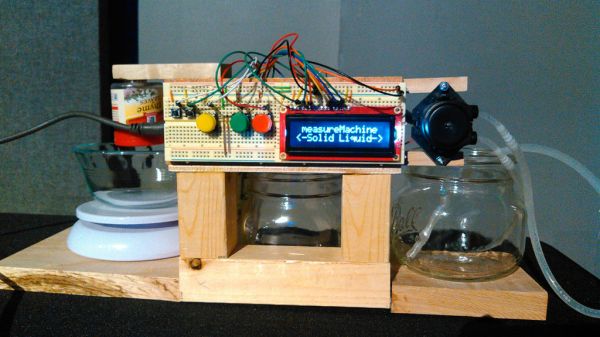
If you like to cook or bake, you probably don’t measure everything out in little bowls and ramekins before you start. Well,unless you also happen to like doing dishes. Even so, there are a lot of measuring spoons and -cups that end up getting dirty in the process. But what if you had a measuring machine to dole out spices and low-viscosity liquids in specific quantities for you?

[enddev]’s creation is based around an Arduino Mega, and the interface is three buttons and an LCD. The user selects between liquid and powder, followed by the desired measurement. If liquid is chosen, the peristaltic pump is engaged to deliver the specified amount through silicone tubing. The current powder setup uses a kitchen scale, which the designers found to be inaccurate for small amounts. They believe that a volume auger and stepper motor would be ideal.

The team mentions that the powder delivery system is better suited for flakier substances since it’s basically agitated out of the container. This makes us think this would be great for feeding fish. If you take this admirably-written Instructable and use it to feed your fish or something, let us know. Their code is on the gits.

[via Embedded Lab]

Precision Temperatures For Cooking Or Whatever

sous-vide temp controller

If you have not heard of the sous-vide method of cooking you are not alone. This method uses a low temperature water bath to cook food in airtight plastic bags. Because the temperatures are much lower than normal the cooking time must be much longer and the actual temperature is very critical. The advantage is that the food is heated evenly without overcooking the outside. Since the food is bagged, it also retains moisture.

[Brian] put together a sous-vide control system to automatically maintain the correct temperature of a rice cooker. A temperature control unit was sourced on eBay for about $15. This is not a bad deal considering it has an LED display, control buttons, built-in relay and thermometer input. The control unit is mounted inside a project box with a few other components. The 120 volt AC line comes into the box where the neutral and ground are connected to the control unit and a standard outlet. The hot wire is connected directly to the control unit which determines if the hot wire is or isn’t connected to the outlet by using its built-in relay.

Continue reading “Precision Temperatures For Cooking Or Whatever”

Repairing And Adding Bluetooth Control To An Induction Cooker

When his 6 years old induction cooker recently broke, [Johannes] decided to open it in an attempt to give it another life. Not only did he succeed, but he also added Bluetooth connectivity to the cooker. The repair part was actually pretty straight forward, as in most cases the IGBTs and rectifiers are the first components to break due to stress imposed on them. Following advice from a Swedish forum, [Johannes] just had to measure the resistance of these components to discover that the broken ones were behaving like open circuits.

He then started to reverse engineer the boards present in the cooker, more particularly the link between the ‘keyboards’ and the main microcontroller (an ATMEGA32L) in charge of commanding the power boards. With a Bus Pirate, [Johannes] had a look at the UART protocol that was used but it seems it was a bit too complex. He then opted for an IOIO and a few transistors to emulate key presses, allowing him to use his phone to control the cooker (via USB or BT). While he was at it, he even added a temperature sensor.

Baking Better Bread With Steam

It’s not often we see a build that turns you into a better cook without any electronics whatsoever. [Chris]’s method of baking better bread with steam is one of those builds, and we’re more than willing to test it out on our own.

If you’ve ever tried to bake bread at home, you’ll quickly notice the crust is much thicker and harder than a loaf available at a bakery. The thickness of the crust can be controlled, however, with a careful application of steam. To make a better crust, [Chris] used a pressure cooker fitted with a valve to inject steam into an oven through his oven’s exhaust. Not only does this gelatinate the starches in the bread crust, but it keeps this gelatin from hardening too quickly.

The end result is a thin, golden brown crust that makes for the perfect loaf of bread. Of course, the proper application of steam does take a little bit of practice. If someone is up to the task of Arduinofying this hack with a few solenoid valves, PID sensors, and a high-temperature humidity sensor, send it in and we’ll put it up.

Ice On Your Turkey Makes It Tender, Apparently

Turkey day is fast approaching and for those of us not cool enough to be rocking the deep-fried turkey this year we’ll have to suffer though a potentially dry oven-roasted bird. Chef [Justin] came up with a great way to prevent dried out white meat on a turkey using ice of all things.

The enemy of moist and tender breast meat is heat. Cooking meat for too long will dry it out. There’s a problem, though: the breast is the thickest part of the bird which means it will take longer than the legs or thighs to reach the necessary 160 degrees. [Justin] figured that if he could cool down the breast with ice, it will take longer to cook and both the white and dark meat will come out perfectly.

[Justin] set up a test with two 15-pound birds. Both turkeys were allowed to come up to room temperature, then ice packs were put on the breast of one bird for 15 minutes. This lowered the temperature of the experimental breast by a few degrees. Both birds were then thrown into the oven.

After coming out of the oven, both birds looked great. The bird treated with ice packs appeared to be more tender and moist. Sounds like the perfect thing to pull out of our bag of tricks next week.

Improving A Cheap Espresso Machine

For those of us that would like a good cup of coffee but don’t want to put up with the ‘burnt butt’ taste of Starbucks and don’t have a decent coffee shop nearby, we’ve had very few options. Most of us have been made to suffer with an el-cheapo espresso machine. [Joe] sent in a great build that improves these el-cheapo models and brings them up to the quality we would expect from their more expensive brethren.

For the best pull from an espresso machine, the great [Alton Brown] says 200° F water must be forced through the grind at around 10 PSI atm. [Joe]’s espresso machine can’t build up pressure because the heating element is only active when the lever is in the ‘brew’ or ‘froth’ position. To build up pressure in the water reservoir, [Joe] simply added a pressure gauge to the frothing attachment. When the gauge reads the necessary 10 atmospheres, just move the lever over to the ‘brew’ position and enjoy a nice cup of espresso.

[Joe] has already tested the pressure relief valve of his espresso machine. With the gauge in the way, [Joe] can’t make use of his frother, but a secondary valve could easily remedy that. [Joe] hasn’t published his espresso hack anywhere, but he did email us some pics of his build. We’ve embedded them as a slideshow after the break. Check out the pressure gauge on the frothing attachment and the pressure relief valve below.

Continue reading “Improving A Cheap Espresso Machine”