Passion Fruit Acquire Laser Defenses

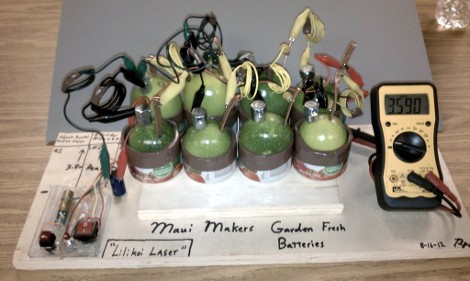
Apparently being overrun by ripe Passion Fruit is a problem if you live in Hawaii. [Ryan K’s] solution to the situation was to use his extra fruit to power a laser. In an experiment that would make [Walter White] proud, [Ryan] gathered everyday supplies to form a battery based on the fruit.

He used some galvanized bolts as the source of zinc. It forms one pole of each cell, with a thin copper tube as the other pole. Each cell is rather weak, but when combined with others it makes a respectable battery. We’ve seen acidic fruit used to power LEDs, but [Ryan] wanted to do a little more. He built a circuit that would store electricity until he had enough potential to power an LED diode. After the break you can see a four second clip of the fruit wielding its new laser defense system.

Continue reading “Passion Fruit Acquire Laser Defenses”

Conductive Ink Circuit Experiments

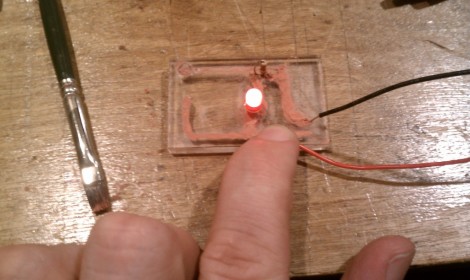
This glowing LED is proof that the experiments [Nvermeer] is doing with conductive ink are working. We’re filing this one as a chemistry hack because  you need to hit the lab ahead of time in order to get the conductivity necessary for success. He reports that this technique uses a copper powder suspended in an epoxy intended for spray painting. Before mixing the two he etched the powder in ammonium persulfate, then washed it in deionized water which made it a much better conductor.

We gather that the ink was applied with the brush seen in the photo. But since this uses that spray paint friendly solution to host the copper powder we wonder about stenciling with something like masking tape in order to spray the circuit paths onto the substrate.

There’s not too much info up yet, but [Nvermeer] does link to one of our other favorite conductive ink projects.

Putting QR Codes In Copper

Former Hackaday contributor [mikeysklar] has been trying to etch a QR code into a sheet of copper. Although his phone can’t read the CuR codes he’s made so far, he’s still made an impressive piece of milled copper.

The biggest problem [mikey] ran into is getting Inkscape to generate proper cnc tool paths instead of just tracing a bitmap image. He’s got the CNC part of his build under control, but he still can’t find a QR code reader that will register his work.

We’re no stranger to QR codes here at Hack a Day, and it’s very possible the only thing that could be stopping [mikey]’s QR code from being read by a phone is the contrast of the image. We’re thinking a little bit of printer’s ink forced into the non-copper part of the PCB would make the QR code register. Since [mikey] already has a very nice negative etching of his QR code, he could easily use his new board as a printing plate, making infinite paper copies of his copper-based QR code.

If you’ve got any ideas on how [mikey] can get his QR code working, post them in the comments.

Etching PCBs With Vinegar

When we hear about etching PCBs at home we assume that either Ferric Chloride or Cupric Chloride were used to eat away unmasked copper from the boards. But [Quinn Dunki] just wrote up her PCB etching guide and she doesn’t use either of those. Instead, she combines vinegar, hydrogen peroxide, and salt. It’s easier to find vinegar than muriatic acid (Cupric Chloride is made using this, peroxide, and adding the copper) so this is something to keep in mind if you’re in a pinch (or a Macgyver situation).

The rest of the process is what we’re used to. She’s using photoresistant boards which can be masked with a sheet of transparency instead of using the toner-transfer method. Once they take a bath in the developer solution she puts them in a shallow dish of vinegar and hydrogen peroxide along with a teaspoon of salt. She wipes the surface with a foam brush every minute or so, and inspects them every ten minutes to see if they’re done.

She does discuss disposal. Seems that she throws the solution in the garbage after each use. The liquid will contain copper salts which are bad for wildlife. We’ve heard that you should neutralize the acid and make a block of concrete using the liquid, then throw it in the garbage. Does anyone have a well-researched, ethical, and environmentally friendly way of getting rid of this stuff?

How To Etch Your Own Solder Paste Stencils

We’re kind of surprised we haven’t covered this concept before since it only uses techniques that are commonly avaialable for home PCB fabrication. [Ray] made this solder paste stencil out of a sheet of copper using the same etching techniques you would for a circuit board. He designed and printed a resist pattern, with toner everywhere except the places where there should be holes in the stencil. He transferred the toner to the copper using an iron.

The difference here should be obvious; this a thin copper sheet with no substrate. Because of that, you must protect the copper surface before etching. he covered the entire thing, both sides, in packing tape. After that it’s into the Cupric Chloride bath to dissolve the exposed parts. Once the tape and toner has been removed you can scree a precise amount of solder paste onto your boards.

This isn’t for everyone, but if you’re assembling many boards it’s not a bad approach. If the stencil is no longer used it can be recycled, but we do wonder how corrosion on the copper will affect the stencil’s performance.

The idea for this technique came to [Ray] from a guide that’s been around for years.

DIY Spot Welder Can Join Anything Together, Even Copper

copper-spot-welder

Hackaday reader [David] was looking for a cheap and easy way to spot weld copper tabs together. As he notes in his writeup, the properties of copper which are most enticing, such as high thermal capacity, make welding it all that more difficult. His home-brew method of spot welding is admittedly quick and dirty, but it does get the job done quite well.

He started off with an array of four 2.5V @ 2600 Farad ultra capacitors, which provide the high current required to do copper spot welding properly. They are wired in series and connected to his electrodes using heavy gauge wire. The graphite-tipped electrodes were an interesting DIY job themselves, cleverly constructed using copper tubing and a graphite block. The most simple/dangerous/clever part of the whole rig is his trigger mechanism, which consists of a pair of copper blocks that he bangs together manually to complete the circuit.

[David] is well aware that the setup is just a touch rough, but according to him it makes great welds, and it’s only a proof of concept at this point. He has a hefty list of improvements to make for the final version, including a different switching method among a few other safety precautions.

DIY Vaporizer

Here’s a DIY vaporizer build. It uses a 30 watt Radio Shack soldering iron as a heat source that is regulated with a common dimmer switch. This is done by removing the soldering tip and replacing it with threaded rod attached to a brass pipe fitting assembly. This is housed inside of a Mason jar with a copper pipe for air intake and another for output. Not surprisingly the creator tipped us off anonymously, saying that this a “smoking accessory”. A bit of searching and we came across this Wikipedia article about a Volcano Vaporizer which sheds light on what one is used for.

We don’t condone using illicit substances. But even more so, we’re skeptical about breathing through this thing because of the warning that [Anon] included about noxious vapors put off by the epoxy putty when it heats up. Still, it’s an interesting build so we though we’d share.