Arduino Vs. Arduino: The Reseller’s Conundrum

Over the last few months, the internal struggles between the various founders of Arduino have come to a head. This began last November when Arduino SRL (the Italian version of an LLC) sued Arduino LLC for trademark infringement in Massachusetts District court. To assuage the hearts and minds of the maker community, Arduino SRL said they were the real Arduino by virtue of being the first ones to manufacture Arduino boards. A fork of the Arduino IDE by Arduino SRL – simply an update to the version number – was a ploy to further cement their position as the true developers of Arduino.

This is a mess, but not just for two organizations fighting over a trademark. If you’re selling Arduinos in your web store, which Arduino do you side with?

[Nate] from Sparkfun is answering that question with a non-answer.

Currently, Arduino SRL is the only source of Arduino Unos. Sparkfun will continue to buy Unos from SRL, but they’re not necessarily siding with Arduino SRL; people demand blue Arduinos with Italy silkscreened on the board, and Sparkfun is more than happy to supply these.

There are, however, questions about the future of Arduino hardware. The Arduino software stack will surely be around in a year, but anyone that will be purchasing thousands of little blue boards over the next year is understandably nervous.

redboardThis isn’t the first time Sparkfun has faced a challenge in Arduino supply. In 2012, when the Arduino Uno R3 was released, all the documentation for their very popular Inventor’s Kit was obsoleted overnight. In response to these supply chain problems, Sparkfun created the RedBoard.

Sparkfun has always offered to pay royalties on the RedBoard to Arduino LLC, just as they do with the Arduino Pro and Pro Mini. Effectively, Sparkfun is on the fence, with offers to manufacture the Arduino Zero, Uno, Mega, and Due coming from the LLC.

The reason for this is consumers. If someone wants an Arduino SRL-manufactured board, they’ll buy it. If, however, a customer wants to support Arduino LLC, that option is on the table as well.

It’s not a pretty position to be in, but it does show how someone can support one Arduino over another. In a year or two, there will only be one Arduino, but until then, if you have a preference, at least Sparkfun is giving you a choice.

Credit to Sparkfun for the great Spy vs. Spy image. Why don’t you sell googly eyes?

An Improved Table Saw Fence With Threaded Rod

Back in the bad old days, table saw fences were terrible. You would have to measure the top and bottom of the fence before each cut, just to make sure the fence was square to the blade. In the 1970s, [Bill Biesemeyer] invented a better table saw fence, one that was always square, and included a measuring tape, right on the table saw.

[Jer] wanted an upgrade for his table saw and came up with what might be the next evolution of the table saw fence. It will always produce a square cut, but unlike the 1970s version, this fence has repeatability. If you rip a board to 1″, move the fence, come back to it after a month, and try to rip another board to 1″, those two boards will be exactly the same width.

The secret to this repeatability is a threaded rod. On the front of the fence is a big, beefy piece of threaded rod with 16 threads per inch. On the fence itself is two nuts, cut in half, welded to the guide, with a lever and cam to lock them in place.

When the lever is up and the nuts are disengaged from the threaded rod, the fence easily moves from one side of the table to the other. When the fence is locked down, it locks to the nearest 16th of an inch, and only the nearest 16th of an inch. While that may seem a little large for a relatively expensive tool, this is wood we’re talking about here. There’s not much reason to make the resolution of this fence any smaller; wait until the humidity changes and you’ll have a piece of wood that’s the desired dimension.

Continue reading “An Improved Table Saw Fence With Threaded Rod”

The RUM 80 – A Home Brew Z80 Computer Built From Scratch

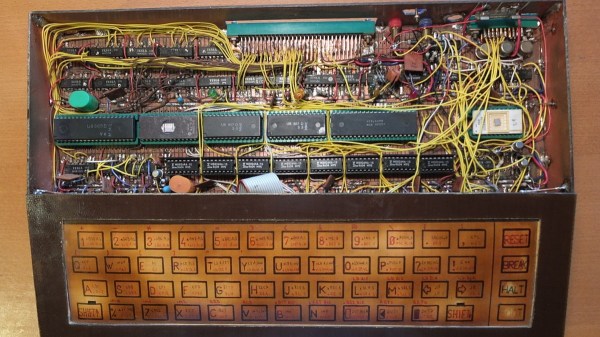
[M] recently tipped us off about hacker [Lumir Vanek] from the Czech Republic. Between 1985 and 1989, [Lumir] built his own home brew, Z80 based computer. The list of home computers available in the 1980’s is extensive. Those living in western Europe and the Americas could choose offerings from Acorn, Apple, Commodore, Atari, Radio Shack, and Sinclair Research to name just a few. Even the erstwhile Czechoslovakia had home computers available from Didaktik and Tesla.

[Lumir]’s built was based around the Z80 processor and is built using regular, double-sided, prototyping board. It featured the 8-bit Z80 processor CPU, 8kB EPROM with monitor and BASIC, two Z80 CTC timers, an 8255 parallel interface for keyboard and external connector, 64kB DRAM, and Video output in black & white, 40×25 characters, connected to a TV. The enclosure is completely made from copper clad laminate. [Lumir] documented the schematics, but there is no board layout – since the whole thing was discrete wired. He even built the membrane keyboard – describing it as “layers of cuprextit, gum, paper with painted keys and transparent film”. When he ran out of space on the main board, he built an expansion board. This had an 8251 serial interface for cassette deck, one 8-bit D/A converter, and an 8255 parallel port connected to the “one pin” BT100 printer.

On the software side, he wrote his own monitor program, which allowed simple interactions, such as displaying and modifying registers, memory, I/O ports and to run programs. He wrote this from scratch referring to the Z80 instruction set for help. Later he added a CP/M emulator. Since the Z80 had dual registers, one was used for user interaction, while the other was reserved to allow background printing. Eventually, he even managed to port BASIC to his system.

Check out [Martin Malý]’s awesome article Home Computers behind the Iron Curtain and the follow up article on Peripherals behind the  Iron Curtain, where you can read more about the “one pin” BT100 printer.

Continue reading “The RUM 80 – A Home Brew Z80 Computer Built From Scratch”

Chain Cleaner

DIY Automatic Chain Cleaning Machine

Spring is here and it’s time to pull the bikes out of the shed. One think that is often overlooked is bicycle maintenance. No one wants to be that guy walking his bike home after a part failure renders the bike unrideable. One portion of proper bike maintenance is cleaning the chain. A contaminated bike chain can wear quicker, not be as flexible, hinder shifting and increase wear to the drivetrain cogs. Tired of sitting there cleaning his chain with a tooth brush, [Ally] built a washing machine for bike chains.

This machine is quite simple, it’s a plastic box full of turpentine and dish detergent. The chain is submerged in the liquid and a lid is put on the box. At the local hobby store, [Ally] purchased a small gearbox and motor assembly. Powered by a 5vdc wall wart, the output shaft of the gearbox spins a crank that in-turn agitates the box, chain and cleaning liquid. After about 5 minutes the chain is free of grit and gunk. Not bad for a few dollars, spare parts and a little bit of time. Check out the video of it in action after the break.

While you’re waiting for your chain to be cleaned you should work on making your bike pedal in both directions.

Continue reading “DIY Automatic Chain Cleaning Machine”

Simple Keypad Scanning With SPI And Some Hardware

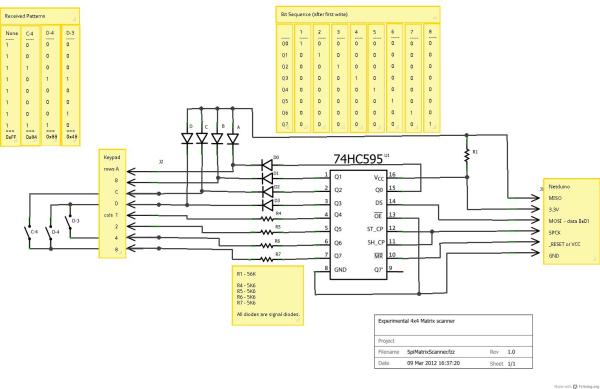
16-button keypads have a clever method of encoding their data into 8 pins. Pins are mapped to four rows and four columns on the keypad. A user reads the keypad by bringing each row up to logic: HIGH, and reading the corresponding column values, (HIGH or LOW). Keypad scanning can be farmed out to a microcontroller with a simple finite-state machine and some button debouncing techniques. [Mario], [Glen], and [Paul] on the Netduino forums took an entirely different route: they’ve designed and implemented a Keypad Scanner using any microcontrollers SPI peripheral and a 74HC595 Shift register.

The trio’s solution is an elegant adventure into circuit design. With two diodes and a voltage divider, they devise a simple circuit that pulls the SPI MISO line LOW if a button in the corresponding circuit’s row is pushed closed. Copied four-fold, this circuit joins the rows and columns of the 74HC595 to the keypad matrix. To scan across the four columns, the microcontroller performs an SPI transfer of the key value: 0x01. To decode which button is pushed, the value received back from the SPI bus encodes which button was pushed out of the 16 possible buttons. Note: some cases for ambiguity as to “which button was pressed” do exist if multiple buttons are pushed at the same time, but for the general case where we’re punching in values one-by-one, this circuit works perfectly.

The team’s hack is a clever use of existing hardware to outsource a microcontroller’s software problem to hardware while leveraging the SPI peripheral to cleverly decrypt and retrieve data back from the keypad. Kudos to the team of three over at the Netduino Forums, and we’re always thrilled to see and idea grow from one person to the next. In case you want to take a step lower and build up the keypad itself, here’s a blast from the past that does just that.

Where 3000MPG+ Cars Come To Compete: The Ecomarathon

Every year teams from around the world come together for the Ecomarathon, an event (ironically put on by Shell) that tasks teams from high schools and universities with creating energy-efficient electric, gas, and hybrid vehicles. This year’s competition was held in Detroit, so I headed over to check it out.

vehicle-blurThe event has two categories that vehicles compete in: prototype vehicles that compete for the highest fuel efficiency and “urban concept” vehicles that are more focused on normal driving environments and look slightly closer to street-legal vehicles. Cars in both categories can be fully electric or powered by gas, diesel, compressed natural gas, or other alternative fuels. Vehicles drive around a 0.9 mile track that weaves through downtown Detroit and the efficiency of each vehicle is measured as they complete a fixed number of laps around the track.

Continue reading “Where 3000MPG+ Cars Come To Compete: The Ecomarathon”

Bike-Powered Everything

It’s hard to argue that bicycles aren’t super handy. They get you from point A to B in a jiffy with little effort. Since these machines are so simple and convenient, why not use them for things other than transportation? Well, [Job] set out to do just that.

[Job’s] starts with a standard single speed bike and adds a few parts. First, a stand is installed to the back axle. When in the down position, it lifts the rear wheel off of the ground and provides support so the bike does not tip over. When flipped up into the ‘up’ position the stand creates a rack for holding goods and the bike can be pedaled around in a normal manner.

dualpurposebike-midNext, a jack shaft made from a bike bottom bracket and crank is installed up front in between the top tube and down tube of the frame. On one side of the jack shaft is a sprocket and the other side is a large pulley. When converting to what [Job] calls ‘power production mode’, the chain going to the rear wheel is removed from the crank sprocket and replaced with a chain connected to the jack shaft.

With the rear stand down supporting the bike and the pedals now powering the jack shaft and large pulley, it is time to connect the bike to any sort of machine. A belt is slung around the pulley and connected to a matching pulley on a power-hungry machine. This dual-purpose bike has powered a rice thresher, peanut sheller, water pump, table saw and even a wood lathe!

[Job] set out to create a simple and inexpensive way to make a bike even more useful than just riding around town. We think he did just that. For more bike-powered stuff, check out this generator.