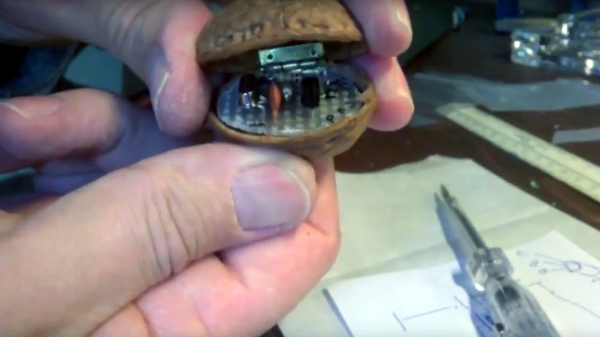
A Beautiful Morse Key From A Hard Drive Actuator

Morse code, or CW, is a subject that divides the amateur radio community from top to bottom. For some it’s a faded anachronism, while for others it’s the purest form of the art. With it no longer in significant commercial or military use it is radio amateurs who keep it alive, and those for whom it is a passion devote considerable effort to its continuing use.

With well over a century of history behind it there are a huge array of morse keys available to the CW enthusiast. From vintage telegraph keys through WW2 surplus military keys to sideways “bug” keys and modern boutique handcrafted keys, many operators will amass a collection for the love of it, and regularly use them all.

Just one of the hand-drawn illustrations for this project.

Other operators create their own keys, either crafting them from raw materials or using whatever materials they have at hand. Keys have been made from every conceivable piece of junk that will conduct electricity, and made contacts to all parts of the world.

[H. P. Friedrichs, AC7ZL] has produced such a home-made key from surplus material, but it has nothing of the junkbox about it. He’s used the head actuator from a surplus hard drive as the arm of a straight key, and the result is an item of beauty.  The actuator bearing is the pivot point, and the business end of the key replaces the hard drive’s heads. The spring is provided by the repulsive force between magnets, the connection at the rear is provided by a piece of guitar string, and the contacts themselves are taken from a surplus power relay. Even his write-up is a thing of beauty, a compelling read with hand-drawn illustrations. If you are not a Morse enthusiast it’s still an engaging project.

We’ve featured many keys here over the years, and this isn’t the first one using a hard drive actuator, as this mint tin paddle shows. Among others we’ve linked you to a collection of unorthodox keys, and of course shown you a vintage telegraph key with a Raspberry Pi decoder.

Tiny USB Morse Code Beacon

It is reasonably easy to make a microcontroller spit out some Morse code. What makes [pavlin’s] take on this project interesting is that it resides on a tiny USB board with an ARM processor. The design for the board is available with single-sided artwork suitable for production using simple methods like toner transfer.

The STM device has a built-in USB bootloader. It can also act as a serial port, which makes the project very simple. The only external parts are a speaker and an optoisolator. The program provides a command line interface over the serial port that you can use to program the message and set other options like speed and the delay between messages. The code is available on GitHub.

You might argue that a beacon shouldn’t need a USB port, and we’ve seen an alternative that fits the bill. If you want a much larger Arduino-based keyer, we’ve seen those, too.

The Michigan Mighty-Mite Rides Again

One of the best things about having your amateur radio license is that it allows you to legally build and operate transmitters. If you want to build a full-featured single-sideband rig with digital modes, have at it. But there’s a lot of fun to be had and a lot to learn from minimalist builds like this Michigan Mighty-Mite one-transistor 80-meter band transmitter.

If the MMM moniker sounds familiar, it may be because of this recent post. And in fact, [W2AEW]’s build was inspired by the same SolderSmoke blog posts that started [Paul Hodges] on the road to his breadboard and beer can build.  [W2AEW]’s build is a bit sleeker, to be sure, but where the video really shines is in the exploration and improvement of the signal quality. The basic Mighty-Mite outputs a pretty dirty signal – [W2AEW]’s scope revealed 5 major harmonic spikes, and what was supposed to be a nice sine wave was full of divots and potholes. There’s only so much one transistor, a colorburst crystal and a couple of capacitors can do, so the video treats us to an explanation of the design of the low-pass filter needed to get rid of the harmonics and clean up the output into a nice solid sine wave.

If your Morse skills aren’t where they should be to take advantage of the Might-Mite’s CW-only mode, then you’ll need to look at other modulations. Maybe a tiny FM transmitter would suit your needs better?

Continue reading “The Michigan Mighty-Mite Rides Again”

Morse Code RF Transmitter From A Micro’s Clock Output

If you’re looking for a simple way to make an RF transmitter, check out [Tomasz]’s Morse code transmitter. His design uses nothing more than a microcontroller and a 16MHz crystal to transmit CW Morse code on 96MHz. We’ve seen some similar designs that work at lower frequencies, but transmitting up at 96MHz is pretty impressive.

[Tomasz] used an STM32L microcontroller for this project, which isn’t specced to run up at the high frequencies he wanted to transmit at. To get around this, [Tomasz] wired a 16Mhz oscillator up to microcontroller’s clock input. The clock input is run into the micro’s PLL which is capable of generating high frequencies. He mentions that you can use the internal oscillator instead of a crystal, but it has a ton of phase noise and splatters all over the spectrum.

[Tomasz] chose to start transmitting at 96MHz, which can be picked up by a standard FM radio. To generate this frequency, he set the PLL to multiply the 16MHz crystal up to 192MHz followed by a clock divide of 2 which brings it down to 96MHz. The microcontroller’s CPU runs on the 16MHz crystal input before it goes into the PLL. Next [Tomasz] enabled the MCO clock output pin which routes the 96MHz signal to the outside world.

Transmitting CW is pretty simple; it just involves turning a fixed-frequency transmitter on and off. [Tomasz] wrote a function that enables and disables the MCO output pin. This has the effect of keying any Morse code string you throw at it. Check out the video after the break to see the transmitter in action.

Continue reading “Morse Code RF Transmitter From A Micro’s Clock Output”

Transmitting Data Long-Distance With Morse Code

[Konstantinos] wrote in to tell us about his CDW project: a digital encoding scheme for ham radio that uses CW (continuous wave) Morse code for digital data transfer. [Link updated 1/5/16] CW operation with Morse code is great for narrow-bandwidth low-speed communication over long distances. To take advantage of this, [Konstantinos] developed a program that takes binary or text files, compresses them, and translates them to a series of letters and numbers that can be represented with Morse code.

The software translates the characters into sequences of Morse code pulses, and plays an audio stream of the result. His software doesn’t support decoding Morse from an audio stream, so [Konstantinos] recommends using one of many existing programs to get the job done. Alternatively those with a good ear and working knowledge of Morse can transcribe the characters by hand.

After receiving a broadcast, the user pastes received characters back in the software. The software re-assembles the binary file from the Morse characters and decompresses the result. [Konstantinos] also added a simple XOR encryption feature, but keep in mind that using encryption on ham radio bands is technically illegal.

Retrotechtacular: How To Teletypewriter

This week, you’re going to learn the ins and outs of the AN/GRC-46 thanks to this army training film from 1963. What is the AN/GRC-46, you ask? Why it’s a complete mobile-tactical sheltered radio-teletypewriter rig capable of CW, voice, and teletype transmission.

The film covers the components that make up the AN/GRC-46, their functions, the capabilities of the system, and proper operation procedures. There’s a lot going on in the tiny 1400lb. steel shelter, so each piece will be introduced from the ground up.

You’ll become familiar with the voltage distribution system and the AN/GRC-46’s included accessories. This introduction will be followed by a short course in RF signal transmission and the Frequency-Shift Keying (FSK) that is performed by the modulator. The ranges of both the transmitter and receiver are discussed, along with the capabilities mentioned before: CW operation using the keyer, voice operation, teletype operation, and reperforation of teletype tape.

Finally, you’ll observe a seasoned operator make contact and send a teletype message with movements so careful and deliberate that they border on mesmerizing. When he’s not sending messages or taking long walks on the beach, he can usually be found cleaning and/or lubricating the transmitter filter.

Continue reading “Retrotechtacular: How To Teletypewriter”

THP Semifinalist: A Continuous Wave Radar

There aren’t many Hackaday Prize entries playing around in RF, save for the handful of projects using off the shelf radio modules. That’s a little surprising to us, considering radio is one of the domains where garage-based tinkerers have always been very active. [Luke] is bucking the trend with a FM continuous wave radar, to be used in experiments with autonomous aircraft, altitude finding, and synthetic aperture radar imaging.

[Luke]’s radar operates around 5.8-6 GHz, and is supposed to be an introduction to microwave electronics. It’s an extremely modular system built around a few VCOs, mixers, and amplifiers from Hittite, all connected with coax.

So far, [Luke] has all his modules put together, a great pair of cans for the antennas, everything confirmed as working on his scope, and a lot of commits to his git repo.

You can check out [Luke]’s demo video is available below.


SpaceWrencherThe project featured in this post is a quarterfinalist in The Hackaday Prize.

Continue reading “THP Semifinalist: A Continuous Wave Radar”