Yet another Internet of Things service has left its customers in the lurch. IoT devices (mostly lightbulbs) made sold by Greenwave Systems stopped talking to the outside world on July 1. More specifically, the server to which they all connected (ahem, “the cloud”) has been turned off, which rules out using the bulbs with Internet-based services like IFTTT, which was a major selling point of the Things in the first place.
It’s not the first time we’ve seen IoT companies renege on their promises to provide service, and it’s surely not going to be the last. We’re preaching to the choir here, but when even Google is willing to take the PR hit to effectively brick your devices, the only protection that you’ve got against obsolescence is an open protocol.
At least the users of Greenwave’s TCP’s devices will continue to be able to control them from within the home. That, plus some clever hacking, will make them workable into the future. But it’s not like the convenience that was sold with the devices.
Boo to shady IoT companies! But thanks to [Adrian] for the tip.
Perhaps the buzziest among buzzwords when it comes to electronics is Home Automation. This is a branch of IoT where you can actually go to the home store and come out with bags filled with products. The current Hackaday Prize round challenges you to automate your life and setting your sights on the home seems like an area open to everyone. But we’re having trouble putting our finger on what exactly makes a home automated, and more importantly, the best ways to benefit those who live beside that technology. So we want to know what you think.
Do you have a great idea for what makes an automated home more than a buzz word? Perhaps you are already sold and have been building your own; tell us about it! We want to know how (and when) you think this will turn from a buzzword to something most people want running their house. We’ll round up the best from this discussion for a future post. As a thank you, we’ll select some of the best comments and send you a T-shirt from the Hackaday store.
Who doesn’t love an automatic ice maker?
You can go back fifty years to the cartoons of the 1960’s and see that home automation was just around the corner. The Flintstones had dinosaurs to handle the mundane, and The Jetsons had a robot maid reigning over a cadre of whimsical gadgets in the home. At that point in time the home was already moving into the automation realm with thermostatically controlled air conditioning and water heaters. This was around the same time that automatic ice makers started to appear in a home’s freezer and remote garage door openers came into use.
Beginning in the 1970’s and 80’s it became common to find a dishwasher under the counter in the kitchen. The porch light option of dusk-until-dawn sensors came into use and were followed later by motion detecting lights which used PIR sensors. Automatic lawn sprinklers started to appear in the yards surrounding the home, and security systems that monitor doors, windows, and often motion (using PIR sensors again) became a thing.
These are great examples of home automation which is often overlooked. Even smarter thermostats are all the rage today, and security system add-ons that let you monitor cameras and locks over the Internet.
Which brings us back to the question. Where is this all going? What kind of automation will be developed now in our time, and looked back in 50 years as obvious technology wanted in every home? Do we already have the automated hardware in place and just need something to stitch it all together? Let us know what you think below, and if you’re already working on your own automation project don’t forget to enter it in the Hackaday Prize.
Internet of Everything is the way to go for home automation these days. ITEAD makes an ESP-8266 switch that IoT-ifies your appliances. If you still have an ancient, 433 MHz style radio switch system, they even make one that does WiFi and 433 MHz. But if you’re too cheap to shell out for the dual-mode version, you can always add a $1 433 MHz radio yourself. Or at least, that’s what [Tinkerman] did.
Aside from the teardown and reverse-engineering of the WiFi-enabled switch, [Tinkerman] also flashed custom firmware into the switch’s ESP-8266, and worked it all into his existing home Node-RED framework. Now he’s got more possible ways to turn on his living-room lights than any person could possibly hope for!
If you want to get into this whole WiFi-based home automation game, you could do worse than to have a look at the series we ran on MQTT just a little while ago. Seeing [Tinkerman]’s Node-RED demo makes us think that we’ll have to give that a look for our home system as well.
In this installment of Minimal MQTT, I’m going to cover two loose ends: one on the sensor node side, and one on the MQTT server side. Specifically, I’ll tackle the NodeMCU’s sleep mode to reduce power and step you through bridging MQTT servers to get your data securely out of your home server and into “the cloud”, which is really just other people’s servers.
If you’re just stepping into this series now, you should really check out the other three posts, where I set up a server, then build up some sensor nodes, and then flesh-out a few ways to control everything from your phone or the web. That’s the coolest material, anyway. This last installment just refines what we’ve built on. Let’s go!
So you’ve built a central server and filled your house with WiFi-connected nodes all speaking to each other using the MQTT protocol. In short, you’ve got the machine-to-machine side of things entirely squared away. Now it’s time to bring the humans into the loop! We’re going to explore a couple graphical user interfaces.
You could build a physical knob and/or LED display for every little aspect of your entire system, but honestly, this is where GUIs really shine. In this installment of Minimal MQTT, we’re going to look at human-friendly ways of consuming and producing data to interact with your connected sensors, switches, and displays. There are a ton of frameworks out there that use MQTT to build something like this, but we’re going to cut out the middle-man and go straight for some GUI MQTT clients.
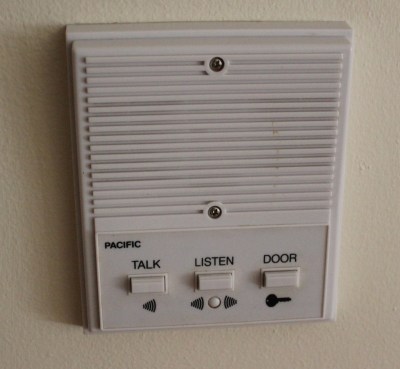
If you’ve been to an apartment complex with a locked front door, you’ve seen the buzzer systems. You press the corresponding button for the apartment you want and can talk to the resident. They can press a button to unlock the door briefly, and then you go up to their apartment and they don’t have to come down to let you in. But what if you’re the resident and you want to go for a run without your keys jingling in your pocket? What if you want to open it using just your smartphone?
I knew this was a silly problem, and everyone I told about it thought that for the amount of time and effort it might save, it was hardly worth it.
Challenge accepted.
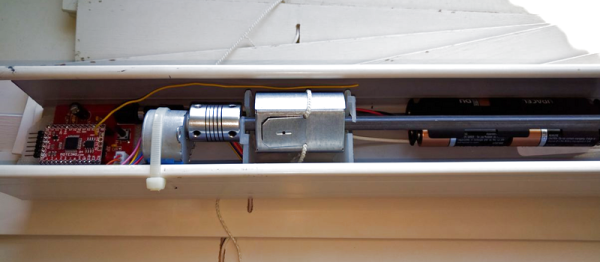
How fast can I put this together using only parts I have around the apartment? Turns out about 2 hours.
Commercially available motorized window blinds are a nice high-end touch for today’s automated home, but they tend to command a premium price. Seems silly to charge so much for what amounts to a gear motor and controller, which is why [James Wilcox] took matters into his own hands and came up with this simple and cheap wireless blind control.
[James] started his project the sensible way, with a thorough analysis of the problem. Once COTS alternatives were eliminated – six windows would have been $1200 – he came up with a list of deliverables, including tilting to pre-determined positions, tilt-syncing across multiple windows, and long battery life. The hardware in the head rail of each blind ended up being a Moteino on a custom PCB for the drivers, a $2 stepper motor, and a four-AA battery pack. The Moteino in one blind talks to a BeagleBone Black over USB and wirelessly to the other windows for coordinated control. As for battery life, [James] capitalized on the Moteino’s low-power Listen Mode to reduce the current draw by about three orders of magnitude, which should equate to a few years between battery changes. And he did it all for only about $40 a window.


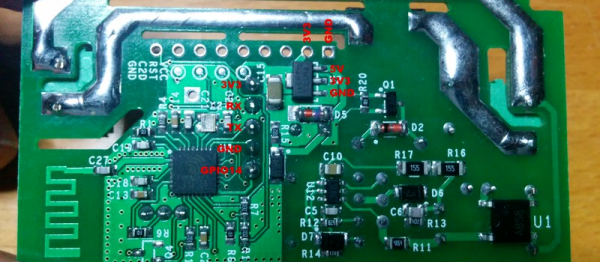
 Aside from the teardown and reverse-engineering of the WiFi-enabled switch, [Tinkerman] also flashed custom firmware into the switch’s ESP-8266, and worked it all into his existing home