Light Guns Aren’t Just For CRTs Anymore

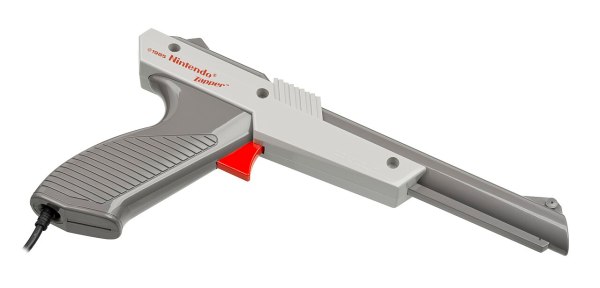
For how much of a cultural phenomenon light gun games like Duck Hunt were, they didn’t survive the transition from CRT televisions to LCDs particularly well because of all of the technological quirks the light guns exploited in older technology that simply disappeared with modern TVs. But it’s not impossible to get a similar gameplay from modern technology as evidenced by the success of the Wii and its revolutionary Wiimote, and there are plenty of modern games that use similar devices. There are a few paths to getting older light guns working again, though.

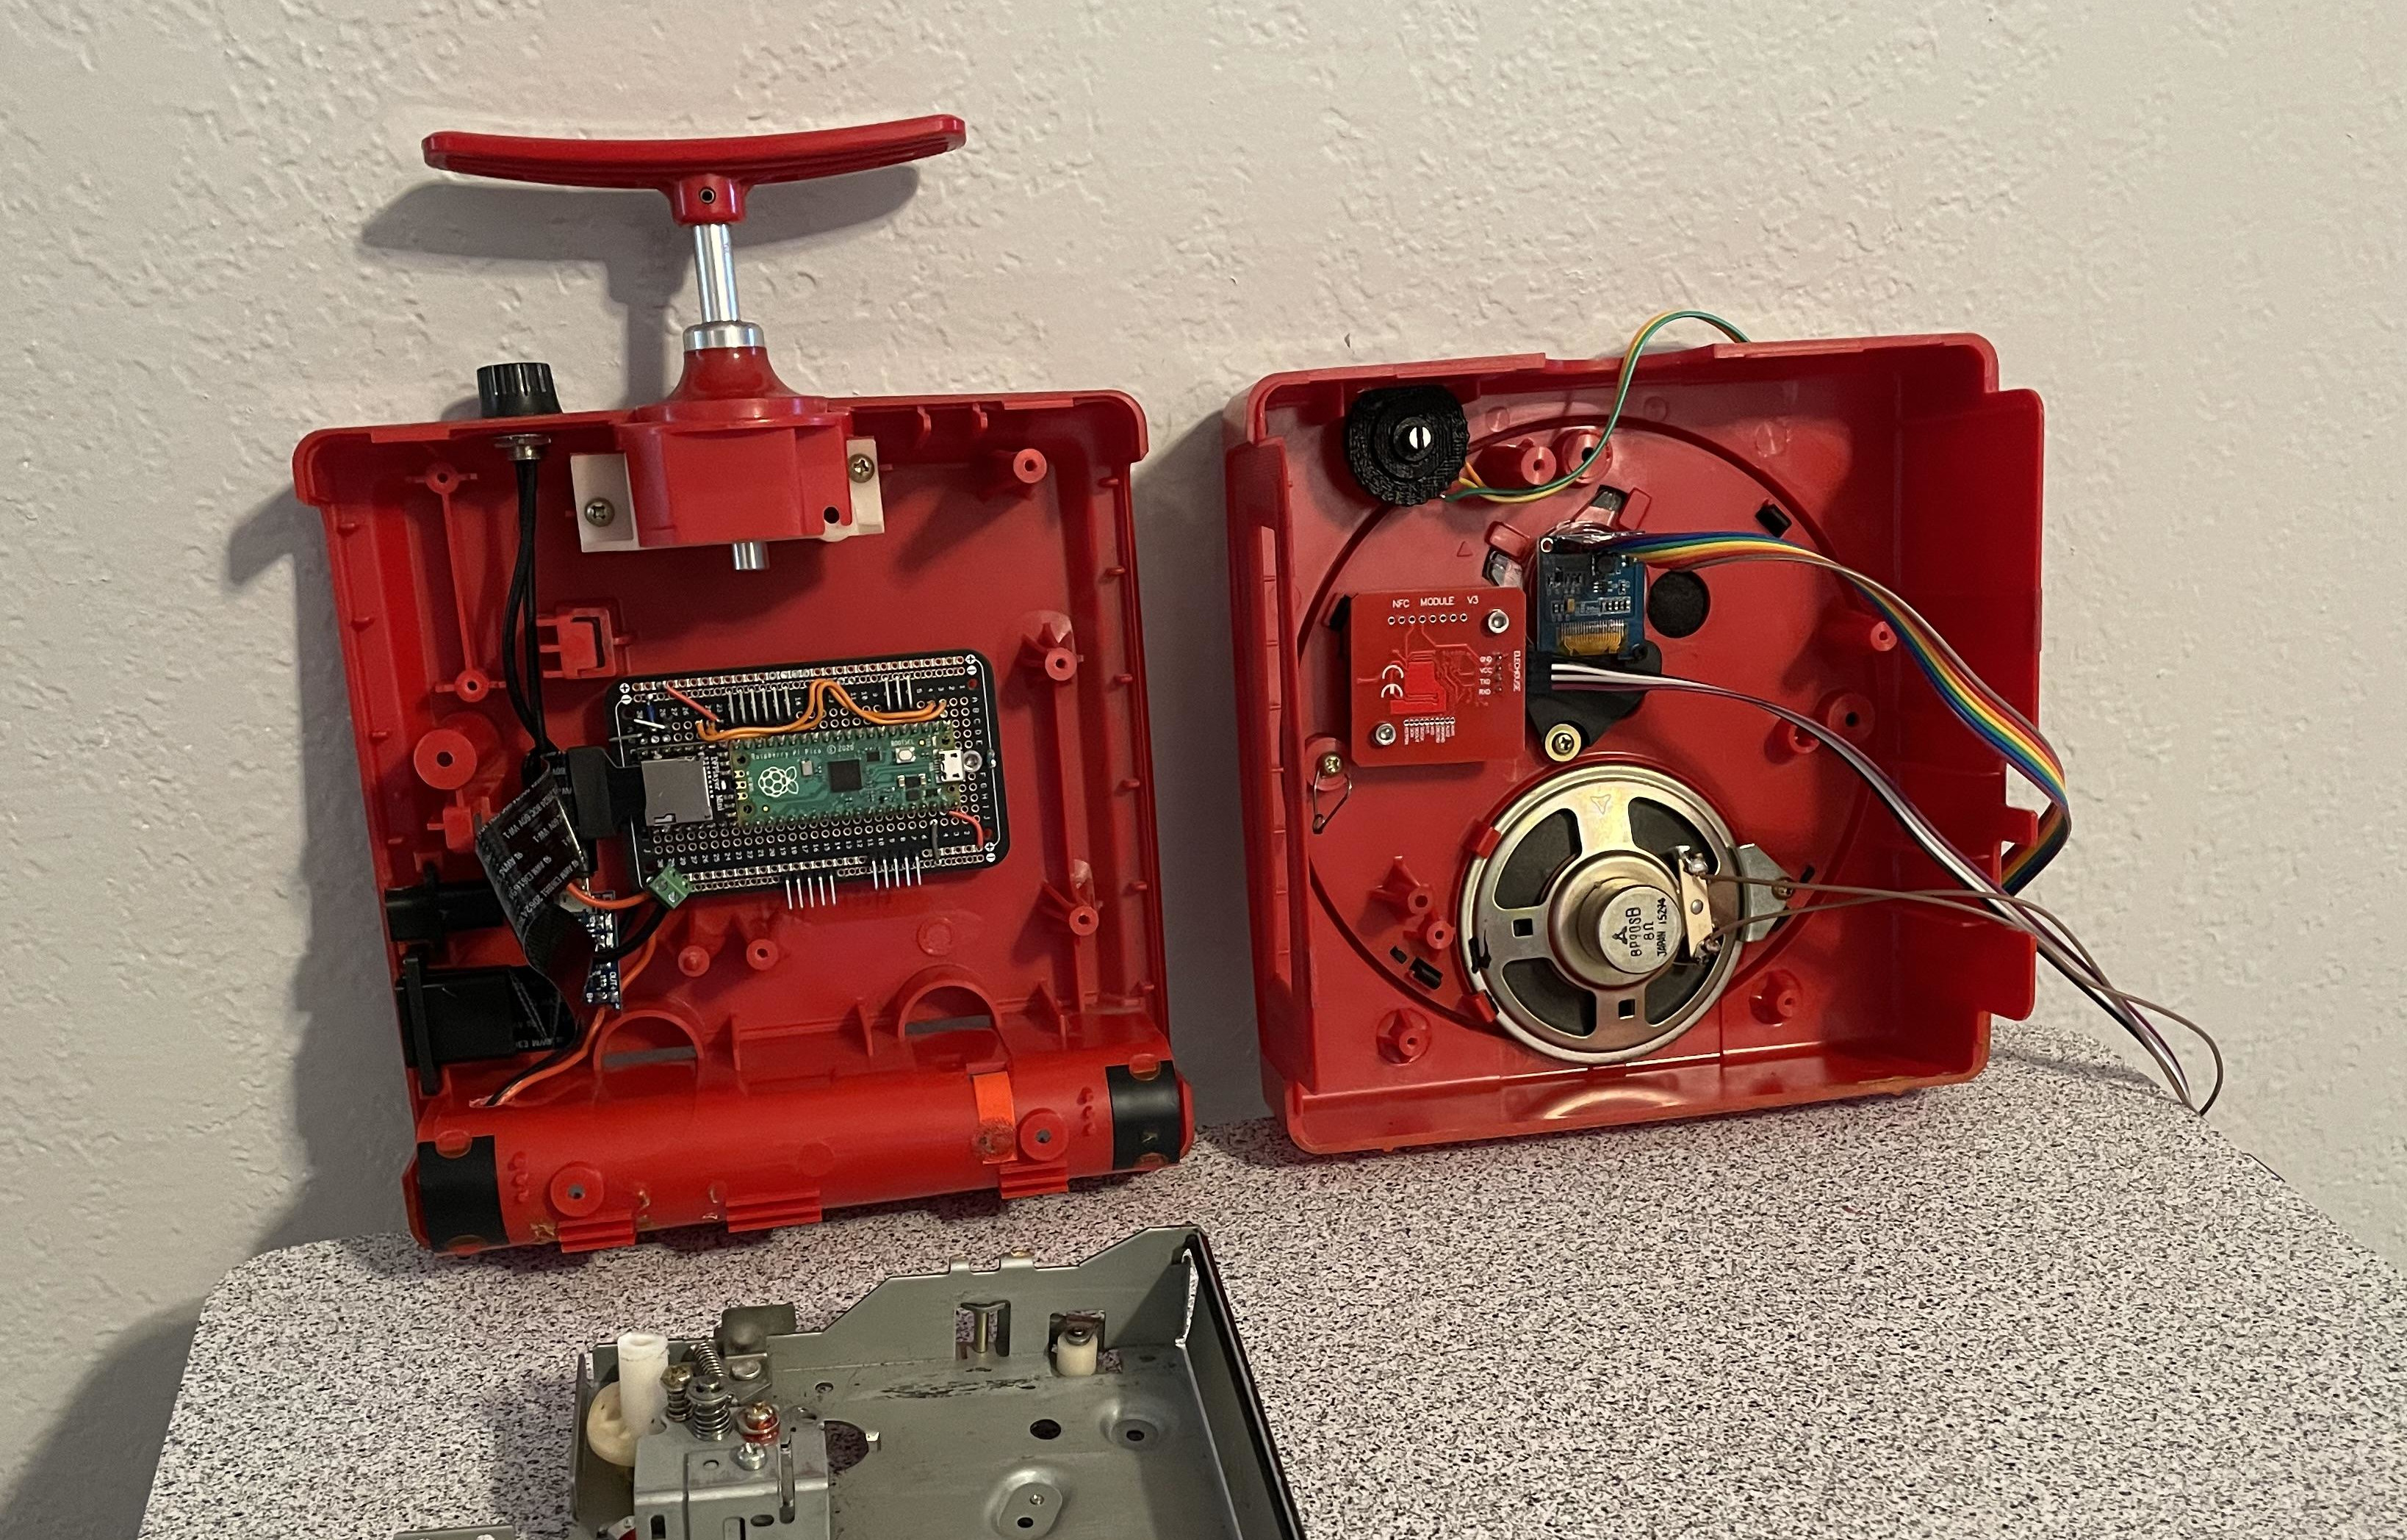
The first system to note, called SAMCO, uses a system of LEDs and a camera to synchronize the game’s flashes to the new technology and translate the input back into the game. Gun4ir uses a similar technique, and boasts extremely high accuracy and low latency largely due to being programmed in assembly. Both systems can use either an infrared tracking sensor or a Wiimote sensor as the LEDs and while the SAMCO system can run on a Raspberry Pi Pico, Gun4ir exclusively uses ATmega32U4 boards with the optimized assembly programming.

Both SAMCO and Gun4ir offer PCBs for anyone looking to try them out without designing their own circuit boards, and once the electronics are assembled they can either be put in an original NES-era light gun, put in a custom printed enclosure, or even stuffed into a Nerf gun. For others looking for a more turnkey solution, there are also offerings from companies like Sinden which make complete system. You can always build your own system to restore the functionality of original light guns from scratch if that’s more your style.

Thanks to [LookAtDaShinyShiny] for tipping us off to the latest happenings in the light gun community!

Photo courtesy of Wikimedia Commons

The IMac GPU Becomes Upgradeable, With PCIe

Over its long lifetime, the Apple iMac all-in-one computer has morphed from the early CRT models through those odd table-lamp machines into today’s beautiful sleek affairs. They look pretty, but is there anything that can be done to upgrade them? Maybe not today’s ones, but the models from the mid-2000s can be given some surprising new life. [LowEndMac] have featured a 2006 24″ model that’s received a much more powerful GPU, something we’d have thought to be impossible.

The iMacs from that era resemble a monitor with a slightly chunkier back, in which resides the guts of the computer. By then the company was producing machines with an x86 processor, and their internals share a lot of similarities with a laptop of the period. The card is a Mac Radeon model newer than the machine would ever be used with, and it sits in a chain of mini PCIe to PCIe adapters. Even then it can’t drive the original screen, so a replacement panel and power supply are taken from another monitor and grafted into the iMac case. This along with a RAM and SSD upgrade makes this about the most upgraded a 2006 iMac could be.

Of course, another approach is to simply replace the whole lot with an Intel NUC.

DIY Shredder Creates Insulation

Plenty of us have experience with paper shredders, but there are all kinds of machines designed to completely destroy other materials as well, from metal and plastic, to entire cars. [Action BOX] built their own heavy-duty shredder capable of dismantling things like cell phones and other robust handheld objects, but after seeing what it would physically shred they decided to give it an actual job creating insulation for the attic space in their garage.

The shredder itself uses opposing metal plates arranged on sets of two cylinders, with each cylinder powered by it’s own large motor. In total, the entire system uses around 1.5 kW, so to make their green insulation project as green as possible they decided to power it with an equivalent amount of solar panels. For the insulation they’re using a year’s worth of boxes from various deliveries, and after a time-consuming process preparing the boxes for the shredder, shredding the strips of cardboard, and packaging it in garbage bags their efforts netted them enough to partially fill the space between four ceiling joists. Continue reading “DIY Shredder Creates Insulation”

Using LEDs To Determine A Video Camera’s True Framerate

Interpolation and digital cropping are two techniques which are commonly used by marketing folk to embellish the true specifications of a device. Using digital cropping a fictitious zoom level can be listed among the bullet points, and with frame interpolation the number of frames per second (FPS) recorded by the sensor is artificially padded. This latter point is something which [Yuri D’Elia] came across with a recently purchased smartphone that lists a 960 FPS recording rate at 720p. A closer look reveals that this is not quite the case.

The smartphone in question is the Motorola Edge 30 Fusion, which is claimed to support 240 and 960 FPS framerates at 720p, yet the 50 MP OmniVision OV50A sensor in the rear camera is reported as only supporting up to 480 FPS at 720p. To conclusively prove that the Motorola phone wasn’t somehow unlocking an unreported feature in this sensor, [Yuri] set up an experiment using three LEDs, each of which was configured to blink at either 120, 240 or 480 Hz in a side-by-side configuration.

As [Yuri] explains in the blog post, each of these blinking frequencies would result in a specific pattern in the captured video, allowing one to determine whether the actual captured framerate was equal to, less than or higher than the LED’s frequency. Perhaps most disappointingly about the results is that this smartphone didn’t even manage to hit the 480 FPS supported by the OV50A sensor, and instead pegged out at a pedestrian 240 FPS. Chalk another one up for the marketing department.

KaboomBox Is A Firecracker Of A Music Player

Ka-chunk. Let’s face it, 8-tracks were not that great. But the players, that’s another story. The Panasonic RQ-830S, aka the dynamite or TNT player is just one of many lovely designs that used to grace the shelves of electronics stores. Hackaday alum [Cameron Coward] came across a non-working model and used it to create the KaboomBox.

Just like before, all [Cameron] has to do is stick a tape in, and music starts playing. But now, instead of using rust on tape, the music is accessed via RFID and lives on an SD card inside the 8-track player.

Power it on, and a tiny LCD screen showing through the track number window first displays the KaboomBox logo, then shows a timer whenever it’s waiting for a tape. And just like before, pushing down on the plunger skips to the next track.

The new guts include a Raspberry Pi Pico and an RFID reader, plus a DF Player Mini to handle the digital-to-analog conversion and amplify the signal, and an SD card to store the music. Now, [Cameron] is only limited by the size of the SD card. Check out the demo video after the break.

We’ve seen all kinds of boomboxen around here, from the lit to the Bluetooth to the payphone variety.

Continue reading “KaboomBox Is A Firecracker Of A Music Player”

Retrotechtacular: The $175,000 Laser Printer

Laser printers today are cheap and readily available. But in 1976, they were the height of printing technology. The IBM 3800 was the $175,000 printer to have in that year. (Video, embedded below.) But you couldn’t have one on your desktop. Even if you could afford it, the thing is the size of a car, and we don’t even want to guess what it weighs. The printer took tractor-fed continuous form paper and could do 167 pages a minute at about 150 dots per inch (actually 180 x 144). For the record, that was as much as 1.7 miles of paper an hour!

In those days, people who would use this printer traditionally had massive banks of noisy impact printers. We imagine this device saved many data processing person’s hearing. Compared to a modern laser printer, though, it needed a lot of maintenance. For example, the initial models needed a xenon flash lamp replaced every month, although later models could go years on one bulb. Looking at some of the hardware in the video, it was probably made closer to the end of life for these printers which were made through 1999.

Continue reading “Retrotechtacular: The $175,000 Laser Printer”

Arduwatch Design Study Is Compelling Concept For DIY Smartwatch

Smartwatches are a battleground these days, with smartphone manufacturers vying to have the prettiest, sleekest, and longest-lasting device on the market. Meanwhile, DIY efforts continue to improve in sophistication as better components become available. [Rocky Bergen’s] Arduwatch is a particularly appealing design study, with such visual flair that we’d love to see it become a reality.

The design was inspired by the Arduboy, itself a lightweight homebrewed handheld console of impressive simplicity. [Rocky]’s concept hinges on taking that credit-card sized platform and repurposing it as a wearable device instead. The squared-off, retro design of the Arduwatch is appealing, as is its simple four-button interface and the bright colors [Rocky] chose to show it off. Ultimately, too, its low-resolution display would realistically be more than suitable for a great variety of simple smartwatch tasks, which often just involve displaying notifications and the like.

[Rocky’s] work may just be a design study, but it’s well thought out and eminently viable. We’d love to see how well this design could work in the real world, particularly if built with some nice resin-printed parts paired with a quality watch strap.

If you’ve heard of [Rocky Bergen] before, it may be due to his exquisite collection of retrocomputer papercraft designs. If you’ve been cooking up your own DIY smartwatch ideas, don’t hesitate to hit up the tipsline!