magic_music_table_accessible_jukebox

Magic Table Gives Disabled Child Control Over Her Music

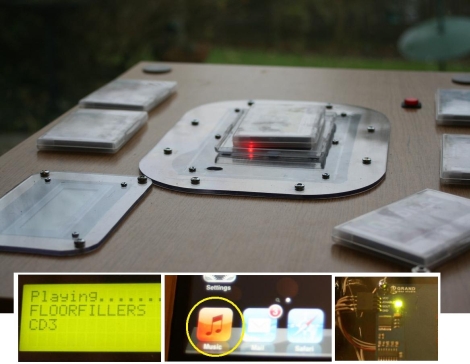
Instructables user [XenonJohn] recently put together a fantastic tutorial detailing how he made an RFID-controlled jukebox. The Magic Music Table was created for a disabled child, who is unable to use a CD payer, nor navigate small buttons and menus on MP3 players. He originally though about making the buttons more accessible a la the Frankenkindle, but ultimately settled on making the table instead.

Embedded in the center of the Music Table under a piece of plexiglass is a small project box containing an iPod, Arduino Mega, and a Parallax RFID reader. He crafted small RFID “bricks” that can be waved over the RFID reader, triggering the iPod to play a specific album from a large playlist. The Arduino acts as the middleman, controlling the RFID reader and relaying the appropriate information to the iPod when required.

The system looks pretty sturdy, and [XenonJohn] says that it works great. We think it’s a wonderful use of technology – you certainly can’t argue with brightening up a child’s day.

Continue reading to see a video of the Magic Music Table in action.

Continue reading “Magic Table Gives Disabled Child Control Over Her Music”

Hackaday Links: Saturday, June 18th

Tripod CNC Machining Setup:


Here’s a strange “tripod” device using the EMC software package generally used for CNC machining.  In this case it looks like something that (when scaled up) might control a sky-cam-like device that one would see at football games.

The Off-Grid Container House:


Project to make an off-grid container house.  Pretty crazy idea, but definitely not developed yet. This seems like a cool idea, so hopefully this guy will come through. It may give you some other ideas, so check it out. Pizza in a cup anyone?

Iphone Window Pocket


Iphone window pocket – This Instructables article shows how to make a “window” in your pants for your Ipod. The combination of bad style and nerdiness gives a great first impression every time. Not sure how it works with the capacitive touch screen, but it should be good for viewing at least.

The Multiple AC Unit Experiment


Here’s someone who’s done some experimenting with using a central AC unit with several window units. Not bad, considering he documents shaving about 1/3 off his power bill.  Maybe it could inspire something even better!

Incredible CNC “hexapod” Milling Center


Finally, this machine isn’t exactly a “hack”, but a professionally designed machining center. It uses a machining setup similar to a delta robot. Six linear actuators are coordinated to allow this CNC robot to move in five degrees of freedom with incredible speed.

Quick Hack Disables IPod Dock Auto-standby

ipod_dock_hacking

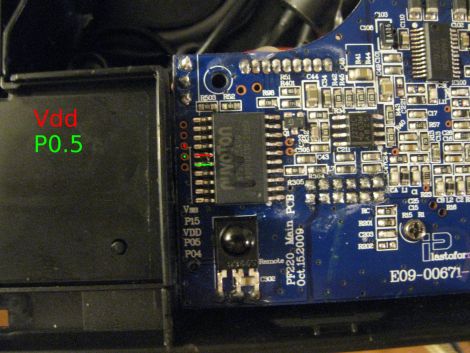
[Aaron] wrote in to share with us a quick hack that has made his life a little easier. He bought a Rocketfish RF-HV3 portable iPod dock to listen to his music, but he wanted to utilize it as an alarm clock as well. He also found that the speakers worked quite well when he hooked up his Yaesu handheld transmitter to the dock.

The only problem he had with it was that the dock would automatically power down when there was no input for 5 minutes. That’s fine when the dock is running on batteries, but if [Aaron] was going to use it as an alarm clock or to listen to his HAM radio, that simply wouldn’t do.

He pulled the dock apart and started poking around with his DSO Nano scope. He found that if pin 16 stays low for 5 minutes, it turns off the dock even if there is a signal coming through. His fix for the problem was actually quite simple – all he did was solder the VDD pin to the pin in question, and the 5-minute timeout was disabled.

We’re glad that [Aaron] was able to solve his problem in such an easy manner – it just goes to show what you can do with a scope and a few minutes’ time.

Breathing New Life Into A Broken IPod

ipad_nano_button_fix

[Craig] had a busted 2nd Gen iPod Nano that was well out of warranty. The play/pause button no longer worked, leaving him unable to play or pause music, nor power off the device. He didn’t want to scrap the iPod, so he figured out a way to add an external play/pause button instead.

He ordered an iPod dock connector from SparkFun and found that it had just enough space inside for the electronic components he would be adding. He consulted some online references for pinout information, then got busy cramming an ATiny13 and a pushbutton into the dock connector.

To minimize the drain on the iPod’s battery, he puts the ATiny into sleep mode when it is not being used. When the button is pressed, it wakes up the microcontroller and sends the proper signal to the iPod. Based on his estimations, it would take nearly 250 years for the ATiny to drain the iPod’s battery completely, so he’s pretty comfortable leaving the dongle attached at all times.

If you have an iPod with similar issues, he has made his source code available so you can save yours from the trash heap as well.

Pitch Shifter Makes Your Band Sing Higher

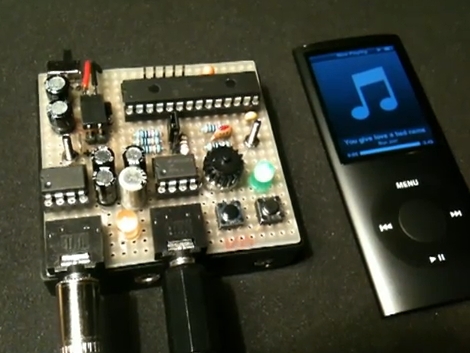
[Markus Gritsch] tipped us off about this little module he built to shift the pitch of audio playback. It uses a PIC 24FJ along with a couple of LM386 amplifier chips to manage the input and output signals. At the push of a button, audio being fed through the device can be modulated to a different key without changing the playback rate. Here it’s being used with a iPod but because this device just sits between an audio source and a signal input we wonder if you can have some fun on the cellphone with this circuit?

Check out the video after the break to hear it in action. We must compliment [Markus] on his layout. We haven’t seen the underside of that protoboard but he’s done a great job of fitting everything into a small area. You can find the schematic for the circuit by following the link at the top of this feature. He took a picture of his hand-drawn plans which saves him time from laying it out with something like KiCAD but still gives us the details that we love to see with your projects.

Continue reading “Pitch Shifter Makes Your Band Sing Higher”

Cellphone Charger Has A USB Port Forced Upon It

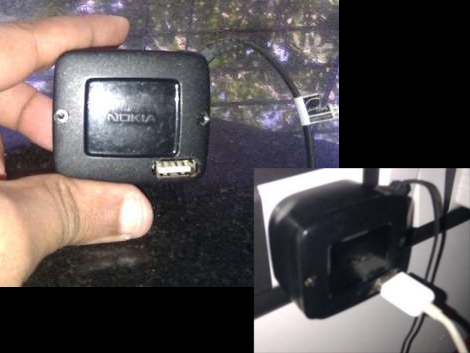
We still can’t figure out why a standard charging scheme hasn’t been developed for handheld devices (other than greed). Certainly we understand that many devices have different electrical needs as far as voltage and current are concerned, but we still long for the ability to use one charger for many different doodads. [Rupin] is trying to narrow down the number of dedicated chargers he uses by adding a USB charging port to his Nokia cellphone charger. Since the USB standard calls for regulated 5V a hack like this can often be done just by patching into the power output coming off of the voltage regulator in the plug housing of the device. [Rupin’s] charger had 5V printed on the case, but when he probed the output he found well over 8 volts. He added a 7805 linear regulator to get the stable output he needed, then cut a hole in the case to house the connector.

Since [Rupin] wants to use this as an iPod charger he couldn’t just let the two data lines float. Apple uses a specific charger verification scheme which requires some voltage dividers to get the device to start charging.

Repair Stuck IPod Nano Buttons

A system is only as strong as its weakest link and [Roberto Barrios] found that on the sixth generation iPod nano the buttons are the problem. It makes sense that the buttons would be exposed to wear since they’re movable parts. The issue isn’t one of contacts or springs wearing out, but how the buttons are assembled. Each consist of a couple of parts; the tactile piece that you see and press, the electrical switch which converts that force into an electrical signal, and a shim that bridges the gap between the two.

After two months of use the iPod [Roberto] was fixing had stopped responding to presses of the Power button. It turns out that the shims are attached with double-sided tape. Inspection of the internals revealed that the shim had slid to one side and no longer made contact with the electrical system. His solution was to remove the tape and clean off the goo, then reattach the shims using “two-part metal cement”.

With the shim back in place all is well but he made sure to execute this fix on all of the buttons before reassembly.