Olimex Announces Their Open Source Laptop

A few months ago at the Hackaday | Belgrade conference, [Tsvetan Usunov], the brains behind Olimex, gave a talk on a project he’s been working on. He’s creating an Open Source Hacker’s Laptop. The impetus for this project came to [Tsvetan] after looking at how many laptops he’s thrown away over the years. Battery capacity degrades, keyboards have a fight with coffee, and manufacturers seem to purposely make laptops hard to repair.

Now, this do it yourself, Open Source Hardware and hacker-friendly laptop is complete. The Olimex TERES I laptop has been built, plastic has been injected into molds, and all the mechanical and electronic CAD files are up on GitHub. This Open Source laptop is done, but you can’t buy it quite yet; for that, we’ll have to wait until Olimex comes back from FOSDEM.

The design of this laptop is completely Open Source. Usually when we hear this phrase, the Open Source part only means the electronics and firmware. Yes, there are exceptions, but the STL files for the PiTop, the ‘3D printable Raspberry Pi laptop’ are not available, rendering the ‘3D printable’ part of PiTop’s marketing splurge incongruent with reality. If you want to build a case for the Open Source laptop to date, [Bunnie]’s Novena, random GitHub repos are the best source. The Olimex TERES I is completely different; not only can you simply buy all the parts for the laptop, the hardware files are going up too. To be fair, this laptop is built with injection molded parts and will probably be extremely difficult to print on a standard desktop filament printer. The effort is there, though, and this laptop can truly be built from source.

As far as specs go, this should be a fairly capable laptop. The core PCB is built around an Allwinner ARM Cortex-A53, sporting 1GB of DDR3L RAM, 4GB of eMMC Flash, WiFi, Bluetooth, a camera, and an 11.6″ 1366×768 display. Compared to an off-the-shelf, bargain-basement consumer craptop, those aren’t great specs, but at least the price is consummate with performance: The TERES I will sell for only €225, or about $250 USD. That’s almost impulse buy territory, and we can’t wait to get our hands on one.

Turn That Old Tablet Into A Sub-$100 Linux Laptop

Tiny laptops have always been devices that promise so much, yet fail somehow to deliver. From the Atari Portfolio palmtops through to the recent crop of netbooks they have been either eye-wateringly expensive if they are any good, or so compromised by their size constraints as to be next-to-useless. We’ve seen DOS, EPOC, Windows, WinCE, Palm OS, Linux distros and more in tiny form factors over the years, yet few have made a significant mark.

The prospect of a “proper” computer in your hand isn’t something to abandon just yet though. We are now reaching the point at which the previous generation of higher-end Android tablets are both acceptably powerful and sufficiently numerous as to be available at a very reasonable price. Perhaps these can provide the tiny laptop seeker with a basis for something useful. [NODE] certainly thinks so, because he’s produced a nice little Ubuntu laptop using a second-hand Nexus 7 tablet and a Bluetooth keyboard case. Android is replaced with an Ubuntu image, and a cardboard cut-out display bezel is held in place with magnetic strips. A step-by-step guide has been put up to help others interested in following the same path.

This is not the most amazing of hardware hacks, in that it involves mostly off-the-shelf items and a piece of software. However it’s worth a look because it does provide a route to a very acceptable little Linux laptop for an extremely reasonable price. One concern is that the Ubuntu version seems not to be a recent one, however we’re sure readers will point at any newer distribution builds in the comments. If you fancy a look at the finished laptop he’s posted a video which we’ve included below the break.

Continue reading “Turn That Old Tablet Into A Sub-$100 Linux Laptop”

Hacklet 125 – DIY Laptops

In the old days of the 1970’s, the only way to get your own computer was to build one from scratch. Thanks to an army of hackers like [Woz], PC’s are no commodity objects that can be bought for a couple of hundred dollars. The magic of building your own still is there though – especially when we’re talking about portable machines. Laptops, notebooks, netbooks take quite a bit of skill to assemble. Stuffing a keyboard, screen, and battery into a small clamshell case takes a bit of planning. Our last look at DIY laptops was exactly 100 Hacklets ago, so it’s time for a refresh. This week we’re checking out some of the best DIY laptops and portable computers on Hackaday.io!

piberryWe start with [Sahas Dinesh Chitlange] and Pi-Berry Laptop. [Sahas] found just the right mix of simple and elegant with this build. A Raspberry Pi 2 is the brains of the operation. The Pi sits in a case built from a mix of MDF and regular wood. The display is a 10.1″ HDMI LCD. The keyboard was pulled from a tablet case. Power was easy — a USB power bank provides enough for 4-5 hours of runtime. [Sahas] covered his laptop in Italian leather for a polished look. He planned out his parts layout well enough that the power-hungry Pi stays cool without a fan.
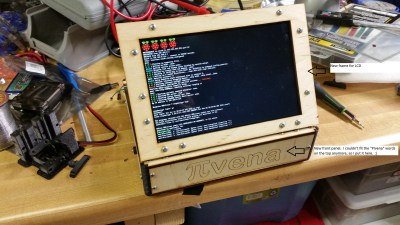
pivenaNext up is [Tim] with PIvena. [Tim] took his inspriation from [Bunnie Huang’s] Novena open laptop. Rather than roll his own ARM board, [Tim] went with a Raspberry Pi. His original design was for the Raspberry Pi model B. Last time we looked at PIvena, the model B+ was still pretty new. As we hoped, [Tim] modified his design to accept the new Pi layouts. This means it will physically work with the B+, Pi 2, and Pi 3 boards. [Tim] didn’t stop there though. He also upgraded from an 800 x 480 LCD to an 1200 x 800 LCD. He managed to do that while keeping the same bolt pattern on the travel cover. Nice work [Tim]!
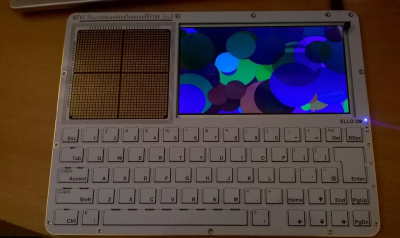
elloNext we have [KnivD] with ELLO 2M. The most striking thing about ELLO 2M is the construction. The entire laptop is made from 6 PCBs which sandwich all the other parts. The keyboard is PCB material with keys routed out. The processor is a Microchip PIC32MX470-120. Software is loaded from one of 3 microSD cards. The 7 inch touchscreen LCD and 4500 mAh LiPo battery are nestled in between PCB layers. A true hacker, [KnivD] included a generous pin grid for debugging add-on circuits. The whole setup looks great with white silkscreen. As [Mark Sherman] mentioned in the comments, this machine reminds us of a modern-day TRS-80 Model 100.
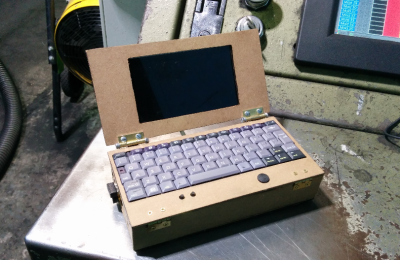
pipdaFinally we have [pdrift86] with Mini rpi2 laptop. Palmtop might be a better name for this. [pdrift86] took his inspiration (and his keyboard) from the old HP Jornada Personal Digital Assistant (PDA). The housing is Masonite, cut from a clipboard. A Raspberry Pi 2 hides inside, along with a 4 cell 18650 Li-Ion battery. The screen is a 5″ LCD with a composite input. The display isn’t a touchscreen, so a Playstation Portable analog stick is on-board, and will eventually be connected for mouse control. [pdrift86] even managed to sneak the Pi camera on the back of his machine, so it can take pictures cellphone style.

If you want to see more DIY laptop projects, check out our new DIY Laptops notebooks, and portables list. Notice a project I might have missed? Don’t be shy, just drop me a message on Hackaday.io. That’s it for this week’s Hacklet, As always, see you next week. Same hack time, same hack channel, bringing you the best of Hackaday.io!

FPGA Drives Old Laptop Screen

Every year, new models of laptops arrive on the shelves. This means that old laptops usually end up in landfills, which isn’t exactly ideal. If you don’t want to waste an old or obsolete laptop, though, there’s a way to reuse at least the screen out of one. Simply grab an FPGA off the shelf and get to work.

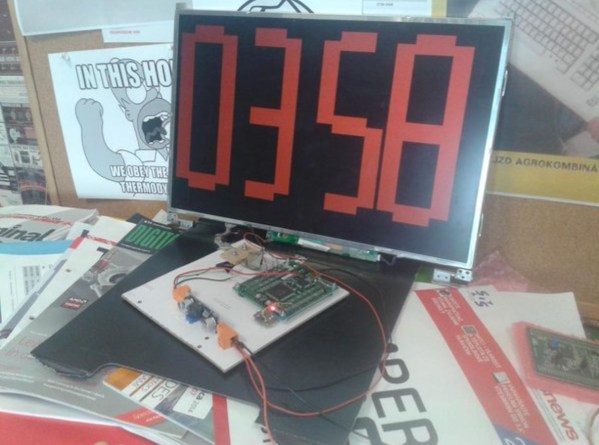
[Martin] shows us all how to perform this feat on our own, and goes into great detail about how all of the electronics involved work. Once everything was disassembled and the FPGA was wired up, it took him a substantial amount of time just to turn the display on. From there it was all downhill: [Martin] can now get any pattern to show up on the screen, within reason. The only limit to his display now seems to be the lack of external RAM. He currently uses the setup to drive an impressive-looking clock.

This is a big step from days passed where it was next to impossible to repurpose a laptop screen. Eventually someone discovered a way to drive these displays, and now there are cheap electronics from China that can usually get a screen like this running. It’s impressive to see it done from scratch, though, and the amount of detail in the videos are a great way to understand how everything is working.

Continue reading “FPGA Drives Old Laptop Screen”

Beautiful Raspberry Pi Laptop Inspired By Psion

In the four years since the first Raspberry Pi appeared, there have been many takes on a portable computer based on it. The choice of components is fairly straightforward, there is now a wide selection of suitable keyboards, displays, and battery packs to choose from. You might therefore think that there could be nothing new in the world of the portable Pi, indeed another one might be as mundane as just another PC build.

News reaches us from Japan this morning of [nokton35mm]’s “RasPSION” Pi laptop build (machine translation) inspired by the Psion portable computers of the late 1990s.

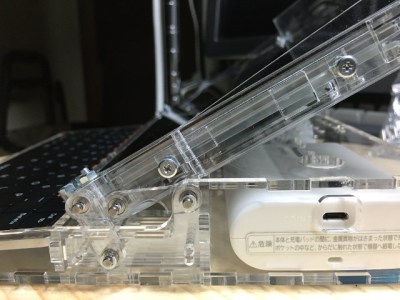
That hinge, in close-up

The RasPSION features the Raspberry Pi 7″ display as well as a Bluetooth keyboard, 5V battery pack and the Pi camera. What makes it special is its laser cut case, and in particular its pivoting hinge mechanism. This is the part that takes its inspiration from the Psion machines, and its operation can be seen in the video below the break.

He claims the finished laptop gives him about two hours of battery life, which is no mean feat given that it lacks the sophisticated power management you’ll find in a commercial laptop. We hope that in time we’ll see him posting the details of the build somewhere other than Twitter, as this is a laptop we’d love to know more about.

Continue reading “Beautiful Raspberry Pi Laptop Inspired By Psion”

Refurbishing Armored Tablets

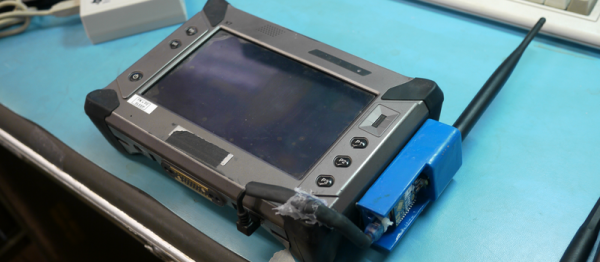
Who can resist the insane deals on bizarre hardware that pop up on auction websites? Not [Dane Kouttron], for sure. He stumbled on Armor X7 ruggedized tablets, and had to buy a few. They’d be just perfect for datalogging in remote and/or hostile locations, if only they had better batteries and were outfitted with a GSM data modem… So [Dane] hauled out his screwdrivers and took stuff apart. What follows is a very detailed writeup of the battery management system (BMS), and a complete teardown of this interesting tablet almost as an afterthought.

First, [Dane] tried to just put a bunch more batteries into the thing, but the battery-management chip wouldn’t recognize them. For some inexplicable reason, [Dane] had the programmer for the BMS on-hand, as well as a Windows XP machine to run the antiquated software on. With the BMS firmware updated (and the manufacturer’s name changed to Dan-ger 300!) everything was good again.

Now you may not happen to have a bunch of surplus X7 ruggedized tablets lying around. Neither do we. But we can totally imagine needing to overhaul a battery system, and so it’s nice to have a peek behind the scenes in the BMS. File that away in your memory banks for when you need it. And if you need even more power, check out this writeup of reverse-engineering a Leaf battery pack. Power to the people!

Building The Novena Laptop

The latest hardware project from [Bunnie] is the Novena, a truly open source laptop where nearly every part has non-NDA’d datasheets. This is the ideal laptop for hardware hacking – it has an FPGA right on the motherboard, a ton of pin headers, and a lot of extras that make interfacing with the outside world easy.

While the crowdfunding campaign for the Novena included a completely custom laptop, it was terribly expensive. That’s okay; it’s an heirloom laptop, and this is a DIY laptop anyway. With the Novena now shipping, it’s time for people to build their laptops. [Ben Heck] is the first person to throw his hat into the ring with his own build of the Novena laptop, and it’s fantastic.

The second video of the build was dedicated to what is arguably the most important part of any laptop: the keyboard. For the keyboard, [Ben Heck] went all out. It’s a completely mechanical keyboard, with backlit LEDs built around the Phantom PCB with Cherry MX switches. Because this is a DIY laptop and something that is meant to be opened, the keyboard is completely removable. Think of something like the original Compaq luggable, but turned into a laptop that looks reasonably modern.

The laptop enclosure was constructed out of a sandwich of an aluminum and laser cut plastic. These layers were glued and screwed together, the parts were carefully mounted into the case. The USB keyboard was attached directly to one of the chips on the motherboard with a few flying wires and hot glue.

The finished build is fantastic, even if it is a bit thick. It’s the ultimate hacker’s laptop, with an FPGA, Linux, open source everything, and even a cute little secret compartment for storing tools and cable adapters. A great build from one of the best builders around.

Continue reading “Building The Novena Laptop”