Hackaday Prize Entry: A Suite Of Lab Instruments

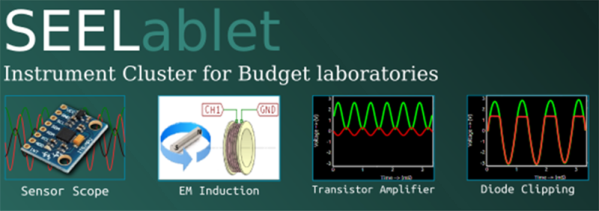
For their Hackaday Prize entry, [Jithin], [Praveen], [Varunbluboy], and [Georges] are working on SEELablet, a device that will equip budding citizen scientists with control and measurement equipment.

One of the best ‘all-in-one’ lab devices is National Instruments’ VirtualBench, a device that’s an oscilloscope, logic analyzer, function generator, multimeter, and power supply, all crammed into one box. There’s a lot you can do with a device like this, but as you would expect, the name-brand version of this isn’t meant for middle school students.

In an effort to bring the cost of an all-in-one lab tool down to a price mere mortals can afford, the team behind the SEELablet have combined a single board computer with the capability of an oscilloscope, frequency counter, logic analyser, waveform generator, and a programmable power supply.

This has been a multi-year project for the team, beginning with a Python-powered instrumentation tool, and later a device running this code that’s also a versatile lab tool. If the latest iteration of the project turns out to be all it promises, we can’t wait to see the data this box will produce. There’s a lot you can measure in a fully stocked electronics lab, and this project makes the whole setup much easier to obtain.

FPGA Drives Old Laptop Screen

Every year, new models of laptops arrive on the shelves. This means that old laptops usually end up in landfills, which isn’t exactly ideal. If you don’t want to waste an old or obsolete laptop, though, there’s a way to reuse at least the screen out of one. Simply grab an FPGA off the shelf and get to work.

[Martin] shows us all how to perform this feat on our own, and goes into great detail about how all of the electronics involved work. Once everything was disassembled and the FPGA was wired up, it took him a substantial amount of time just to turn the display on. From there it was all downhill: [Martin] can now get any pattern to show up on the screen, within reason. The only limit to his display now seems to be the lack of external RAM. He currently uses the setup to drive an impressive-looking clock.

This is a big step from days passed where it was next to impossible to repurpose a laptop screen. Eventually someone discovered a way to drive these displays, and now there are cheap electronics from China that can usually get a screen like this running. It’s impressive to see it done from scratch, though, and the amount of detail in the videos are a great way to understand how everything is working.

Continue reading “FPGA Drives Old Laptop Screen”

Build A Foam Cutter Right Now

Cutting foam is difficult with traditional methods. The best way is with a hot wire. If you read Hackaday, it is a good bet you can figure out how to use electricity to make a wire hot without any help. However, there’s something  clever about [MrGear’s] minimal build.

As you can see in the video below, he uses a 9V battery, a clip, some popsicle sticks, and the wire from a ballpoint pen. He also used a switch, but we couldn’t help but think that was unnecessary  since you could just unclip the battery to turn the device on and off. Since he used hot glue to attach the switch to the battery, replacing the battery would be a pain.

Continue reading “Build A Foam Cutter Right Now”

DIY Smart Home Device Means No More Fumbling In The Dark

Smart home tech is on the rise, but cost or lack of specific functionality may give pause to prospective buyers. [Whiskey Tango Hotel] opted to design their own system using a Raspberry Pi and Bluetooth device connectivity. Combining two ubiquitous technologies provides a reliable proximity activation of handy functions upon one’s arrival home.

Electrical Wiring Diagram

The primary function is to turn on a strip of LEDs when [Whiskey Tango Hotel] gets home to avoid fumbling for the lights in the dark, and to turn them off after a set time. The Raspberry Pi and Bluetooth dongle detect when a specified discoverable Bluetooth device comes within range — in this case, an iPad — after some time away. This toggles the Pi’s GP10 outputs and connected switching relay while also logging the actions to the terminal and Google Drive via IFTTT.

Continue reading “DIY Smart Home Device Means No More Fumbling In The Dark”

Yes, You Should Be Hacking Your Car’s Data System

If you own a car, I would wager it’s the most complex device you own. Within you find locomotion, safety systems, and an entertainment system that may be using technology from several decades ago (but that’s a rant for a different article). Jalopy or Sweet Hotness, your ride has an underlying data network that is a ton of fun to hack, and something of a security dinosaur. Both were discussed by Craig Smith and Erik Evenchick during their talk on Car Hacking tools at Hope XI.

You should recognize both of these names. Eric Evenchick is a Hackaday contributor who has been traveling the world presenting talks and workshops on his open source car hacking hardware called CANtact. Craig Smith is founder of OpenGarages and author of the Car Hacker’s Handbook which we highly recommend. The pair made a great joint presentation; both were charismatic, using wit to navigate through the hardware, software, techniques, and goals you want to have in mind to jump into car hacking.

Continue reading “Yes, You Should Be Hacking Your Car’s Data System”

3D Printering: Non-Planar Layer FDM

Non-planar layer Fused Deposition Modeling (FDM) is any form of fused deposition modeling where the 3D printed layers aren’t flat or of uniform thickness. For example, if you’re using mesh bed leveling on your 3D printer, you are already using non-planar layer FDM. But why stop at compensating for curved build plates? Non-planar layer FDM has more applications and there are quite a few projects out there exploring the possibilities. In this article, we are going to have a look at what the trick yields for us.

Continue reading “3D Printering: Non-Planar Layer FDM”

Cyclist’s LED Pixel Clock Has No Fat Around The Middle

If you like LED clocks and illuminated bicycle wheels, [Harald Coeleveld] has just the right weekend project for you. His RGB pixel LED clock is as simple as it is beautiful, and it can be built in no time: The minimalist and sporty design consist of not much more than a LED strip wrapped around a bicycle wheel rim.

[Harald] took 2 meters of addressable WS2812 LED strip (with 30 LEDs per meter, we assume), wrapped it around a 27″ bicycle rim padded with a foam strip, and obtained 60 equally spaced RGB LEDs on a ring, ideal for displaying time. Apparently, the rim-tape circumference of this particular 27″ bicycle wheel is close enough to 2 meters, so it lines up perfectly.

On the electronics side, the project employs an Arduino Nano and a DS3231 precision RTC module. For switching between two illumination modes for day and night, [Harald] also added a photoresistor. During the day, colored dots around the ring display the time: A red dot for the seconds, a blue one for the minutes, and a group of 3 green LEDs for the hours. At night, the entire ring shimmers with an effective red glow for easier readability.

The Arduino code for this build can be downloaded from the project page, enabling anyone to effortlessly replicate this design-hack in under an hour!