Motion Controlled Reddit Vote Sign.


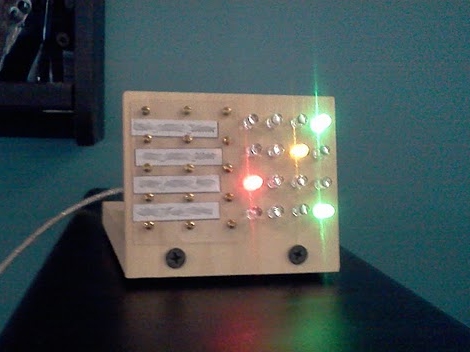
A little while back I attended the largest east coast gathering of folks from the ever popular social news site, Reddit.com. Those of you familiar with Reddit already know that it is all about link aggregation. Users post links to interesting websites and material, and can then vote up or vote down content based on interest or relevance. Through the magical site algorithms original and interesting content is, as implied, aggregated up to the front page.  The whimsical nature of this big DC event lead many people to furnish signs of all types based on the culture of the site, internet memes, etc… The signs that really caught my attention were based primarily on the stylistic site layout, blowing up mail icons and other Reddit specific graphics.

The concept of using site graphics gave me the idea of being able to personally vote up or down other peoples’ signs. It was far too easy to just make a cardboard arrow, and I don’t have a color printer. I happened to have a shelved coffee table project involving orange and blue LEDs. Same colors as the arrows! Sweet. To make this project work I would have to work entirely from my project pile, there simply was no time to order anything from the internet. I managed to crank out a functional up/down voting sign in 3 days leading up to the gathering (and the morning of), here is what I did:

Continue reading “Motion Controlled Reddit Vote Sign.”

Mini LED Message Board Built From Retro Displays

personal_electronic_retro_telegram

[Iain] is getting to the point in his life where he finds himself waxing nostalgic about various different technologies from his youth. One item he has always been fond of is first generation 7 segment consumer LED displays, like those found in old calculators.

He was excited to find one of these displays at the bottom of a box full of electronics odds and ends he received from a friend. After identifying the display and tracking down a data sheet online, he decided that he wanted to build some sort of little gadget out of it.

His first inclination was to build a tiny text scrolling gadget from the display, and thus his “Personal Electronic Retro Telegram” (P.E.R.T) was born. With Arduino in hand, he prototyped the circuit on a breadboard, then sent away to have some PCBs built. Once he received the boards, alll of his prototyping components were swapped out with SMD versions, including a TQFP ATMega168 chip in place of the full-sized Arduino board.

The final result is a nice melding old and new technology which he decided to give to his girlfriend as a gift. Continue reading to see a quick video of the P.E.R.T in action.

Continue reading “Mini LED Message Board Built From Retro Displays”

Open Hacker Conference Badge Project Needs Your Help!

[Aestetix] writes in to tell us that the OpenAMD (Attendee Meta-Data) project is working on a new revision of their hardware, to be debuted at CCC Camp this fall.

For the uninitiated, OpenAMD combines an Active RFID tracking system with social networking, and is completely open-source. You walk into the conference, put on the OpenAMD badge, and suddenly you can see yourself as a dot moving around on a map. Or you can log into the social networking site, create a profile, and watch as your personal information is pulled into the mesh, which then tells you talks you might like, people you might like, where those people are, and more. There’s even an open API where you can create your own ‘killer’ apps, which may include games or other interesting aggregates of the attendee information.

Continue reading “Open Hacker Conference Badge Project Needs Your Help!”

build_status_board

LED Build Monitor Helps Keep An Eye On Your Servers

In his line of work, Hackaday reader [Pedantite] often has to monitor the build status of several continuous integration servers throughout the day. One afternoon, he got the idea to install a set of stop lights in the office in order to monitor the status of the servers, but filed it away as a “wouldn’t it be cool if…” project.

After some time had passed, he was bitten by the idea bug again and decided he would build a physical device to display the status of his build processes. This time around, he brainstormed on a smaller scale and the result is the “Indictron” you see above.

He built a simple LED board made up of four rows of four LEDs to display the build processes. Different LEDs are lit depending on the project’s current build status as well as the results of the previous build. The board uses an ATmega88, and interfaces with a compiler watchdog application using a virtual USB package made specifically for AVR micro controllers.

The end result is a simple, yet useful status board that “just works”. He does not seem to have code or schematics posted on his site at the moment, but we’re pretty sure he would share them upon request.

If you’re interested in a bit more of [Pedantite’s] work, check out his “Good Times” parental timer we featured last week.

Webcam Images Processed And Played Back On LED Display

[Mathieu] has bee working to refine the code running on an LED matrix, and added some neat display tricks along the way. He wanted to make the display directly addressable from a computer. The 96×64 bi-color LED display is powered by an Atmel FPSLIC and already used double-buffering. Enabling a PC to write directly to one of the buffers was not too hard, requiring just a bit of optimization to get the timing right. From the look of the video after the break, he nailed it.

The video feed is generated from a webcam stream using Matlab to process each image. Just 50 lines of code captures a frame, sizes it appropriately, converts the result to black and white for edge detection, then finishes the job by compressing image data for transmission to the embedded processor. We’d like to say it’s easier that it sounds but we’re pretty impressed with this work. The display manages about 42 Hz with the current setup.

Continue reading “Webcam Images Processed And Played Back On LED Display”

Reverse Engineering LED Vodka Bottle Displays

wireless_led_marquee

When [Tyler] heard about the LED matrix display that Medea Vodka was building into their bottles, he immediately wanted to get his hands on one. Who could blame him? Someone had finally combined two things we love dearly: booze and LEDs.

He struggled to find a bottle at any of his local stores for the longest time, but was absolutely stoked when he finally came across one of their reps promoting the brand while he was out shopping.

Once he got home, he pulled the display off the bottle and began poking around to see what made it tick. The display is made from a flexible PCB, and attached to the bottle with some clear elastic film. It is powered by two CR2032 batteries and controlled by a PIC16F chip, which pulls stored messages from a small Atmel EEPROM.

Once he figured out how to control the LED matrix, he uploaded his own fonts and added a LINX wireless module to remotely send messages to the board. He mounted it in a wooden frame and now uses it as a simple marquee display.

If you have one of these displays hanging around your house, be sure to swing by his site for schematics of his wireless interface board as well as the code he uses to drive the marquee. You can check out a video of the display in action there as well.

Retrofitting LCD Projectors With High-powered LEDs

highpower_led

[Devon] recently repaired a handful of Phillips LCD projectors which he was quite excited to use. The only problem is that he didn’t want to mess with replacing the bulbs after every 2000 hours of use at $100 apiece. He was pretty confident that he could find a better way to drive the projectors, so he disassembled them once more and started looking around for bulb replacements.

He figured that a high-powered LED would do the trick, so he ordered a handful of parts and went about his first retrofit. Using his oscilloscope, he found that the control board pulses the high voltage board when the projector is powered on, and continues to pulse a signal until the machine is turned off. At this point, the HV board powers down the bulb.

He created a small circuit using a PIC that is used to interpret the initial pulse from the control board as well as watch for the steady “heartbeat” pulses that occur while the projector is powered on. This board is used to control the driver board for the high-powered LED he purchased.

His bulb replacement works well as far as color fidelity is concerned, but is not nearly as bright as he hoped for. He has plans to source some far brighter LEDs or automobile HID lighting in the very near future, and we look forward to seeing if he can match the brightness of the original bulbs.