flipflop_clock

FlipFlop Clock Uses Mains Frequency To Keep Time

One afternoon, [Sam] was a bit bored and decided he would build a clock. Not wanting to spend any money on the project, he set off to construct his clock using only the components he had on hand – this meant no micro controllers would be used whatsoever.

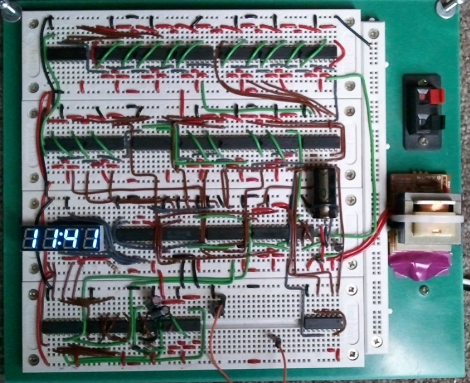
Built on a set of four breadboards, his clock sports a pretty short parts list. It uses just over a dozen flipflops, a few NAND chips, a 555 timer, and a small handful of other components. What you won’t find on the bill of materials however, is any sort of crystal or real-time clock. Instead of using a separate chip for keeping time, he opted to use the 60hz mains frequency as the basis for his time keeping.

The mains sine wave is passed through a series of frequency dividers to reach a 1/60hz signal, which is used to trigger the clock counters he constructed. The time is displayed on a 4-digit seven segment display, using a pair of multiplexers clocked by a 555 timer.

The clock seems to work nicely, though you have to be pretty well-versed in how the clock was built to set the time. The only means of doing so is to probe into the clock of the digit you are setting while pressing the lone pushbutton mounted on the breadboard.

While we are pretty sure no one will ever mess with his clock’s time, we have to wonder if it blinks on and off like our old VCR when the power goes out.

PIC-based Temperature Logger With Onboard Storage

pic_temp_logger

Last summer, [Rajendra Bhatt] built himself a simple PIC-based temperature monitor with data logging abilities and recently got around to sharing it on his site. The sensor is based on a PIC12F683 micro controller and measures the ambient temperature on a set interval, storing the values on the MCU’s internal EEPROM.

He used a Maxim DS18B20 temperature sensor, which communicates with the PIC over a 1-wire bus. The sensor is read based upon the interval chosen by the user, and can be configured to measure the temperature every second, every minute, or every 10 minutes. The data is stored on the aforementioned EEPROM and can be uploaded to a computer via a serial connection. The PIC has the ability to store 254 readings before the data must be cleared from the device.

It’s a great beginner project, and has plenty of room for improvement. As [Rajendra] points out, an external EEPROM could be added to expand the recording capacity, and it would be nice to have a real-time clock on hand for accurate time stamping. If we were to build one ourselves, a means of wireless data transfer would be first on our list of potential enhancements.

Brainwave-based Assistive Technology In The Home

eeg_smart_house

Amyotrophic lateral sclerosis (ALS) is a debilitating disease that eventually causes the afflicted individual to lose all control of their motor functions, while leaving their mental faculties intact. Those suffering from the illness typically live for only a handful of years before succumbing to the disease. On some occasions however, patients can live for long periods after their original diagnosis, and in those cases assistive technology becomes a key component in their lives.

[Alon Bukai and Ofir Benyamin], students at Ort Hermalin Collage in Israel, have been working hard on creating an EEG-controlled smart house for ALS patients under the guidance of their advisor [Amnon Demri]. The core of their project focuses around controlling everyday household items using brainwaves. They use an Emotiv EPOC EEG headset which monitors the user’s brainwaves when focusing on several large buttons displayed on a computer screen. These buttons are mapped to different functions, ranging from turning lights on and off to changing channels on a cable box. When the user focuses on a particular task, the computer analyzes the headset’s output and relays the command to the proper device.

As of right now, the EEG-controlled home is only a project for their degree program, but we hope that their efforts help spur on further advancements in this field of research.

Continue reading to see a pair of videos demonstrating their EEG-controlled smart house in action.

Continue reading “Brainwave-based Assistive Technology In The Home”

Hackaday Reader Throwdown: Electronic Dice

electronic_dice

Hackaday reader [Daid] posted in our forums showing off a set of electronic dice he recently constructed. Back in January, we featured a similar set of electronic dice built with an Arduino that was way overpowered as far as [Daid] was concerned. Not satisfied with simply saying it could be done better, he put his money where his mouth is – something we would love to see more of.

He used an ATTiny2313 to provide the device’s logic, outputting the dice values on a set of four 7 segment displays. The whole setup is controlled by a single push button that serves triple duty rolling the dice, configuring how many sides the dice have, as well as selecting how many dice are being thrown.

He admits that the wiring job is a bit of a mess, but he was going for function over form, and it works just fine. He also says that he would have finished it far sooner if it hadn’t been for those meddling kids some broken 7 segment displays.

We think he did quite a nice job, though we’re all ears if you think you can do it better.

Doom II On Epaper Display

We love to see Doom ported to new hardware because it usually means that someone has found a way around the manufacturer’s security measures. But the most exciting thing for us to see this time is that Doom II is played on an epaper display. These are notorious for slow refresh rates, but as you can see in the video after the break, this one achieves an admirably fast page redraw.

According to a translation of the original forum post, the PocketBook 360° Plus boasts a 5″ E Ink Pearl screen, 533 MHz Freescale i.MX35 ARM11 processor, 128 Mb of RAM, 2 gigs of storage, and WiFi. No word on price for one of these babies as it seems they’ve not yet been release. Remind anyone of the green monochrome goodness from the original Game Boy?

Continue reading “Doom II On Epaper Display”

Are Phones With Haptic Feedback In Our Future?

Can we do away with a keypad and just squeeze our phones to check messages and dial contacts? [Sidhant Gupta] has been researching the idea of an electronically adjustable spring mechanism that might just make this possible. He calls the prototype above the SqueezeBlock. If you pick it up and give it a squeeze you can feel springs pushing back against your fingers, but it’s all a trick. Inside you’ll find one motor with a gear that converts the linear motion into a rotating force. Attached to the same axle as that gear are a motor and a rotary encoder. A microcontroller monitors that encoder to detect a user squeezing the two plates together, then drives the motor to vary the resistance. [Sidhant] outlines some possible uses that included stiffer resistence as unread email starts to pile up, or squeezing the device to its smallest size to turn the ringer volume all the way down.

We’re a little skeptical of this functionality in handhelds just because of the power consumption issue. But if that is somehow overcome we think this would make a pretty interesting phone feature… at least at first. Click through the link above for a video demonstration or get the details from the research presentation (PDF)

[Thanks Dan]

Webcam Images Processed And Played Back On LED Display

[Mathieu] has bee working to refine the code running on an LED matrix, and added some neat display tricks along the way. He wanted to make the display directly addressable from a computer. The 96×64 bi-color LED display is powered by an Atmel FPSLIC and already used double-buffering. Enabling a PC to write directly to one of the buffers was not too hard, requiring just a bit of optimization to get the timing right. From the look of the video after the break, he nailed it.

The video feed is generated from a webcam stream using Matlab to process each image. Just 50 lines of code captures a frame, sizes it appropriately, converts the result to black and white for edge detection, then finishes the job by compressing image data for transmission to the embedded processor. We’d like to say it’s easier that it sounds but we’re pretty impressed with this work. The display manages about 42 Hz with the current setup.

Continue reading “Webcam Images Processed And Played Back On LED Display”