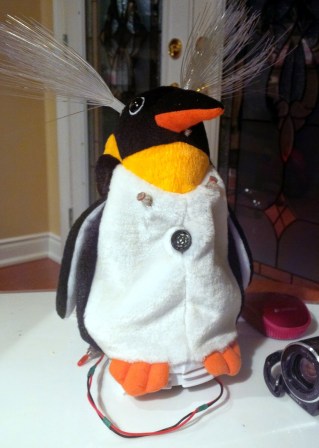
Raspberry Pi Automates Your Tomato Farm

rpi-tomato-farming

Check out the tomato plants [Devon] grew using a monitoring system he built himself. It’s based around a Raspberry Pi. As far as grow controllers go it falls a bit short of full automation. That’s because the only thing it can actuate is the black water line seen hovering above the plants. But [Devon’s] work on monitoring and collecting sensor data should make it easy to add features in the future.

The moisture sensors pictured above monitor the soil in which the plants are growing. But he also has temperature and light sensors. These are very important when growing from seed and could be used in conjunction with a heating mat for plants that require higher soil temperatures (like pepper plants). The tomatoes are also pretty leggy. Now that he’s monitoring light levels it would be good to augment the setup with a grow light. A long term goal could even be a motorized bed which could raise the plants right up to the bulbs so they don’t reach for the light.

Don’t let the stars in our eyes distract you though. He’s done a ton of work on the project both with the physical build, and in plotting the data collected by the system. Great job!

Continue reading “Raspberry Pi Automates Your Tomato Farm”

Using A Flashing LCD Monitor To Transfer Data

lcd-screen-data-transfer
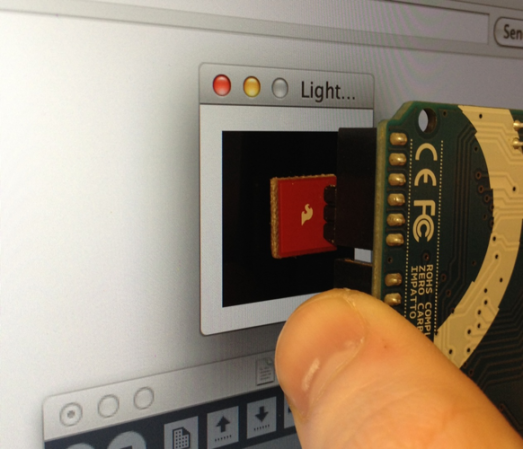
We love the concept of using an LCD screen to transfer data. The most wide-spread and successful method we know of is the combination of a QR code and the camera on a smart phone. But for less powerful/costly devices data can be transferred simply by flashing colors on the screen. That’s what [Connor Taylor] is testing out with this project. He’s using a TEMT6000 light sensor to turn a white and black flashing monitor into binary data.

So far this is just a proof of concept that takes measurements from the light sensor which is held in front of a Macbook Retina display with different backlight levels. At 3/4 and full brightness it provides more than enough contrast to reliably differentiate between black and white when measuring the sensor with the Arduino’s ADC. What he hasn’t gotten into yet is the timing necessary to actually transfer data. The issue arises when you need to have multiple 1’s or 0’s in a row. We’ve tried this ourselves using an LDR with limited success. We know it’s possible to get it working since we’ve seen projects like this clock which can only be programmed with a flashing screen.

[Connor’s] choice of the TEMT6000 should prove to be a lot more sensitive than using just an LDR. We figure he could find a way to encode using multiple colors in order to speed up the data transfer.

Graphing The Efficiencies Of LED Light Strips

After adding a few LED light strips above his desk, [Bogdan] was impressed with the results. They’re bright, look awesome, and exude a hacker aesthetic. Wanting to expand his LED strip installation, [Bogdan] decided to see if these inexpensive LED strips were actually less expensive in the long run than regular incandescent bulbs. The results were surprising, and we’ve got to give [Bogdan] a hand for his testing methodology.

[Bogdan]’s test rig consists of a 15 cm piece of the LED strip left over from his previous installation. A Taos TSL2550 ambient light sensor is installed in a light-proof box along with the LED strip, and an AVR microcontroller writes the light level from the sensor and an ADC count (to get the current draw) of the rig every 6 hours.

After 700 hours, [Bogdan]’s testing rig shows some surprising results. The light level has decreased about 12%, meaning the efficiency of his LED strip is decreasing. As for projecting when his LEDs will reach the end of their useful life, [Bogdan] predicts after 2200 hours (about 3 months), the LED strip will have dropped to 70% of their original brightness.

Comparing his LED strip against traditional incandescent bulbs – including the price paid for the LED strip, the cost of powering both the bulb and the strip, the cost of the power supply, and the time involved in changing out a LED strip, [Bogdan] calculates it will take 2800 hours before cheap LEDs are a cost-effective replacement for bulbs. With a useful life 600 hours less than that, [Bogdan] figures replacing your workshop lighting with LED strips – inexpensive though they are – isn’t an efficient way to spend money.

Of course with any study in the efficiency of new technology there are bound to be some conflating factors. We’re thinking [Bogdan] did a pretty good job at gauging the efficiency of LED strips here, but we would like to see some data from some more expensive and hopefully more efficient LED strips.

Writing On LEDs With A Laser Pointer

After [Ch00f] got his hands on an 8×8 LED display, he didn’t make a 64-pixel video game or VU meter. He made a laser doodler, allowing him to draw on this display with only a laser pointer.

Using LEDs as light sensors is nothing new; [Forrest Mims III] discovered that LEDs can also detect light way back in the late 60s. [Ch00f] played around with this concept before creating a circuit that uses an LED as both a light emitter and sensor that reacts to the ambient brightness.

[Ch00f]’s laser doodler takes this phenomena and applies it to an Adafruit bicolor LED matrix. When a light shines on an individual pixel in the display, the ATMega48 senses the current and turns that pixel on. Since this these pixels have two colors, [Ch00f] used a latch circuit and a button to cycle between what color the ‘Mega writes to the display.

In the video after the break, [Ch00f] shows off his display by having the LEDs light up in response to a laser pointer. It may be a bit small, but we can see a lot of potential for something like this as a gigantic art installation.

Continue reading “Writing On LEDs With A Laser Pointer”

Heliowatcher Positions Solar Panels For Highest Efficiency

[Jason Wright] and [Jeremy Blum] are showing off the project they developed for their Designing with Microcontrollers course at Cornell University. They call it the Heliowatcher, and if you know your Greek mythology we’d be you figured out this watches the movement of the sun and adjust a solar panel to follow it.

Their design is simple and effective. The base is mounted like a Lazy Susan, able to pivot on the horizontal plane. The bottom edge of the solar panel is mounted with two door hinges, with a motorized screw jack used to raise and lower it. The system uses a GPS to provide geographical position, day, and time feedback. This is used in conjunction with an array of four LEDs to determine the best position of the panel. Those LEDs are acting as light sensors; when the top and the bottom detect similar levels, the panel is at its most efficient orientation. The left and right LED sensors work the same way.

Now if we can just work out a self-cleaning system to keep the panels free of the dirty film that builds up over time we’d be set!

Continue reading “Heliowatcher Positions Solar Panels For Highest Efficiency”

Toilet Buddy Helps Cover Up Bathroom Noises

toilet-buddy

When it comes to bathroom etiquette, [Nick] and the crew at Gadget Gangster are nothing less than proper gentlemen. Inspired by a Japanese toilet that automatically plays a “courtesy flush” noise in an effort to conserve water while masking sounds, they created the Toilet Buddy.

While the Toilet Buddy does nothing to cover up any aromas, it does provide some sound cover for those louder times. Not only that, it also helps serve as a reminder for other bathroom courtesies as well. When mounted on the tank lid, the Toilet Buddy alerts the last occupant to put the seat down and shut off the lights before leaving the bathroom. Built with a Parallax Propeller board, it uses IR and ambient light sensors to determine the position of the toilet seat and the status of the bathroom lights, playing an audio notifier when necessary. Now if it only sprayed air freshener automatically!

[Nick] points out that the Toilet Buddy is not limited to bathroom duty, and can be used in a variety of projects where light/motion sensing is required. Be sure to check out his writeup for some usage suggestions if you’re thinking of building one.

In the meantime, continue reading to see a video of the Toilet Buddy in action.

Continue reading “Toilet Buddy Helps Cover Up Bathroom Noises”

Megavallometer Camera Trigger

megavallometer_camera_trigger

[Tobe] has an intervalometer for his camera, but he wanted a device that could trigger the shutter using several different methods, not just time. He calls his creation the Megavallometer, which can utilize any one of three distinct criteria.

He recently purchased an Arduino and a couple of shields, so he figured this would be a perfect project in which to use them. He hooked up a microphone and a photodiode to the Arduino, allowing him to use both sound and light to trigger his camera, depending on which mode he selects. Of course, the Megavallometer still incorporates the functionality of a standard intervalometer as well.

Once connected to his camera he selects one of the three trigger programs, and the Arduino handles the rest. If either the light or sound triggers are selected, the respective sensors measure the ambient levels upon selection, allowing for accurate results in any setting.

While the Megavallometer is a bit larger than other intervalometers we have seen, it looks incredibly useful and can likely be strapped to a tripod or similar if need be.

If you have a minute, be sure to check out the video on his site for a sneak peak if his Megavallometer in action.