“Hey, You Left The Peanut Out Of My Peanut M&Ms!”

Candy-sorting robots are in plentiful supplies on these pages, and with good reason — they’re a great test of the complete suite of hacker tools, from electronics to machine vision to mechatronics. So we see lots of sorters for Skittles, jelly beans, and occasionally even Reese’s Pieces, but it always seems that the M&M sorters are the most popular.

This M&M sorter has a twist, though — it finds the elusive and coveted peanutless candies lurking in most bags of Peanut M&Ms. To be honest, we’d never run into this manufacturing defect before; being chiefly devoted to the plain old original M&Ms, perhaps our sample size has just been too small. Regardless, [Harrison McIntyre] knows they’re there and wants them all to himself, hence his impressive build.

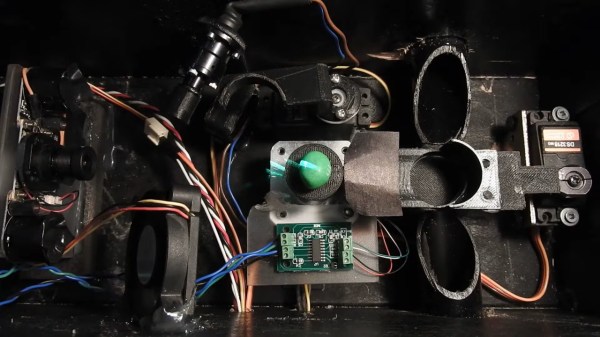
To detect the squib confections, he built a tiny 3D-scanner from a line laser, a turntable, and a Raspberry Pi camera. After scanning the surface to yields its volume, a servo sweeps the candy onto a scale, allowing the density to be calculated. Peanut-free candies will be somewhat denser than their leguminous counterparts, allowing another servo to move the candy to the proper exit chute. The video below shows you all the details, and more than you ever wanted to know about the population statistics of Peanut M&Ms.

We think this is pretty slick, and a nice departure from the sorters that primarily rely on color to sort candies. Of course, we still love those too — take your pick of quick and easy, compact and sleek, or a model of industrial design.

Continue reading ““Hey, You Left The Peanut Out Of My Peanut M&Ms!””

Tensile Testing Machine Takes 3D Printed Parts To The Breaking Point

If you’re serious about engineering the things you build, you need to know the limits of the materials you’re working with. One important way to characterize materials is to test the tensile strength — how much force it takes to pull a sample to the breaking point. Thankfully, with the right hardware, this is easy to measure and  [CrazyBlackStone] has built a rig to do just that.

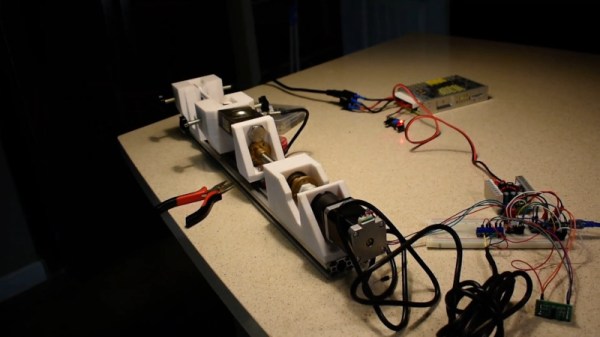
Built on a frame of aluminium extrusion, a set of 3D printed parts to hold everything in place. To apply the load, a stepper motor is used to slowly turn a leadscrew, pulling on the article under test. Tensile forces are measured with a load cell hooked up to an Arduino, which reports the data back to a PC over its USB serial connection.

It’s a straightforward way to build your first tensile tester, and would be perfect for testing 3D printed parts for strength. The STEP files (13.4 MB direct download) for this project are available, but [CrazyBlackStone] recommends waiting for version two which will be published this fall on Thingiverse although we didn’t find a link to that user profile.

Now we’ll be able to measure tensile strength, but the stiffness of parts is also important. You might consider building a rig to test that as well. Video after the break.

Continue reading “Tensile Testing Machine Takes 3D Printed Parts To The Breaking Point”

Cheap Lab Balance Needs Upgrades, Gets Gutted Instead

What is this world coming to when you spend seven bucks on a digital scale and you have to completely rebuild it to get the functionality you need? Is nothing sacred anymore?

Such were the straits [Jana Marie] found herself in with his AliExpress special, a portable digital scale that certainly looks like it’s capable of its basic task. Sadly, though, [Jana] was looking for a few more digits of resolution and a lot more in the way of hackability. And so literally almost every original component was ripped out of the scale, replaced by a custom PCB carrying an STM32 microcontroller and OLED display. The PCB has a complicated shape that allows the original lid to attach to it, as well as the stainless steel pan and load cell. [Jana] developed new firmware that fixes some annoying traits, for example powering down after 30 seconds, and adds new functionality, such as piece-counting by weight. The video below shows some of the new features in action.

Alas, [Jana] reports that even the original load cell must go, as it lacks the accuracy her application requires. So she’ll essentially end up building the scale from scratch, which we respect, of course. At this rate, she might even try to build her own load cell from SMD resistors too.

Continue reading “Cheap Lab Balance Needs Upgrades, Gets Gutted Instead”

Automated Cat Feeder Leaves Little To Chance

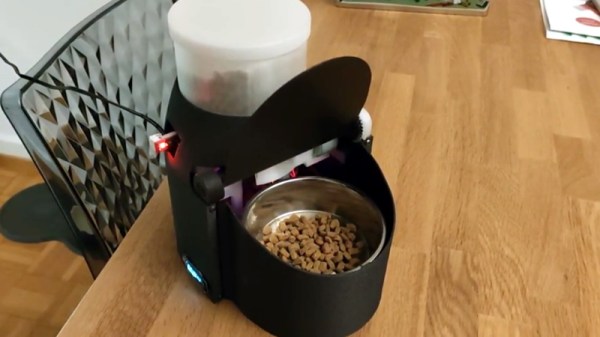
We often like to say that if something is worth doing, then it’s worth overdoing. This automatic cat feeder built by [krizzli] is a perfect example of the principle. It packs in far more sensors and functions than its simple and sleek outward appearance might suggest, to the point that we think this build might just set the standard for future projects.

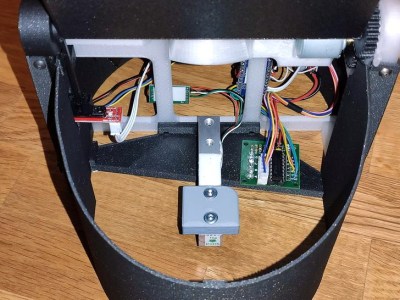
The defining feature of the project is a load cell located under the bowl, which allows the device to accurately measure out how much feed is being dispensed by weight. This allows the feeder to do things such as detect jams or send an alert once it runs out of food, as well as easily adjust how much is dispensed according to the animal’s dietary needs. To prevent any curious paws from getting into the machine while it’s doling out the food, the lid will automatically open and close during the filling process, complete with optical sensors to confirm that it moved as expected.

All of the major components of the feeder were printed out on a Prusa i3 MK3S, and [krizzli] says that the feed hopper can be scaled vertically if necessary. Though at the current size, it’s already packing around a week’s worth of food. Of course, this does depend on the particular feline you’re dealing with.

In terms of electronics, the feeder’s primary control comes from an ESP8266 (specifically, the Wemos D1 Mini), though [krizzli] also has a Arduino Pro Mini onboard so there’s a few more GPIO pins to play with. The food is dispensed with a NEMA 17, and a 28-BYJ48 stepper is in charge of moving the lid. A small OLED on the side of the feeder gives some basic information like the time until the next feeding and the dispensed weight, but there’s also a simple API that lets you talk to the device over the network. Being online also means the feeder can pull the time from NTP, so kitty’s mealtime will always be on the dot.

Over the years we’ve seen an incredible array of automatic cat feeders, some of which featuring the sort of in-depth metrics possible when you’ve got on onboard scale. But we can’t help but be impressed with how normal this build looks. If nothing else, of all the feeders we’ve seen, this one is probably the most likely to get cloned and sold commercially. They say it’s the most sincere form of flattery.

Does Your Home Assistant Know When You Are Sleeping?

It always gives us a sense of wonder when we realize that what would be a simple task for a human child is a big deal for a computer. For example, if you asked someone if you or someone else was in bed, that’s a pretty simple thing to check. For you, that is. For a computer, it requires some sort of sensor. [Lewis] used load cells to tell if someone is in a particular bed or not. He uses Home Assistant and has a great post about how he created and interfaced the sensors. Of course, the sensors really only tell you if something heavy is in the bed. It doesn’t know who it is or even that it isn’t an overstuffed suitcase.

Load cells aren’t exactly high tech. There are several different types that use hydraulic pressure or pneumatics to measure force. However, the most common that we encounter use strain gauges. A strain gauge is a resistor that changes value when it deformed and a load cell usually has several strain gauges wired in a bridge configuration so that small forces create larger output changes.

Continue reading “Does Your Home Assistant Know When You Are Sleeping?”

Let Your Pi Make A Pie Chart For Your Pie

March 14th is “Pi Day”, for reasons which should be obvious to our more mathematically inclined readers. As you are not reading this post on March 14th, that must mean we’re either fashionably late to Pi Day 2019, or exceptionally early for Pi Day 2020. But in either event, we’ve got a hack for you that celebrates the day using two things we have it on good authority most hackers overindulge in: food and needless complexity.

This project comes from [Mike MacHenry], and it’s just as straightforward as it looks. Put simply, he’s using a load cell connected to the Raspberry Pi to weigh an actual pie and monitor its change over time. As the pie is consumed by hungry hackers, a pie graph (what else?) is rendered on the attached screen to show you how much of the dessert is left.

One might say that this project takes a three dimensional pie and converts it to a two dimensional facsimile, but perhaps that’s over-analyzing it. In reality, it was a fun little hack [Mike] put together just because he thought it would be fun. Which is certainly enough of a motive for us. More practically though, if you’re looking for a good example for how to get a load cell talking to your non-edible Raspberry Pi, you could do worse than checking this out.

We’ve also got to give [Mike] extra credit for including the recipe and procedure for actually baking the apple pie used in the project. While we’re not 100% sure the MIT license [Mike] used is actually valid for foodstuffs, but believe it or not this isn’t the first time we’ve seen Git used in the production of baked goods.

Quartet Of SMD Resistors Used To Sense Z-Axis Height

Here’s a neat trick for your next 3D-printer build or retrofit: a Z-axis sensor using a DIY strain gauge made from SMD resistors. We’re betting it could have plenty of other applications, too.

Conventional load cells, at least the ones you can pick up cheaply from the usual sources or harvest from old kitchen or bathroom scales, are usually way too big to be used on the extruder of a 3D-printer. [IvDm] wanted to build a touch sensor for his Hybercube printer, so he built his own load cell to do it. It consists of four 1000 ohm SMD resistors in the big 2512 device size. He mounted them to an X-shaped PCB and wired them in the classic Wheatstone bridge configuration, with two resistors on one side of the board and two on the other.

The extruder mounts into a hole in the center of the board and floats on it. Through an HX711 load cell driver chip, the bridge senses the slight flex of the board when the extruder bottoms out on the bed, and an ATtiny85 pulls a limit switch input to ground. [IvDm] even did some repeatability testing with this sensor and it turned out to be surprisingly consistent. The first minute or so of the video below shows it in action on the Hypercube.

We found the use of SMD resistors as strain gauges pretty clever here, but there’s plenty to do with off-the-shelf load cells: measuring how much filament is left on a roll, checking the thrust of a model rocket engine, or even figuring out if you’re peeing correctly.

Continue reading “Quartet Of SMD Resistors Used To Sense Z-Axis Height”