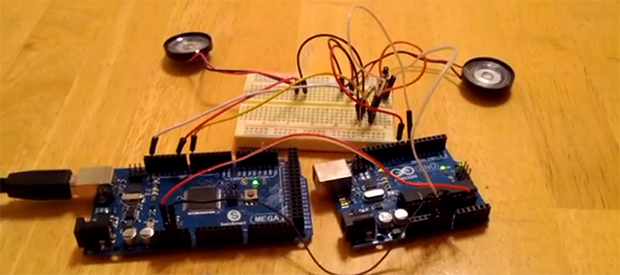
Making A Real Instrument Out Of A Kaoss Pad And Ribbon Controllers

swinger

MIDI guitars have been around since the 80s, and nearly without exception they are designed as direct, one-to-one copies of their acoustic and electric brethren. [Michael] has been working on turning this convention on its head with the Misa Tri-Bass, a MIDI guitar designed to be the perfect guitar-shaped synthesizer interface.

The tri-bass doesn’t produce any sound itself; instead, it’s a polyphonic MIDI controller with three channels controlled by three ribbon controllers on the neck. The body contains a huge touch screen divided into four MIDI channels, essentially turning this guitar into an instrument designed for electronic music first, and not an acoustic instrument kludged into filling an electronic role.

Unlike a whole lot of other digital guitar-shaped MIDI controllers, the tri-bass is actually made out of wood. Yes, the neck is made out of maple (inlaid with the three ribbon controllers, of course), and the body comes directly from a tree, with the styling inspired by a forgotten retro-modern design. It’s an impressive piece of kit, and we can’t wait to see [Michael]’s handiwork in the hands of digital guitarists the world over.

You can check out a video of [Michael] rockin out below.

Continue reading “Making A Real Instrument Out Of A Kaoss Pad And Ribbon Controllers”

Touch Control For Every Key On The Keyboard

keys

Of all the musical instruments out there, the keyboard is among the worst for changing the pitch and timbre of individual notes. Wind and stringed instruments can do this easily in the hands of a skilled player, but outside the wheel and joystick controls of a few electronic keyboards, tickling the ivories means the only thing you can really change about how something sounds is the volume.

TouchKeys wants to put an end to this severe lack of dynamics available on keyboard instruments. Basically, it turns every single key on a keyboard into a multi-touch sensor, allowing any keyboardist to change the pitch, filter, timbre, or any other parameter of their instrument simply by moving their finger around on a key.

TouchKeys works by overlaying all the keys on a keyboard with circuit boards that plug into a module hidden under the hood. These boards are studded with capacitive sensing points, allowing a computer to recognize where the player is touching each key, and modifying filters or volume for each key independently.

The TouchKeys Kickstarter is offering a kit to equip a 25-key keyboard with these sensors for about $550. A hefty price tag, but hopefully we’ll see this tech in real production keyboards in the future.

The Perils Of Cheap MIDI Adapters

MIDI

[Arvydas] recently bought a Rock Band 3 Wii keyboard thinking it would be an excellent and very inexpensive (£9.99) MIDI controller. The keyboard has a proper DIN-5 MIDI out port, so theoretically the only thing needed to plug this into a computer is a USB to MIDI adapter. Unlike the keyboard, the MIDI adapter was a cheap piece of Chinese cruft, but given some ingenuity and a handful of components, he was able to get everything working.

The 30-year-old MIDI specification includes a few schematics on how to properly connect MIDI devices together. The most important part of these schematics is an optoisolater on the MIDI in, a valuable addition considering early MIDI keyboards cost thousands of dollars. It seems [Arvydas]’ MIDI to USB adapter didn’t include this vital component, instead replacing it with a simple resistor. Anything to keep costs down, right?

To get the MIDI adapter working, [Arvydas] headed over to Maplin and bought an optioisolator, With everything wired up on a breadboard, he got it to work and eventually transplanted the circuit to the adapter’s PCB.

It’s a great piece of work to get this MIDI adapter functioning, especially since it’s doubtful the cheap adapter would have worked with any MIDI device.

Tearing Apart An Organ And Making A MIDI Keyboard

pedul

What do you do if you’re in a band and have an old, dead organ lying around? Build a MIDI foot controller, of course.

After dispensing of the old organ guts, [Mark] mounted the pedals in a handsome road case and started working on the electronics. His first inclination was to mount an Arduino Pro Mini on a piece of stripboard, but after that failed decided to learn Eagle and fabricate a PCB. each key of the organ pedals are connected to a switch read by the Arduino which sends data to a Korg Microsampler over MIDI.

The swell pedal from the organ was also reused, but because the old incandescent light in the pedal was toast, this was replaced with an LED. It still works, allowing [Mark] to do volume swells on his new, fancy, MIDI foot controller.

You can check out a video of the controller below.

Continue reading “Tearing Apart An Organ And Making A MIDI Keyboard”

MIDI Out For A Korg CX-3 Organ

midi-out-for-a-vintage-korg-cx-3-organ

[Michael] loves this old organ of his, but recently he wondered if it would be possible to add MIDI out without altering its original functionality. With a bit of research and more than a bit of hard work he accomplished his goal.

The nice thing about working on a quality piece of hardware like this is the resources you can find regarding how they work (which we bet is tailored for how to repair them when they break). [Michael] found a website with plenty of info on the circuit boards and how they work. From this he was able to locate a few chips which stream serial data regarding which keys have been pressed. Bingo!

Once he located the three signals he was after he built a board to translate them to the MIDI protocol. His circuit is based around an ATtiny2313. It is supported by a liner voltage regulator circuit as well as a buffer chip which converts the incoming signals to the 5V levels needed. His home etched board is clean and well mounted, and the success of the project can be heard in the clip after the jump.

Continue reading “MIDI Out For A Korg CX-3 Organ”

Automatic Tubular Bells Given A MIDI Interface Too

automatic-tubular-bells

We’ve got to say it… these tubular bells sound awful! They don’t really have a tight pitch center so they sound really out of tune to us. But we think that’s the failing of the instrument itself and not the work which [Tolaemon] did to automate the instrument.

There are three main parts to his project. The first, which is shown above, adds a hammer for each bell. The hammers are hinged, with one side being pulled by a solenoid in order to strike the bell. The second part of the hack also uses solenoids, dampening the bell’s ability to ring by pressing a felt pad up against the bottom of the tube. The final portion of the project brings it all home by adding MIDI control to the hardware.

The clip after the break gives a good overview of the different features including some preprogrammed playback as well as direct control of the instrument using an electric keyboard. This reminds us of that scratch-built solenoid xylophone.

Continue reading “Automatic Tubular Bells Given A MIDI Interface Too”

Hackaday Links: Sunday, April 21st, 2013

hackaday-links-chain

Regular reader and master hacker [Bill Porter] got married. Congratulations [Bill] and [Mara]! The two of them just couldn’t leave their soldering irons at home. The actually swore their vows by soldering together a circuit during the ceremony (blinky wedding dress, el wire tuxedo, and all).

[Kevin] sent in a link to [Red Fathom’s] hacked Wacom tablet. It’s the screen from a Wacom-enabled laptop brought back to life with a Teensy and an LVDS interface module.

The Neato XV-11 is able to find its charging station when the batteries run low. [Derek] figured out that you can make a second station using some reflective tape.

If you use your drill a lot you’ll eventually break the rubber thing that holds the key to the chuck. Here’s a way to 3D print a replacement.

[Torxe] put eight floppy drives to use as a polyphonic Arduino-controlled MIDI player. And while we’re on the subject of Arduino controlled projects you should take a look at this web-interface to tell you if the foosball table is being used.

And finally [Th3 Bad Wolf] sent in this link to a milling machine built out of LEGO. It is able to mill floral foam and uses a lathe-like setup for one of the table axes.