Visualize Vroom With This RGB LED Tachometer

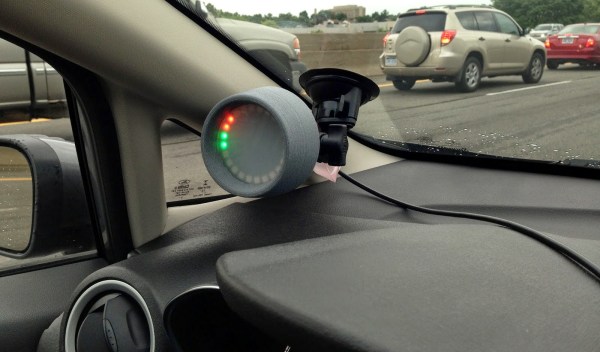
[Pete Mills] recently bought the all-new Ford Fiesta, which offers impressive fuel economy over that of his Jeep. He soon figured out that he has real time access to a wealth of engine and chassis data through Ford’s OpenXC platform and used it to build blueShift, a neopixel tachometer. The car already has a tach, but this one is more visual, can be seen in periphery, and is just plain fun.

In case you hadn’t heard, the OpenXC platform is Ford’s consumer key to the kingdom of OBD2 treasures. It unlocks the magic through its Vehicle Interface, which plugs into the OBD2 port and translates the CAN bus messages to OpenXC format. These messages are packaged into JSON format and can be sent over Bluetooth or Ethernet/Wi-Fi to an Android, Python, or iOS device.

[Pete] went with Bluetooth and used a BlueSMiRF with an Arduino Pro Mini. He derives power from the car’s on-board USB port, but has future plans to use the OpenXC VI port. blueShift reads the RPM data and displays a green trail as the engine revs up. At the peak revolution, it shows a red LED. This one is sticky and will persist for the lesser of three seconds or the time elapsed to a new positive RPM. [Pete] is also reading the headlight status of the car. As soon as they come on, the RGB LEDs dim to avoid blinding him at night.

[Pete] wanted to make an enclosure more finished-looking than a Tupperware box. He nearly detoured into 3D-printer design, but ended up putting together a Prusa i3v and came up with this RAM mount-compatible enclosure. His fantastic write-up and code are on his blog, but you can make the jump to see a short demo and a full explanation video. You can also make smart brake lights or even create art with OpenXC.

Continue reading “Visualize Vroom With This RGB LED Tachometer”

Network Controlled Decorative LED Matrix Frame

LED-Pixel-FrameThere is nothing better than a project that you can put on display for all to see. [Tristan’s] most recent project, a Decorative LED Matrix Frame, containing 12×10 big square pixels that can display any color, is really cool.

Having been built around a cheap IKEA photo frame this project is very doable, at least for those of you with a 3D printer. The 3D printer is needed to create the pixel grid, which ends up looking very clean in the final frame. From an electronics perspective, the main components are a set of Adafruit Neopixel LED strips, and an Arduino Uno with an Ethernet shield. The main controller even contains a battery backup for the real time clock (RTC) when the frame is unplugged; a nice touch. Given that the frame is connected to the local network, [Tristan] designed the frame to be controlled by a simple HTML5 interface (code available on GitHub). This allows any locally connected device to control the frame.

Be sure to check out the build details, they are very well done. If you are still not convinced how cool this project is, be sure to check out a video of it in action after the break! It makes us wish that you could play Tetris on this frame. Very nice job [Tristan]!

Continue reading “Network Controlled Decorative LED Matrix Frame”

Driving 1000 NeoPixels With 1k Of Arduino RAM

timing

NeoPixels, or WS2812 RGB LEDs, are the display device du jour for impressive and blinding lighting projects. Commonly known for very tight timing requirements, [Josh] discovered this is, in fact, usually unnecessary. The timing requirements for NeoPixels aren’t as bad as they seem, once you get to know them.

The official WS2812 timing specs give values that are fairly constraining for anyone writing a library to drive these RGB LED pixels, but simplifying the timing diagram by assuming a 50% duty cycle on the data lines and ignoring the longer maximum times results in a surprising conclusion: the only tight timing parameter for NeoPixel signaling is the maximum width of the 0-bit pulse.

Realizing this, [Josh] wrote a simple demo program to drive over 1000 NeoPixels – an 11 meter long strip – using 1K of RAM on an Arduino. The trick comes by simply delaying the bitbanging a set number of cycles. No obtuse assembly required.

There is only one problem with [Josh]’s method of driving a nearly unlimited amount of NeoPixels – building a display where every NeoPixel is an element in a larger image, such as in a video display, is impossible on systems with limited amounts of RAM. The code writes values to the NeoPixel strip algorithmically, so if you can’t build your animation with for loops, you’re out of luck. Still, Driving this many NeoPixels is a migraine trigger, and we have to give [Josh] credit for doing this with 1K of RAM.

Check out the video of [Josh]’s extreme NeoPixel strip below.

Continue reading “Driving 1000 NeoPixels With 1k Of Arduino RAM”

Wearable Flames With Fur And LED Strips

wearable-flames-with-fur-and-LED-strips

[Finchronicity] over on Hackaday Projects has made a pretty awesome furry LED Vest to keep him warm and well lit at this year’s Burning Man. He is using a Teensy 3.0 that drives strips of 470 WS2811 LEDs.

The vertically aligned strips run on a continuous sequence which reaches up to 31 frames per second using precompiled animations. The effects rendered in Processing or video mapped, are captured frame by frame and stored as raw color data to an SD card. Playback uses the NeoPixel library to control the strips. The high resolution LEDs, with the video mapped fire and the long pile fur, create one of the nicest flame effects we have seen on clothing.

We’ve also seen the Teensy 3.0 and WS2811 LEDs used as a popular combination for building huge displays, a 23ft tall pyramid, and more recently in the RFID jacket at Make Fashion 2014. Have you made or seen a great Teensy/WS2811 project you would like to share with us? If so, let us know the details in the comments below.

Continue reading “Wearable Flames With Fur And LED Strips”

Sewing Conductive Thread In Parallel Lines

[Cynthia] has shared a great video of  machine sewing parallel lines of conductive thread onto ribbon using a cording foot which usually comes standard with most machines. This technique could be particularly useful when using addressable LEDs like a NeoPixel to get the ground, data, and positive lined up fairly accurately. Sewing the conductive thread onto ribbon also makes it a hell of a lot easier to attach to many garments or textiles,  and also makes it easier to replace or reuse.

The method is pretty easy, essentially using the grooves in the cording foot to guide the conductive treads and ensuring even spacing. Two of the lines are sewn down approximately 3 mm apart using a zigzag stitch. The third line is sewn separately making sure the stitching doesn’t break the first two lines. In the video, a striped ribbon is used which has slight troughs that additionally helps the threads stay in place and the sewer to stay on target.

[Cynthia] of Cynthia Designs Studio has been experimenting with embedding electronics in textiles and has quite a few great videos that you can check out on the Cynthia Designs Studio YouTube channel.

We have seen a machine embroidered LED matrix and a hand sewn LED quilt here on Hackaday, but those who have tried know that conductive thread can be very tricky to work with and keep conductivity.  Do you have any tips or tricks for hand or machine sewing conductive thread? If so, please share in the comments below.

Continue reading “Sewing Conductive Thread In Parallel Lines”

Handheld Tetris Is Retro And We Love It

handheld tetris

[Eduardo Zola] has been playing around with Arduinos, and ever since he started, he wanted to try making a game. Having fond memories of playing Tetris back on Windows 3.1, he decided to try giving a handheld version of it a shot.

He started with two 8×8 Neopixel Matrices due to their simplicity — not to mention the massive library of code available! To make it truly portable, he’s also included a 3.7v 4400mAh lithium ion battery which will keep him gaming for hours. He found a 5-way navigation switch on eBay which makes up the joystick. A small LED bar display tells you what level you’re on, and he’s even included a smaller speaker for music, and a vibrating motor for successfully completed lines in the game!

He borrowed the Tetris algorithm (and added some improvements) from the source code by [Valentin Ivanov], who completed a similar project last fall. Stick around to see a demonstration video of it in action.

Continue reading “Handheld Tetris Is Retro And We Love It”

3D Printed RGB LED Bracelet

3dprintedrgbbraclet

[Marcus’s] 3D-printed LED bracelet has moved through a number of revisions recently, but each iteration is impressive in both simplicity and functionality. Inspired to experiment with his print of [nervoussystem’s] Diagrid Bracelet, [Marcus] took the opportunity to add some LEDs with his first build, which combined a strip of RGB LEDs, a small battery, and an Adafruit Trinket microcontroller.

A second build soon followed, which overhauled the bracelet’s design into a more solid form and managed to double the amount of LEDs by upgrading to a different strip. The bracelet is currently in its third revision, cycling through the spectrum for around 3.5 hours on a single charge. This build also sports a 3-axis accelerometer: when the wearer shakes the bracelet, the colors skip around. If shaken long enough, the bracelet will enter a dazzling flurry of color flickering. Stick around after the break for a few demonstration videos. If you want to print your own, head over to [Marcus’s] Thingiverse file.

Continue reading “3D Printed RGB LED Bracelet”