200 Pound, WiFi Deploying Robot Ran Over My Foot

[Adam Bercu] and [Dan Landers] from Artisan’s Asylum in Somerville, MA brought a very, very cool toy to Maker Faire this year. It’s a two hundred pound WiFi repeater deploying robot able to amble across unforgiving terrain and my foot.

The robot is controlled through a web interface with the help of a front-mounted web cam with pan and tilt controls. All the signals are sent through a WiFi connection to a node.js web server; not the best way to communicate with a robot over long distances, but [Adam] and [Dan] have a few tricks up their sleeve.

On the back of the robot are two Pelican cases loaded up with a battery and a Linksys WRT54G wireless router. When the robot reaches the limits of its range, it activates a solenoid, dropping a WiFi repeater. This repeater has enough battery juice to stay powered for about a day and a half, meaning the robot can make multiple trips to deploy a wireless network through some very hostile terrain. Perfect for disaster and search and rescue operations.

There are two videos after the break: the first is [Dan] going over the capabilities of his tank bot and the second is a short demo of the bot tearing up the grass at Maker Faire.

Continue reading “200 Pound, WiFi Deploying Robot Ran Over My Foot”

Toorcamp: Nibble Node.js Widget

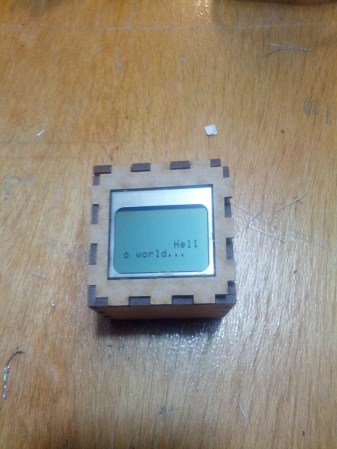
The hardware hacking village at Toorcamp provided space and tools to work on hardware. It was interesting to see what hardware hacks people had brought to work on. One example is [Owen]’s Nibble Node.js Widget. The widget combines the popular node.js platform and custom hardware to create a node for the “internet of things.” The hardware consists of a Arduino Pro Micro, a bluetooth module, a LCD display, and a speaker in a laser cut box.

By using a custom package in node.js, the Nibble becomes an object which can be controlled by its methods. This allows for the developer to push messages to the display and control the device without worrying about the details of the hardware. Since node.js is designed for web applications, it’s simple to make the device controllable from the web.

[Owen] also wrote an emulator for the DCPU from the upcoming game, 0x10c. DCPU assembly is passed in from node.js, which compiles it and sends it to the Nibble. The device can then run the application using the DCPU emulation, which also allows for control of the display and the speaker.

There’s a lot of neat things that can be done with this minuscule cube, and [Owen] plans to release an NPM package for the node.js code.

Node.js For Linux Joysticks

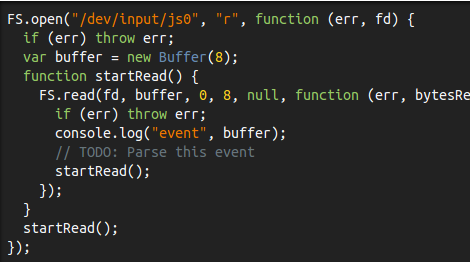
[Tim Caswell] has been using gamepads and joysticks to demonstrate his node.js hacks for a long time. The thing is, he has been relying on C++ bindings to handle the hardware while trying to herald the praises of node.js. Why not cut out the middle man and write a joystick driver in node.js? It turns out to be so simple anyone can do it.

Granted, this is not a kernel driver. He’s relying on the Linux kernel to recognize the hardware and provide him with the customary /dev/js0 file which he can then work with. As you can see in the snippet above, he’s looping through code in order to constantly read from the hardware. To get this far he dug through the documentation for joystick packets (yay for open source!) to find that each is made of a 32-bit timestamp, a 16-bit value, and two 8-bit numbers identifying the event type and button or axis.

Once he has the packets, it’s off to the races. Each data type is parsed into an appropriate variable which you can use in the logic of your own program. Don’t be nervous, this will make a great weekend project!

Using The Raspi As An Ethernet Shield

[Alexandre] wanted to set up a web-based temperature logger with his Arduino, but found the Arduino Ethernet shield a little finicky. Since his Raspberry pi was just delivered, he figured he could use the Raspi as an Ethernet shield with just a little bit of coding.

After [Alexandre] set up his Arduino to send a thermocouple through the USB, the only thing left to do was to add node.js to the Raspi’s Debian installation. Every five minutes, the Arduino wakes up, takes a temperature reading, and sends it over to the Raspberry pi. From there, it’s easy parse the Arduino’s JSON output and serve it up on the web.

In the end, [Alexandre] successfully set up his Raspberry pi as an Ethernet shield to serve a web page displaying the current temperature (don’t F5 that link, btw). One interesting thing we have to point out is the cost of setting up this online temperature logger: the Arduino Ethernet shield sells for $45 USD, while the Raspberry pi is available for $35. Yes, it’s actually less expensive to use a Raspberry pi as an Ethernet shield than the current Arduino offerings. There you have it, just in case you were still on the fence about this whole Raspi thing.

Accelerometer-based Game Control Using An IOS Device Courtesy Of HTML5

This game of Space Invaders is played by tilting your iPhone to the left or right. It’s a demonstration of HTML5 used to link devices in-browser. The only setup that’s required is for the base device to load up a webpage, then the control device scans a QR code (or just types in a link) to connect with the game. You can give it a try right now if you want.

It only works with iOS devices but we believe that’s because mobile Safari has the ability to poll accelerometer data and other browsers do not. If this was using on-screen buttons rather than the tilt controls it would work on any device that implements HTML5. The connection is facilitated by Node.js and Socket.IO. The QR code that is generated by the host machine’s page includes a unique ID which allows the control device to link with it. Once loaded, commands from the controller are sent via Socket.IO to the node on the host machine.

As with this HTML5-based sensor data application, we think this method is important because it allows control without the need for a standalone application. We’re hoping to see a lot of this in embedded projects in the future. By serving data to a smart phone or other device you remove to need for a physical user interface in your projects, which means you can make great things while spending less.

[via Reddit]