[Mike] Illuminates Us On LED Filaments

LED filaments started showing up in light bulbs a few months back. [Mike] discovered that the strips are available in bulk from ebay and Alibaba. Always keen to work with new LED technologies, [Mike] ordered a few for experimenting and posted the results on his [mikeselectricstuff] YouTube channel. He also added the information to his website.

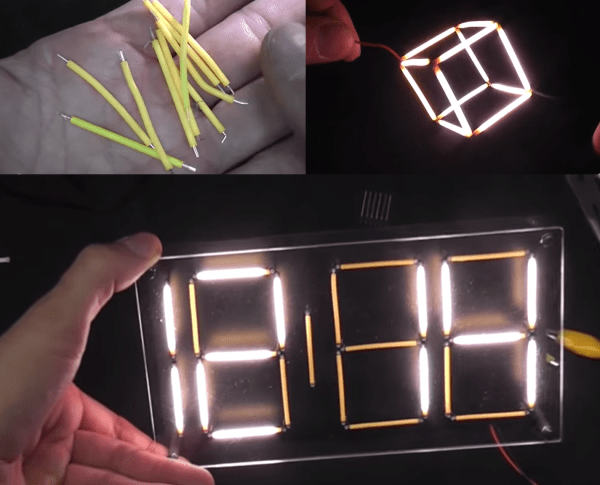
The filaments consist of 28 LEDs connected in series. The blue LEDs are covered by the typical yellow phosphors to make them glow white. It’s interesting to note that some of the filaments use a removable silicone sleeve to hold the phosphor coating, while others are coated with a resin material. The LEDs themselves are bare dies mounted to a metal strip and joined by bond wires. The entire strip can be bent, but be careful, or you’ll break the fragile bond wires.

The strips do require a fair bit of voltage to operate. The entire strip runs best at around 75 and 10~15 mA, while putting out about 1 Watt of light. [Mike] tested a strip to destruction by pumping 40 mA through it. Predictably the strip went out when the bond wires melted. The surprising part was that the strip blinked back on as the wires cooled and re-connected. The strip and wires were working as a temperature controlled switch, similar to the bimetalic strip found in old fashioned “twinkling” incandescent Christmas lights.

Not satisfied with simple tests, [Mike] went on to build a clock using the filaments as elements of a seven segment display. Inspired by numitron and minitron displays, [Mike] built a single sided PCB which held the clock circuit on the bottom and the LED filaments on top. The filaments are spaced off the board by tall wire wrap sockets, which proved to be difficult to keep from shorting out. Texas Instruments TPIC6B595 chips were used to control the LED filaments. Logically the chip functions the same as a 75LS595, which means it can be driven with a SPI bus. The open drain outputs can handle 50 volts – which makes them perfect for this application.  The clock is tremendously bright, but there is still a bit of room for improvement. [Mike] notes that the phosphor of un-powered filaments tend to glow a bit due to light absorbed from nearby illuminated filaments. He’s experimenting with color filters to reduce this effect. At full power though, [Mike] says this clock would easily be daylight readable, and we don’t doubt it!

[Mike’s] final test was a bit whimsical – he built a cube entirely from the LED filaments. The cube looks awesome, but we can’t wait to see who will move things into the 4th dimension and build a tesseract!

Continue reading “[Mike] Illuminates Us On LED Filaments”

Flexible Numitron Tube Clock Build

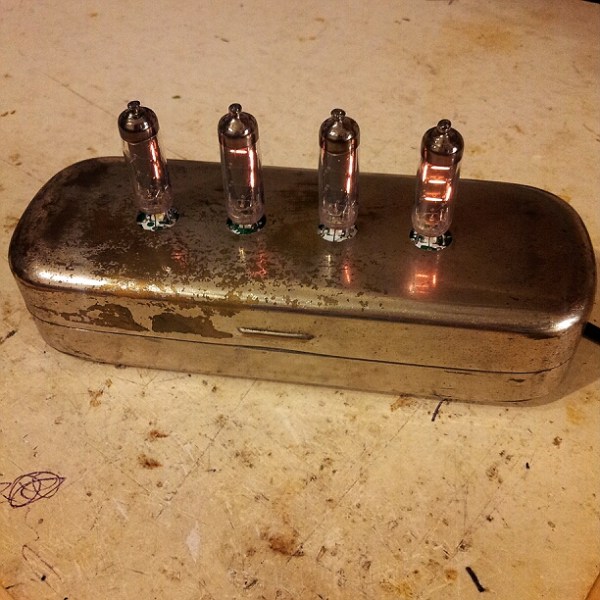
Hackers and makers alike often use whatever’s readily available. Sometimes this is done out of necessity, other times because of the desire to make something work without waiting for parts to ship or some store to open. And many times, we use what we already have simply because it presents a challenge. A couple of years ago, [Alan] made a beautiful clock that combines the lessons he learned from building a word clock with the challenges presented by some IV-9 and IV-16 Numitron tubes he acquired.

This build expanded [Alan]’s horizons while extending the use of his existing tools. The timekeeping is done with a word clock board he had designed previously that can utilize any of three kinds of RTC modules. Further flexibility is evident in the top board, which is designed with double footprints to accommodate through-hole or SMD shift registers and resistors. His current board iteration allows for chaining if you like your time displays long and specific. If the vintage blue reddish-orange glow of VFDs  Numitron tubes offends your eyes for some reason, there’s a dual-footprint for a single-color LED under each tube.

It’s worth mentioning that these are not Nixie tubes, they are vacuum fluorescent displays (VFD)s Numitron tubes.  If you already have or plan to acquire some but don’t know how to drive them, check out this Numitron tutorial we covered a few years back.

Edit: D’oh. As you have pointed out, these are Numitron tubes, not VFDs or Nixies. That is what multitasking will get you. We applaud your vigilance.

The Numitron Geekwatch

numitron_uhr_gehause_i

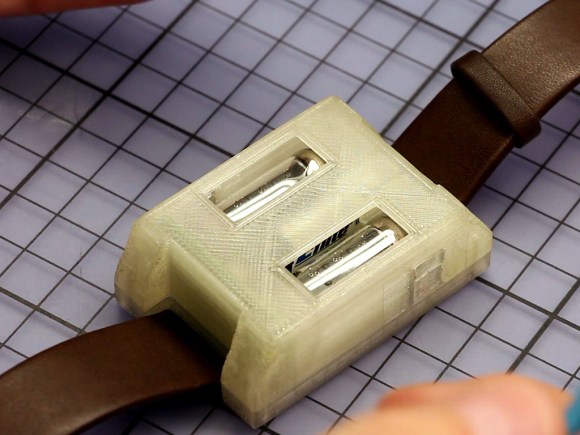
[Johannes] wanted to develop an unusual way to display time on a custom wristwatch. LED’s were too common, and mechanical indicators with small engines were too expansive, but Nixie tubes were just right. His design for the Numitron Geekwatch utilized two boards that were soldered together at a right angle, with a 3D printed enclosure made of semi-transparent PLA.

Future designs of this will improve on the button functionality as well as the housing of the wristwatch to protect the fragile tubes from external forces.

After the break is a video (in German) with [Johannes] going through the steps needed to make one of these of your very own:

Continue reading “The Numitron Geekwatch”

Single Digit Numitron Clock

numitronClock

The above may look like a Nixie tube, but it’s a Numitron: the Nixie’s lower-voltage friend, and part of [pinomelean’s] single-digit Numitron clock. If you’re unfamiliar with Numitrons, we suggest you take a look at our post from a few years ago, which includes a helpful tutorial to catch you up to speed.

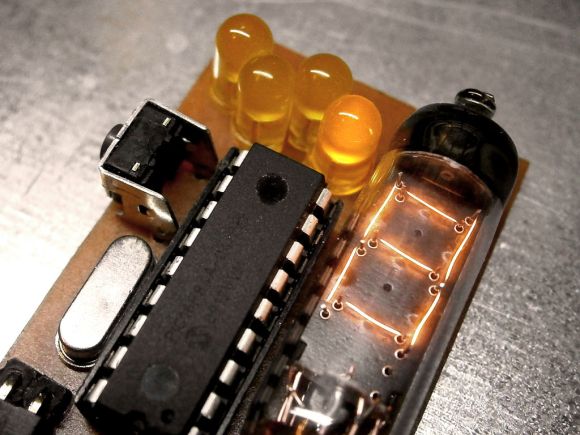
[pinomelean] built this little device to capture a steampunk-ish look on the cheap for a clock small enough to fit on a wrist. The build uses a PIC16F84A uC and a 4MHz crystal on a custom PCB. A small button on the side lets the wearer set the time. Similar to the Vibrating Timepiece from last month, the Numitron clock isn’t perfect, though it is more accurate: gaining only one minute every 3 days.

Check out the video after the break to see it being set and keeping track of the time. It may take a moment to understand how to read the clock, though. Each of the four LEDs indicates where the number in the Numitron tube belongs. The LEDs light in sequence from left to right, displaying the clock one digit at a time.

Continue reading “Single Digit Numitron Clock”

Numitron Tube Tutorial

Nixies and VFDs are great displays, but when using them you’ve got to deal with some fairly high voltages, at least for the micro projects we see on Hack a Day. Luckily, there’s another ancient technology that can be driven at tiny voltages. [Kenneth] put up a great tutorial on Numitron tubes to show the Internet how to get these guys working.

Numitron tubes are like Nixies, but instead of the ten number-shaped filaments in each Nixie, Numitrons are old-school seven-segment displays. [Kenneth] picked up a few on ebay and the seller was kind enough to include a Russian data sheet. Each filament in his IV-9 Numitrons required about 20mA to light up, perfect for the constant current LED drivers [Kenneth] picked up

The test circuit consisted of an ATtiny2313 and an A6278 LED driver. The code on the ATtiny cycles the digits 0 through 9. This is sent through the LED driver and lights up the tiny filaments inside the tube. Check out the video after the break to see the Numitron in action

Continue reading “Numitron Tube Tutorial”

A Clock Made Out Of Some Very Weird Tubes

If you’re like [Richard], you’ve got a few really rare components lying around. Maybe it’s a very weird micro or a really tiny CRT, but eventually you’ve got to build something with these parts. When [Richard] decided to put some ITS1A neon display tubes to use, he fell back to the old standby – a really awesome clock.

Unlike the lowly Nixie tube, the ITS1A tube is weird. It’s a neon seven-segment display that can be controlled directly from the pins of a microcontroller. It does this with the help of seven tiny thyratrons in each segment. Even though this tube has neon, the display isn’t the familiar neon orange-red. The tube emits a lovely green with the help of a phosphor coating.

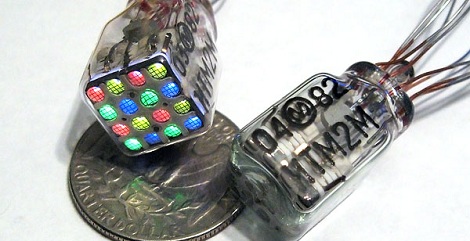
With a single digit already incorporated into [Richard]’s clock, he needed four indicators for the hours and minutes. After a failed experiment with a crazy 4-color, 16-pixel Melz ITM2-M display, he moved on to a simpler MTX90 thyratron indicator.

Using the same control scheme as his earlier numitron clock, Richard had a PCB made and wired everything up. The seven-segment tube indicates the value, and the indicator tubes indicates the position of the digit in the XX:XX standard. A very cool  build with parts you don’t see coming around often.

Sleek Numitron Clock Tells The Time And Temperature

numitron_clock

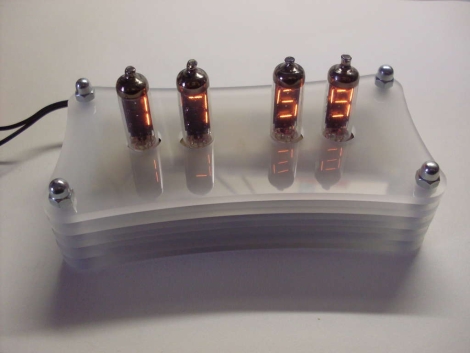
Instructables user [janw] is a big fan of nixie clocks, but he had never built one before. He decided he would rather start small and build a clock using numitron tubes first, before moving to nixies. He preferred the simpler tubes due to their much lower voltage requirements and the fact that he would not have to use any specialized power supply for his project.

His clock serves double-duty, functioning as a thermometer as well. Timekeeping is regulated with a DS12307, and temperature is monitored using a DS18B20 single wire sensor – both of which are pretty common in these sorts of projects. Both are wired to an Atmega48 MCU which serves as the brain of the clock.

The numitrons were mounted in a handsome 5-layer milled acrylate stand with a pair of buttons mounted on the bottom which allow him to set the time. It really is a spectacular looking timepiece, and a great first effort on [janw’s] part.

Be sure to stick around to see a video of the clock in action.

Continue reading “Sleek Numitron Clock Tells The Time And Temperature”