One Man’s Microwave Oven Is Another Man’s Hobby Electronics Store

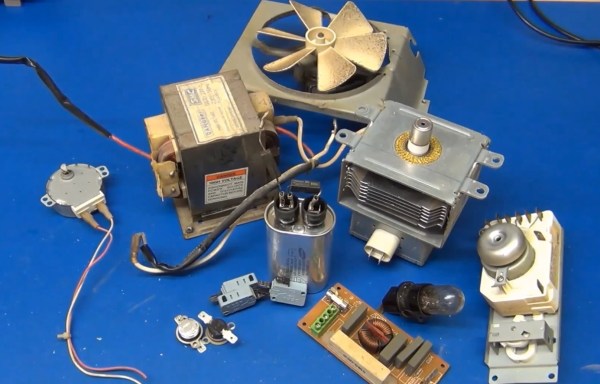
There are loads of Internet content depicting the usefulness of salvaged innards found in defunct microwave ovens. [Mads Nielsen] is an emerging new vblogger with promising filming skills and intriguing beginner electronics content. He doesn’t bring anything new from the microwave oven to the dinner table, yet this video should be considered a primer for anybody looking to salvage components for their hobby bench. To save some time you can link in at the 5 minute mark when the feast of parts is laid out on the table. The multitude of good usable parts in these microwave ovens rolling out on curbsides, in dumpsters, and cheap at yard sales all over the country is staggering and mostly free for the picking.

The harvest here was: micro switches, X and Y rated mains capacitors, 8 amp fuse, timer control with bell and switches, slow turn geared synchronous 4 watt motor 5 rpm, high voltage capacitor marked 2100 W VAC 0.95 uF, special diodes which aren’t so useful in hobby electronics, light bulb, common mode choke, 20 watt 68 Ohm ceramic wire-wound resistor, AC fan motor with fan and thermostat cutout switches NT101 (normally closed).

All this can be salvaged and more if you find newer discarded units. Our summary continues after the break where you can also watch the video where [Mads] flashes each treasure. His trinkets are rated at 220 V but if you live in a 110 V country such components will be rated for 110 V.

Continue reading “One Man’s Microwave Oven Is Another Man’s Hobby Electronics Store”

Build Your Own Backyard Pizza Oven

backyard-pizza-oven

Don’t heat up your house this summer, build your own backyard pizza oven instead. We love to using our garden produce, homemade dough, and fresh farmer’s market mozzarella to whip up a tasty pie in the summer. But it can be tricky to cook it on the grill and we hate heating up the oven when it’s hot out. This could be a perfect solution.

The footprint of the oven used to be a flower bed in [Furiousbal’s] yard. He removed the soil and side walls, laid down a bed of pea gravel, then started building the brick base for the oven. The base is insulated by encasing beer bottles in a bed of clay which he harvested locally. Fire brick then makes the floor of the cooking area as well as the arched opening. To support the clay during construction he built a dome of wet sand and covered it with damp newspaper. The clay is built up in layers before removing the sand from the inside. The final step (not shown above) is to build a little shelter to ensure the elements don’t wash away your hard work.

Of course you need to build your own fire inside to use it. If that’s too much work perhaps you should try solar cooking?

[via Reddit]

Help us decide, should this project gone on LIFE.hackaday?

Reflow Soldering Improved With Carbon Dioxide

co2_reflow-oven

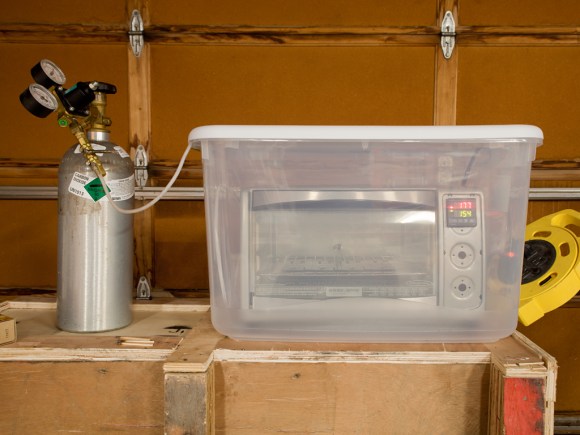
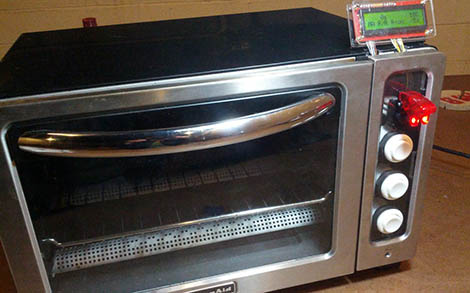
This is exactly what it looks like. [Oleg] calls it soldering in inert atmosphere, but it’s just a toaster oven reflow hack dropped into a container full of carbon dioxide.

Why go to this trouble? It’s all about solder wetting. This is the ability of the molten solder paste to flow into all of the tinned areas of a board. [Oleg] talks about the shelf life of hot air leveled PCB tinning, which is about six months. After this the tin has oxidized. It will certainly not be as bad as bare copper would have, but it can lead to bad solder joints if your PCBs are more than about six months off the production line. This is one of the reasons to use solder flux. The acid eats away at the oxidized layer, exposing tin that will have better wetting.

But there is another way. Soldering in the absence of oxygen will also help the wetting process. CO2 is heavier than air, so placing the reflow oven in a plastic container will allow you to purge air from the space. CO2 canisters are cheap and easy to acquire. If you keg your own homebrew beer you already own one!

If you’ve got everything but the reflow oven just look around for a few examples of how to build your own.

Reflow Oven Courtesy Of Hurricane Sandy

2013-01-23-00.51.57

The Makerbar, Hoboken’s Hackerspace, was in desperate need of a reflow oven. Hurricane Sandy did a number on a whole bunch of household appliances, so when [Kush] saw a neighbor throw out a broken toaster oven, the Makerbar crew sprung into action.

The storm waters shorted the electronics board, fried the existing controls, and basically turned the oven into a metal shell with heating elements. It was the perfect platform for a toaster oven – every part that was going to be thrown out was already destroyed.

[Zach] over at the Makerbar ordered the Sparkfun reflow toaster conversion kit along with a few arcade buttons and set to work. After plugging the heating elements into the mains power to make sure they still worked, [Zach] attached these elements to the relay on board the controller. Three arcade buttons were wired up to the controller, and a whole bunch of code was written.

With the included thermocouple, [Zach], [Kush], and the rest of the Makerbar gang now have a very accurate and reliable reflow oven. There’s also settings for Sculpey clay and shrinky dinks, just in case anyone at Makerbar is feeling a bit creative.

Solar Oven Built To Last

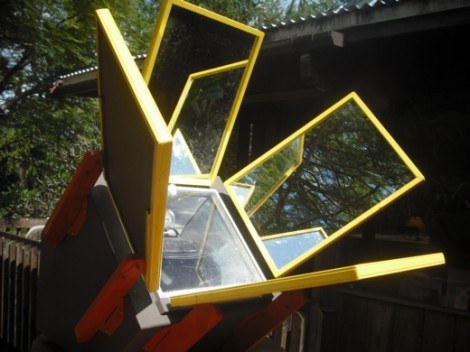
The problem with most solar ovens is that they’re flimsy builds that will stand up to only a handful of uses. But this one stands apart from that stereotype. It’s big, sturdy, and used a lot of math to efficiently gather the sun’s energy when cooking food.

This is the third version of the build and each has included many improvements. The obvious change here is a move from aluminum reflectors to actual mirror reflectors. These attach at a carefully calculated angle to get the most power from the rays they are redirecting. The orange mounting brackets for the mirrors also serve as a storage area for transport. The rectangular reflectors fit perfectly between them (stacked on top of the tempered glass that makes up the transparent side of the cooking chamber).

The body of the oven doesn’t track the sun and one of the future improvements mentions adding tilt functionality to the base. We’d suggest taking a look at some of the solar tracking setups used for PV arrays.

[Thanks John]

Fine-pitch SMD Soldering With Minimal Tools

We try to stick to the 0805 parts because they’re still big enough to solder by hand. But [Scott] shows us that it doesn’t take too many special tools to reflow fine-pitch components at home. In this case he’s using 0402 resistors, a footprint that we consider functionally impossible to solder using an iron.

The two parts of the equation that he spent some money on are professionally produced PCBs and a solder stencil. The stencil is laser-cut from Kapton, which is heat-resistant so it doesn’t warp during the cutting process. An acrylic frame holds the PCB in place, and he just tapes the stencil over it and uses a chunk of acrylic as a squeegee to evenly apply the solder paste. Splurging on the PCB and stencil means you’ll achieve tolerances which lead to success.

The next issue is placing the components. [Scott] shows off some vacuum tweezers he built using an aquarium pump. Watch the video after the break to see how small those 0402 parts are when he extracts one of the resistors from the tape packaging. With the board manually populated (check everything twice!) he moves the board to a completely unaltered toaster oven for reflow. We have seen a lot of projects which add controllers to these ovens, but he really makes the case that you don’t need it. Instead, he uses a thermocoupler read by a multimeter just to let him know what’s going on with the temperature. He uses a smart phone as a timer, and switches the oven on and off to match the solder’s heat profile. Continue reading “Fine-pitch SMD Soldering With Minimal Tools”

Preheat Alarm Added To A Basic Kitchen Oven

[Justin] didn’t want to keep checking if the ‘oven heating’ indicator light had gone off before popping his unbaked edibles into the oven. Many models offer a buzzer to let you know when the chosen temp is reached, but for folks who own a basic oven model there’s just a light that tells when the heating element is getting juice. Not to worry, he plied his circuit design skills and built a buzzer to alert him when the oven’s ready.

It only took a few components to accomplish the task. [Justin] uses a pair of NPN transistors triggered by a photoresistor. One transistor is responsible for switching on the buzzer, the other transistor is driven by the photoresistor and controls the base of its companion transistor (see the schematic for a better understanding).

He designed and etched a small PCB to host all the parts. As you can see above, it mounts over the indicator light and is powered by a 9V battery. There’s an on/off switch to the right so the buzzer doesn’t keep triggering while cooking, and a potentiometer allows him to fine-tune the photoresistor sensitivity.