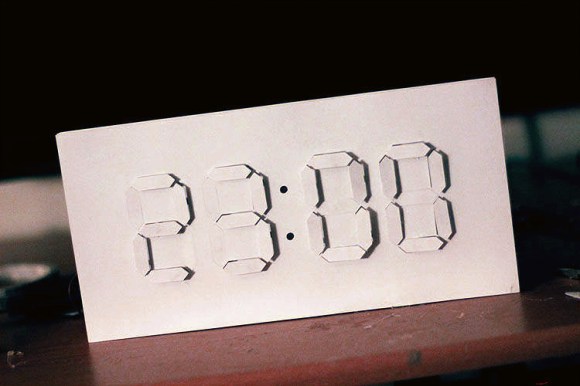
Gold Leaf Circuit Board

Ah, the glitter of gold… or fake gold, we’re not really sure. But [Mike Hogan] and [PJ Santoro] have been working with faux gold leaf as a conductor on circuit boards. The device you see above is mounted on metal-covered paper substrate and it really works.

They started by applying spray adhesive to heavy paper to make the gold-clad they needed. This was cut down into hexagons in homage to their hackerspace, Hive76 in Philadelphia. From there the shape of the microcontroller (an MSP430 G2211 in this case) to prevent shorts under the chip. The leads were flattened to interface well with the gold contacts, and a hobby knife was used to score the traces. Some careful soldering made up the final connections, and they were in business.

Oh, wait; chip on board but nothing on chip. They forgot to program it first! Since there’s no header they needed an easy way to interface with the board. The clever guys used the power of magnets to hold alligator clips in place. See how they did that in the demo video after the break.

They’re also working on some boards that use conductive ink similar to this hack but we haven’t seen a write-up from these two about those experiments… yet.

Continue reading “Gold Leaf Circuit Board”

Printable Solar Cells That Can Be Folded Up When Not In Use

Here’s a photovoltaic cell that can be printed onto paper. The manufacturing technique is almost as simple as using an inkjet printer. The secret is in the ink itself. It takes five layers deposited on the paper in a vacuum chamber. But that’s a heck of a lot easier than current solar cell fabrication practices. In fact, is sounds like the printing process is very similar to how potato chip bags are made. This is significant, because it could mean a fast track to mass production for the technology.

It isn’t just the easy printing process that excites us. Check out the video after the break where a test cell is placed on top of a light source while being monitored by a multimeter. It’s been folded like a fan and you can see a researcher sinch up the cell into a small form for storage. It’s a little counter-intuitive; for instance, you wouldn’t want to make a window shade out of it because it would have to be down during the day to get power. Be we think there’s got to be some great use for these foldable properties. Continue reading “Printable Solar Cells That Can Be Folded Up When Not In Use”

Paper Craft Claw

Grab some stiff paper and get to work building your own paper claw. [Dombeef] posted the instructions to recreate the claw above because he was unsatisfied with his previous design which was flimsy and unable to pick up just about anything. This version is a bit larger and it internalizes all of the parts.

Being paper craft, you don’t need much in the way of materials or tools. A push-pin makes holes for the paperclip and wire which serve as the pivot points. Glue and some tape hold the rest of assembly together. You can see a video of the final product after the break. A shaft at the center closes the claw when pulled, and opens it when pushed to opposite way. This makes it perfect for that home-made crane game (or was that a claw game?)… as long as you’re not trying to pick up anything too heavy.

Continue reading “Paper Craft Claw”

New Conductive Ink Allows Circuit Prototyping With A Pen And Paper

roller_ball_circuit_drawing

Why spend time etching circuit boards and applying solder masks when all you really need is a rollerball pen and some paper? That’s what University of Illinois professors [Jennifer Lewis and Jennifer Bernhard] were asking when they set off to research the possibility of putting conductive ink into a standard rollerball pen.

The product of their research is a silver nanoparticle-based ink that remains liquid while inside a pen, but dries on contact once it is applied to a porous surface such as paper. Once dry, the ink can be used to conduct electricity just like a copper trace on a circuit board, making on the fly circuit building a breeze.

Previous ink-based circuit construction was typically done using inkjet printers or airbrushing, so removing the extra hardware from the process is a huge step forward. The team even has some news for those people that think the writable ink won’t hold up in the long run. The ink is surprisingly quite resilient to physical manipulation, and they found that it took folding the paper substrate several thousand times before their ink pathways started to fail.

While we know this is no substitute for a nicely etched board, it would be pretty cool to prototype a simple circuit just by drawing out the connections on a piece of paper – we can’t wait to see this come to market.

Cutting Paper Scrolls With Frickin’ Lasers

This circuit illustration adds a scrolling paper feeder to the bed of a laser cutter. In the video after the break you can see that the actual assembly is put on the bed of the laser cutter. After the laser has cut out the specified pattern, the scroll is wound to move an un-cut portion into place. It uses a servo motor to drive one of the spools.

An Arduino Uno with a servo shield is being used for this application. It has one button which winds one spool for a pre-programmed period of time. There’s a few issues with this setup, namely that it’s not tied into the CNC program that runs the laser. There’s also a lack of precision when using a continuously rotating servo like this. If it were upgraded to use a stepper motor and patched into the CNC hardware this would make cutting new scrolls for your player piano a breeze.

Here’s a project that does the opposite, it takes old player piano rolls and digitizes them.

Continue reading “Cutting Paper Scrolls With Frickin’ Lasers”

papercraft_strandbeest

Papercraft Strandbeest Is A Great Rainy Day Project

Here in the Midwest it sometimes seems like Spring will never, well…spring. We get that “April showers bring May flowers”, but nearly all of the last month has been cold and rainy around these parts. While things are improving, we think it’s always good practice to have a few fun projects at the ready, just in case your plans with the kids get rained out.

We think that Hackaday reader [Dombeef’s] papercraft strandbeest is a perfect idea for a rainy afternoon. The supply list is pretty short, requiring little more than some scissors, pliers, paperclips, and glue in addition to the thick paper that makes up the body of the strandbeest. The paper is cut into pieces according to the PDF template he includes in his Instructable, secured to one another via small pieces of paperclip.

Once the legs are all constructed, a main axis is built from one of the remaining paperclips, and everything is joined together under the main portion of the strandbeest’s body.

As you can see in the video, the legs work quite well, though the strandbeest can probably benefit from a hand crank in the short term. [Dombeef] plans on adding a small motor to his creation, which should get the strandbeest moving about quite rapidly once completed.

If you are looking for more fun projects to do with the kids, look no further than this papercraft gyroscope or these squishy circuits.

Continue reading “Papercraft Strandbeest Is A Great Rainy Day Project”

Papercraft Gyroscope

Although spring keeps trying to break through the winter doldrums you might be looking for just one more weekend activity before the outdoor season begins. Grab the kids and give this paper gyroscope a try.

It’s not an electronic sensor made of paper, but the modern equivalent of a spinning top. The frame remains stationary while the center assembly spins at high speed, keeping the whole thing balanced on one narrow point. [Dombeef] put together a printable template which you can use to make your own parts. He got a hold of the heavy paper that’s used to hold X-ray film, but you can just trace out multiple copies of the parts and make a beefy section by laminating them together with glue. Combine the inner and outer parts using a paper clip as the axis and you’re ready to go. Pull hard on a bit of floss wound around the axis to get the center frame spinning, then sit back and see how long it will remain standing.