A Parts Bin MIDI Controller In 24 Hours

Part of the reason MIDI has hung on as a standard in the musical world for so long is that it is incredibly versatile. Sure, standard instruments like pianos and drums can be interfaced with a computer fairly easily using this standard, but essentially anything can be converted to a MIDI instrument with the right wiring and a little bit of coding. [Jeremy] needed to build a MIDI controller in a single day, and with just a few off-the-shelf parts he was able to piece together a musical instrument from his parts bin.

The build is housed in an off-brand protective case from a favorite American discount tool store, but the more unique part of the project is the choice to use arcade buttons as the instrument’s inputs. [Jeremy] tied eight of these buttons to an Arduino Uno to provide a full octave’s worth of notes, and before you jump to the comments to explain that there are 12 notes in an octave, he also added a button to the side of the case to bend any note when pressed simultaneously. An emergency stop button serves as a master on/off switch and a MIDI dongle on the other side serves as the interface point to a computer.

After a slight bit of debugging, the interface is up and running within [Jeremy]’s required 24-hour window. He’s eventually planning to use it to control a custom MIDI-enabled drum kit, but for now it was fun to play around with it in some other ways. He’s also posted the project code on a GitHub page. And, if this looks a bit familiar, this was not [Jeremy]’s first MIDI project. He was also the creator of one of the smallest MIDI interfaces we’ve ever seen.

Continue reading “A Parts Bin MIDI Controller In 24 Hours”

Remixed Pi Recovery Kit V2 Offers Another Path

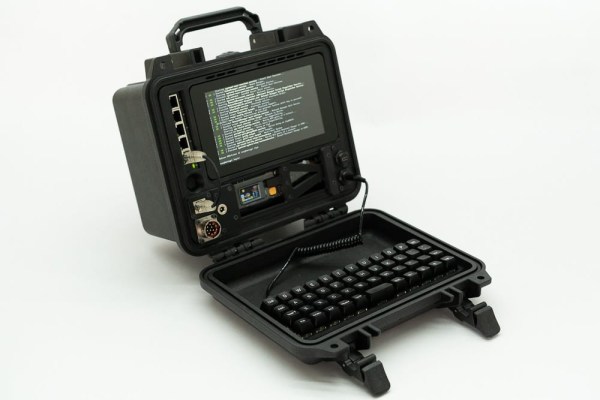
Just a few months after releasing the long-awaited second version of his Raspberry Pi Recovery Kit, [Jay Doscher] is back with an alternate take on his latest Pi-in-a-Pelican design. This slightly abridged take on the earlier design should prove to be easier and cheaper to assemble for those playing along at home while keeping the compromises to a minimum.

Probably the biggest change is that the Raspberry Pi 5 has been swapped out for its less expensive and more abundant predecessor. The Pi 4 still packs plenty of punch, but since it requires less power and doesn’t get as hot, it’s less temperamental in a build like this. Gone is the active cooling required by the more powerful single-board computer, and the wiring to distribute power to the Kit’s internal components has been simplified. The high-end military style connectors have been deleted as well. They looked cool, but they certainly weren’t cheap.

One of the most striking features of the original Recovery Kit was the front-mounted switches — both the networking type that’s intended to help facilitate connecting the Raspberry Pi to whatever hardware is left after the end of the world, and the toggles used to selectively control power to to accessory devices. Both have returned for the Recovery Kit 2B, but they’re also optional, with blank plates available to fill in their vacant spots.

Ultimately, both builds are fairly similar, but there’s enough changes between the two that it will have a notable impact on how much time (and money…) it would take you create one of your own. [Jay] has attempted to offer less intimidating versions of his designs in the past; while other creators take a “one and done” approach to their projects, he seems eager to go back and rethink problems that most others would have considered solved.

The Next Evolution Of The Raspberry Pi Recovery Kit

At Hackaday, the projects we cover are generally a one-off sort of thing. Somebody makes something, they post it online, we share it with our audience — rinse and repeat. If a project really captures people’s imaginations, it might even inspire a copy or two, which is gratifying for everyone involved. But on the rarest of occasions, we run across a project like [Jay Doscher]’s Recovery Kit.

To say that the Recovery Kit was an inspiration to others would be putting it mildly. Revolutionary would be more like it, as it resulted in more “Pi-in-a-Pelican” builds than we could possibly count. So it’s only natural that [Jay] would return to the well and produce a second version of his heavy-duty cyberdeck.

Continue reading “The Next Evolution Of The Raspberry Pi Recovery Kit”

Cyberdeck Contest 2022: Gibson Rev 001 Thinks Outside The Pelican Case

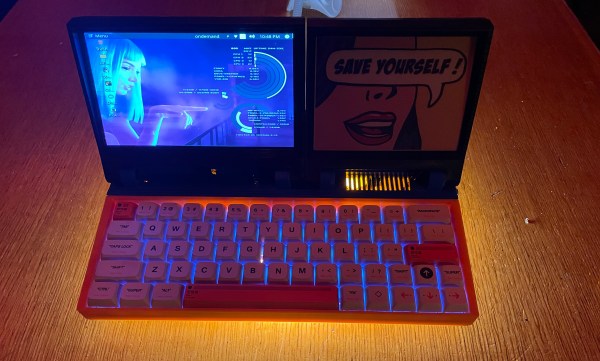
As we’ve gushed previously in these pages, we saw an incredible turnout for our first-ever cyberdeck contest — so many cool ‘decks rolled in that it made judging them all quite the feat, and we would be remiss if we didn’t feature the favorites that, for whatever reason, didn’t make the cut. One of these is the aptly-named Gibson Rev 001 from [Gadjet].

This cyberdeck may be on the pocket-sized side of things, but don’t let that fool you, because it’s loaded with I/O and sensors galore. A Pimoroni Breakout Garden provides particle/smoke and pulse oximetry, temperature/pressure/altitude, an air quality sensor, and a UVA/UVB light sensor — plenty of feelers for judging conditions on the fly. As you might expect, the brains of the operation is a Raspi 4, which is running Twister OS.

We love the dual-display thing going on with the 7″ touchscreen and the color e-ink display — really gives it a cobbled-together-yet-polished, futuristic feel. May the rest of the post-apocalypse gadgetry have such clean lines and cheerful colors (if that’s what you’re into).

ApocaPi Now Is A Cyberdeck For What Comes After

The end of the world seems closer now than ever before, even in the 1980s. But you, dear Hackaday reader, will want more than just a bug-out bag full of C-rations and waterproof matches. You will need the technological version of a bug-out bag — a mil-spec-esque cyberdeck, which is exactly what [hammerandhandmi] is in the middle of perfecting.

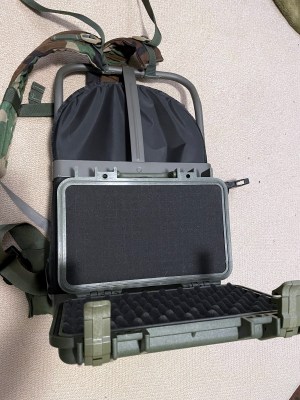
That’s not some kind of fancy cake pan — it’s a Pelican 1170 case lined with conductive foil tape. You see, [hammerandhandmi] has various reasons not elaborated upon for doing this, including EMP protection. Inside is an 8 GB Raspberry Pi 4B donning a Pi Juice UPS HAT and sipping from a fancy power supply. The main charging source for the old Mac book battery is solar via a large panel that’s external to cyberdeck. A smaller, secondary panel lives inside for backup purposes. There’s also an MPPT charge controller for to support the different battery chemistries. [hammerandhandmi] chose the Pelican 1170 because they need to mount it to the back of an LC2 Alice rucksack frame. The 1170 is wider than the popular 1150, and is in fact almost the exact width of the LC2 frame.

The point of this build is to maintain power for the purpose of preserving knowledge — all that stuff we’ll need to rebuild humanity. There will be much information available up via FOSS offline browser Kiwix, plus an atlas, some military field manuals, a lot of survival info, all of the books Project Gutenberg has to offer, plus a handful of movies and a few game ROMs so [hammerandhandmi] can live out the rest of their days in what is hopefully some kind of solar punk utopia.

Provided there’s enough time to implement it all, [hammerandhandmi] plans to add an SDR with antenna hookup, GPS unit, 12 V port, a couple of SSDs, a powered USB hub, and maybe an RFID reader. But the coolest part is that they ultimately want to connect everything up to a HUD mounted in a ballistic helmet. See? The apocalypse could be awesome. It’s up to us!

We often see cyberdecks with mechanical keyboards, like this cherry Pi number. But the salvaged keeb from a 1989 Compaq laptop might be just as future-proof.

Rugged Cyberdeck Makes The Case For Keeping Things Water-Tight

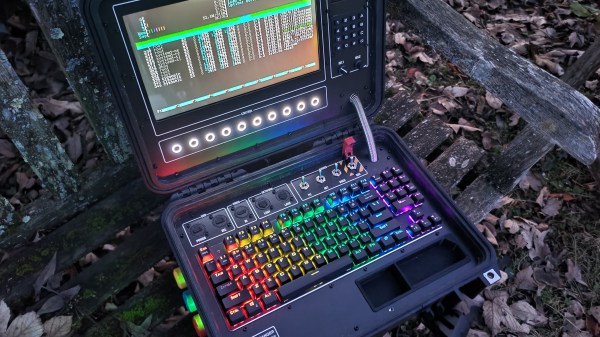
Many people build cyberdecks just for the heck of it, and there’s nothing wrong with that at all. On the other hand, [cyzoonic]’s rugged ‘deck is a bit more purpose-built. In this instance, the purpose is software-defined radio.

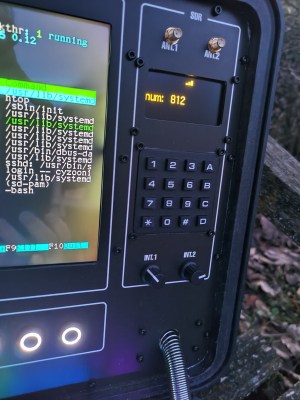
Underneath those sweet custom-cut panels lies a Raspberry Pi 3B and a BOM full of parts that can be had on Ali Express. There’s also an ESP32 that takes input from the keypad plus the 5 buttons that control the display, and the two potentiometers. [cyzoonic] can dial in frequencies with the knobs, or by punching in digits on the keypad.

One of the problems with using a Pelican case is this — how do you install any type of panel without compromising the case’s water-tightness? [cyzoonic] mentions in the comments that Pelican makes a bracket that allows for panels and things to be screwed down without breaching the case. But in this case, [cyzoonic] made their own brackets in a similar fashion.

Another problem with Pelican cases (and cyberdecks in general that are built into hinged boxen) is something that doesn’t get enough attention: typing ergonomics. Personally, we take comfortable and ergonomic typing fairly seriously, and would love to see a cyberdeck that speaks to this issue.

In the meantime, we’ll have to take [cyzoonic]’s word that while it’s not terribly comfortable to type with the ‘deck on a tabletop, sitting on the floor hunched over the thing like a true hacker is much better. This is a work in progress (at least the IO project anyway), so we’ll be tuning back in occasionally to see if any more instructions appear.

Speaking of ergonomic cyberdecks, here’s the one that drew the line in the sand for us — [Tinfoil_Haberdashery]’s lovely ErgoDox-based NUC machine.

Alien Inspired Cyberdeck Packs Vintage Atari 800XL

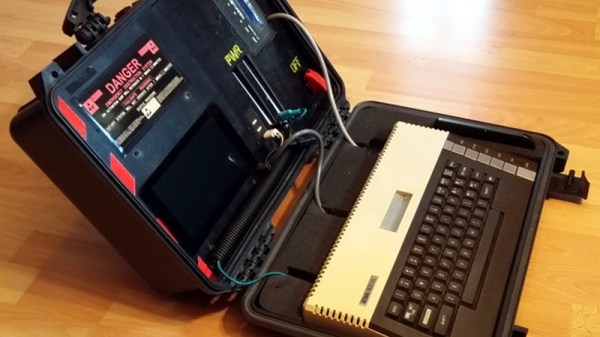
Sticking a Raspberry Pi in a Pelican-style case and calling it a cyberdeck has become something of a meme these days, and while we certainly don’t look down on such projects, we recognize they can get a bit repetitive. But we think this one is unique enough to get a pass. Sure [eizen6] mounted a Pi inside of a rugged waterproof case, but it’s simply serving as a display for the real star of the show: a vintage Atari 800XL computer.

The overall look of the build, from the stenciled Nostromo on the back to the self-destruct warning sticker over the display is a reference to Alien. Partly because both the film and the Atari 800 were released in 1979, but also because [eizen6] says this particular aesthetic is simply the way computers should look. The visual style is also meant to signify that the project embraces the old ways despite the sprinkling of modern technology.

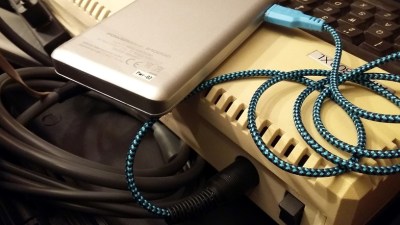
A custom cable lets the 800XL run on USB power.

To that end, retro aficionados will be happy to hear that the Atari appears to be completely unmodified, with [eizen6] going as far as nestling the nearly 40 year old computer in foam rather than permanently mounting it to the case. The various cables for power, video, and data have all been terminated with the appropriate connectors as well, so everything can be easily unplugged should the 8-bit machine need to be returned to more pedestrian use.

In the top half of the case, [eizen6] has mounted the Raspberry Pi 3B+, a seven inch touch screen, a USB hub, and a SIO2SD that allows loading Atari disk images from an SD card. Using a USB capture device, video from the Atari can be shown on the Pi’s display with a simple VLC command. With a USB keyboard plugged into the hub, the Pi can be put to more advanced use should the need arise. It’s also worth noting that, thanks to a custom cable, the Atari is running off of a USB power bank. With a second USB power bank dedicated to running the Pi and its LCD display, this retro cyberdeck is fully mobile.

We’ve seen plenty of modern builds that try and recapture the look and feel of retro computers, but very few that actually integrate the genuine article. While the aesthetic might not be everyone’s cup of tea, we can all appreciate the respect shown for the original hardware in this build.